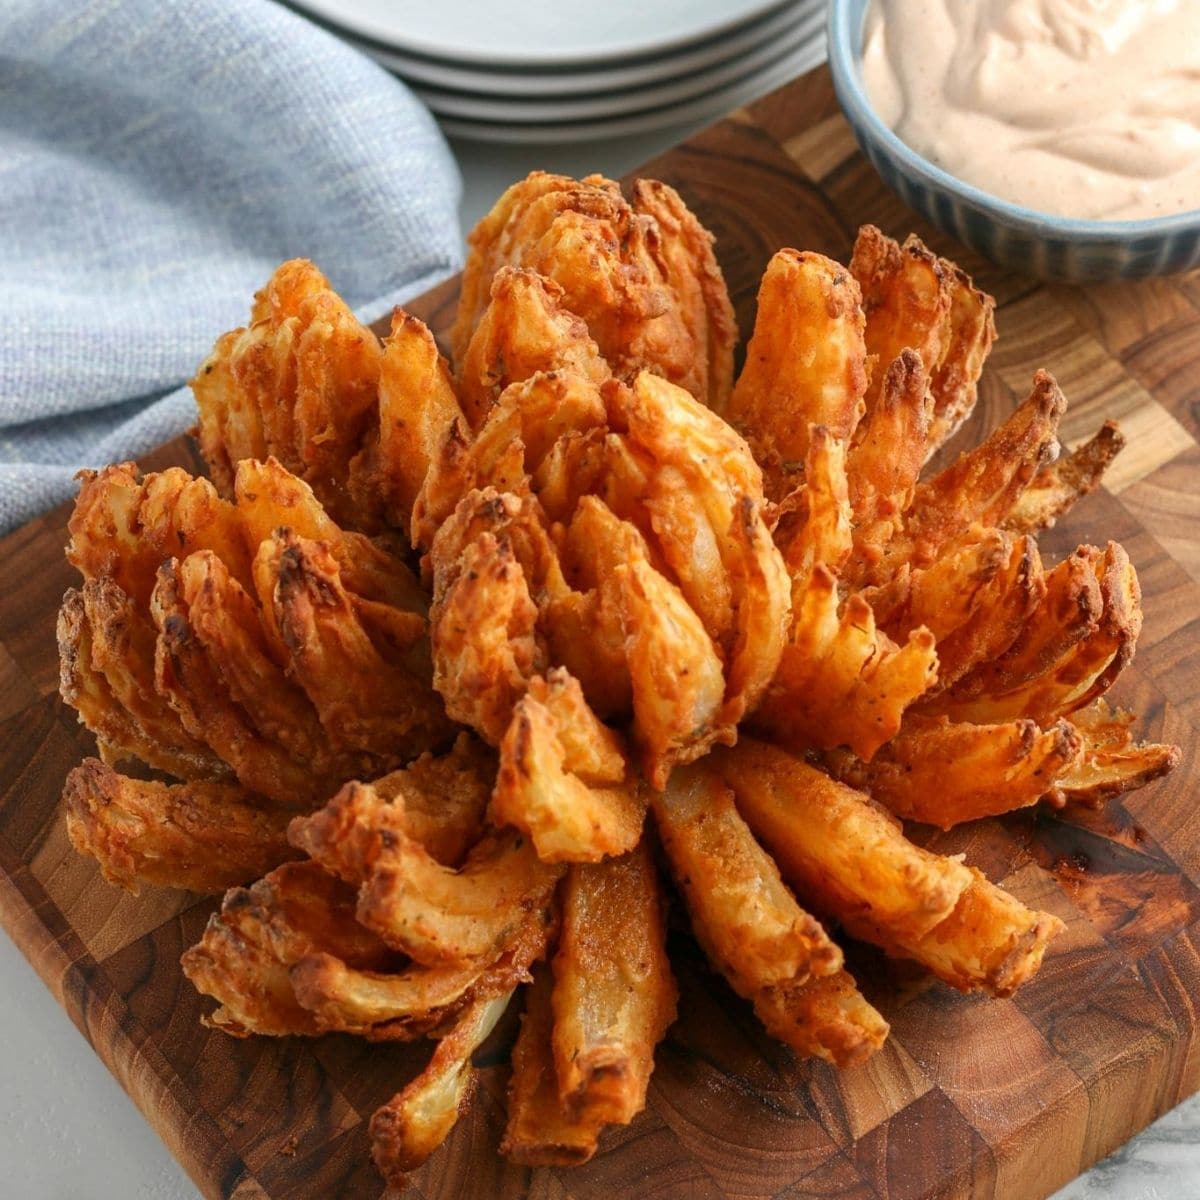
A blooming onion is one of the most visually impressive appetizers ever created. A large onion is carefully sliced into petals, coated in layers of seasoned flour and breadcrumbs, then cooked until every layer becomes crispy, golden, flavorful, and tender inside. The onion resembles a flower once cooked, which is why it is called a “blooming onion.”
Traditional restaurant blooming onions are usually deep-fried in large amounts of oil. While delicious, deep frying can make the onion extremely heavy and greasy. The air fryer version offers a lighter alternative that still delivers incredible crunch, deep flavor, and beautiful presentation while using only a fraction of the oil.
This extremely detailed guide explains every part of the process from beginning to end. Even if you are a complete beginner in the kitchen, you can follow these instructions carefully and create a restaurant-style blooming onion at home.
This guide includes:
- Ingredient explanations
- Onion selection advice
- Knife techniques
- Coating science
- Air fryer cooking methods
- Crispiness tips
- Troubleshooting
- Flavor variations
- Storage methods
- Dipping sauces
- Serving ideas
- Advanced techniques
- Frequently asked questions
- Professional-level cooking advice
Table of Contents
- What Is a Blooming Onion?
- Why Make It in an Air Fryer?
- Choosing the Right Onion
- Understanding Onion Varieties
- Equipment Needed
- Ingredients Overview
- Detailed Spice Breakdown
- Importance of Cornstarch
- Why Panko Breadcrumbs Matter
- Preparing the Onion Correctly
- Cutting Techniques in Detail
- How to Make Perfect Petals
- Ice Water Soaking Method
- Drying the Onion Properly
- Building the Flour Mixture
- Creating the Egg Wash
- Breadcrumb Layer Science
- How to Coat Every Petal
- Common Coating Mistakes
- Chilling Before Cooking
- Air Fryer Preparation
- Correct Temperature Settings
- Cooking Process Explained
- Midway Cooking Adjustments
- Achieving Maximum Crispiness
- Signs of Proper Doneness
- Resting the Onion
- Making Dipping Sauce
- Sauce Variations
- Serving Ideas
- Advanced Restaurant Techniques
- Troubleshooting Guide
- Flavor Variations
- Gluten-Free Method
- Keto Method
- Vegan Method
- Cheese-Stuffed Blooming Onion
- Spicy Southern Version
- Smoky BBQ Version
- Storage Instructions
- Reheating Instructions
- Freezing Instructions
- Nutritional Breakdown
- Frequently Asked Questions
- Professional Chef Tips
- Final Thoughts
1. What Is a Blooming Onion?
A blooming onion is a whole onion sliced into sections that spread outward like flower petals. Once coated and cooked, each petal becomes crispy on the outside while remaining soft and sweet inside.
The dish became especially popular in American-style restaurants and steakhouses because of:
- Its dramatic appearance
- Crispy crunchy texture
- Strong savory seasoning
- Pull-apart design
- Creamy dipping sauces
The blooming onion is often served as:
- Appetizer
- Party food
- Game-day snack
- Side dish
- Sharing platter
2. Why Make It in an Air Fryer?
Air fryers circulate hot air rapidly around food.
This creates crispiness similar to frying but with much less oil.
Benefits include:
- Lower oil usage
- Less mess
- Faster cleanup
- Reduced grease
- Easier cooking process
- Crispy texture without deep frying
Air fryers also reduce the strong oil smell associated with deep frying.
3. Choosing the Right Onion
Choosing the correct onion is one of the most important parts of this recipe.
Ideal Onion Characteristics
You want an onion that is:
- Large
- Round
- Firm
- Heavy for its size
- Fresh
- Symmetrical
Avoid onions with:
- Soft spots
- Mold
- Sprouting
- Uneven shape
- Damage
- Thin layers
4. Understanding Onion Varieties
Sweet Onions
Sweet onions are considered best for blooming onions because they become mellow and slightly sweet during cooking.
Examples include:
- Vidalia onions
- Walla Walla onions
- Maui onions
- Texas Sweet onions
These onions contain higher sugar levels and lower sulfur compounds.
Yellow Onions
Yellow onions are the most commonly available option.
Advantages:
- Strong flavor
- Good texture
- Widely available
- Affordable
Disadvantages:
- Slightly sharper flavor
White Onions
White onions have:
- Cleaner flavor
- Slight sweetness
- Crisp texture
They work well but are slightly less rich than yellow onions after cooking.
Red Onions
Red onions can be used but create a stronger flavor profile.
Their color also darkens significantly during cooking.
5. Equipment Needed
Essential Tools
Air Fryer
Any style works:
- Basket-style
- Oven-style
- Dual-basket
- Compact models
Larger baskets work best.
Sharp Knife
A sharp knife is critical for clean cuts.
Dull knives can:
- Tear onion layers
- Cause uneven petals
- Increase risk of slipping
Mixing Bowls
You need multiple bowls for:
- Flour mixture
- Egg wash
- Breadcrumb coating
Wide bowls help coating reach petals.
Oil Spray Bottle
Spraying oil evenly is very important.
Aerosol cooking sprays or refillable oil sprayers work well.
6. Ingredients Overview
Main Ingredients
Onion
The centerpiece of the recipe.
Flour
Creates the first coating layer.
Cornstarch
Improves crispiness dramatically.
Eggs
Help coatings stick.
Milk
Creates smoother egg wash.
Breadcrumbs
Provide crunch.
Oil Spray
Essential for browning.
7. Detailed Spice Breakdown
Seasonings define the flavor of the blooming onion.
Paprika
Adds:
- Color
- Mild sweetness
- Earthiness
Provides:
- Smoky depth
- Rich aroma
- Restaurant-style flavor
Garlic Powder
Essential savory flavor component.
Onion Powder
Enhances onion flavor even further.
Cayenne Pepper
Adds heat.
You can increase or decrease based on preference.
Black Pepper
Adds mild sharpness and complexity.
Salt
Critical for flavor balance.
Without enough salt, the onion tastes flat.
8. Importance of Cornstarch
Cornstarch creates a crisp coating because it reduces gluten formation.
Benefits include:
- Lighter crust
- Better crunch
- Improved browning
- Less heaviness
A flour-only coating can become dense.
9. Why Panko Breadcrumbs Matter
Panko breadcrumbs are different from standard breadcrumbs.
They are:
- Larger
- Flakier
- Lighter
- Crispier
Panko creates a superior crunch in air fryers.
Regular breadcrumbs can become compact and heavy.
10. Preparing the Onion Correctly
Proper preparation determines whether your onion blooms beautifully or falls apart.
Step 1: Peel Carefully
Remove:
- Dry outer skin
- Tough layers
Do not remove too many layers.
You want enough structure to hold shape.
Step 2: Preserve the Root
The root acts like glue holding petals together.
Never fully remove it before cooking.
11. Cutting Techniques in Detail
Positioning the Onion
Place onion:
- Root-side down
- Flat and stable
Initial Cuts
First create four equal sections.
Cut downward toward root.
Stop approximately:
21 inch≈1.27 cm
before reaching the root.
Secondary Cuts
Cut each quarter into 3 or 4 smaller petals.
You should end with:
- 12 to 16 petals
or even more for very large onions.
12. How to Make Perfect Petals
After cutting:
- Turn onion upside down
- Gently spread petals
Use fingers carefully.
Never force petals aggressively.
The onion should resemble a flower opening.
13. Ice Water Soaking Method
Why It Works
Cold water causes onion layers to:
- Expand slightly
- Separate more easily
- Open wider
It also reduces onion sharpness.
Soaking Instructions
Fill large bowl with:
- Ice
- Cold water
Submerge onion for:
- 30 minutes
14. Drying the Onion Properly
This step is extremely important.
Water prevents coatings from sticking.
After soaking:
- Shake onion gently
- Place on paper towels
- Pat dry thoroughly
- Dry between petals
You may even let it air dry for 10 minutes.
15. Building the Flour Mixture
Ingredients
- 1 cup flour
- 2 tablespoons cornstarch
- 1 teaspoon paprika
- 1 teaspoon smoked paprika
- 1 teaspoon garlic powder
- 1 teaspoon onion powder
- 1 teaspoon salt
- 1/2 teaspoon pepper
- 1/2 teaspoon cayenne
- 1/2 teaspoon oregano
- 1/2 teaspoon thyme
Mixing Technique
Whisk thoroughly.
Uneven spice distribution causes inconsistent flavor.
16. Creating the Egg Wash
Ingredients
- 2 eggs
- 1/2 cup milk
- Optional hot sauce
Whisk until completely smooth.
No visible egg streaks should remain.
17. Breadcrumb Layer Science
Breadcrumbs create:
- Texture
- Crunch
- Surface browning
Panko traps tiny air pockets that crisp beautifully in circulating hot air.
18. How to Coat Every Petal
This stage requires patience.
Flour Stage
Place onion into flour bowl.
Use spoon to:
- Sprinkle flour deep into petals
- Lift petals gently
- Rotate onion repeatedly
Every surface should appear coated.
Egg Wash Stage
Transfer onion carefully.
Pour egg wash between petals.
Allow excess to drip away.
Breadcrumb Stage
Add breadcrumbs generously.
Press lightly.
Do not crush petals.
19. Common Coating Mistakes
Mistake: Thick Clumps
Cause:
- Too much wet coating
Fix:
- Shake excess liquid
Mistake: Bare Areas
Cause:
- Insufficient coating depth
Fix:
- Lift petals individually
Mistake: Coating Falling Off
Cause:
- Onion too wet
Fix:
- Dry thoroughly before coating
20. Chilling Before Cooking
Place coated onion into refrigerator.
Chill for:
- 15 to 30 minutes
This helps coatings adhere better.
21. Air Fryer Preparation
Preheat air fryer to:
375∘F=190.5∘C
Preheating creates immediate crisping.
22. Correct Temperature Settings
Lower temperatures may produce sogginess.
Higher temperatures may burn breadcrumbs before onion softens.
Ideal range:
- 370°F to 380°F
23. Cooking Process Explained
Basket Preparation
Spray basket lightly with oil.
Position Onion
Place onion root-side down.
Spread petals outward.
Oil Spray
Spray entire onion generously.
This is critical.
Oil enables:
- Browning
- Crisping
- Crunch
Dry breadcrumbs stay pale.
24. Midway Cooking Adjustments
Halfway through cooking:
- Open basket
- Check color
- Spray dry areas
- Rotate onion if necessary
Some air fryers cook unevenly.
25. Achieving Maximum Crispiness
For ultra-crispy texture:
- Use panko
- Use cornstarch
- Spray enough oil
- Avoid overcrowding
- Preheat properly
- Cook long enough
- Chill before cooking
26. Signs of Proper Doneness
A finished blooming onion should have:
- Deep golden color
- Crisp edges
- Tender onion layers
- Firm coating
- Visible crunch
27. Resting the Onion
After cooking:
- Let rest 3 to 5 minutes
Resting allows steam redistribution.
This improves texture.
28. Making Dipping Sauce
Classic Sauce Ingredients
- 1/2 cup mayonnaise
- 2 tablespoons ketchup
- 1 tablespoon horseradish
- 1 teaspoon paprika
- 1/2 teaspoon garlic powder
- Cayenne
- Salt
- Lemon juice
Mix until smooth.
29. Sauce Variations
Spicy Sauce
Add:
- Sriracha
- Extra cayenne
- Chili paste
Ranch Sauce
Mix:
- Ranch dressing
- Garlic powder
- Black pepper
BBQ Sauce
Combine:
- BBQ sauce
- Mayo
- Smoked paprika
Honey Mustard
Mix:
- Honey
- Dijon mustard
- Mayo
30. Serving Ideas
Serve blooming onion with:
- Burgers
- Steak
- Grilled chicken
- BBQ ribs
- Sandwiches
- Fries
It also works well on party platters.
31. Advanced Restaurant Techniques
Double Coating Method
For thicker crust:
- Flour
- Egg
- Breadcrumb
- Egg again
- Breadcrumb again
Creates extra crunch.
Layered Seasoning Method
Season:
- Flour mixture
- Breadcrumb mixture
- Final surface
for deeper flavor.
32. Troubleshooting Guide
Problem: Onion Burns
Cause:
- Temperature too high
Fix:
- Reduce temperature slightly
Problem: Onion Undercooked
Cause:
- Onion too large
Fix:
- Extend cooking time
Problem: Petals Not Opening
Cause:
- Cuts too shallow
Fix:
- Cut deeper next time
Problem: Breadcrumbs Flying Around
Cause:
- Loose coating
Fix:
- Press coating gently
33. Flavor Variations
Cajun Blooming Onion
Add:
- Cajun seasoning
- Extra paprika
- White pepper
Garlic Parmesan Version
Add:
- Parmesan cheese
- Garlic butter drizzle
Tex-Mex Version
Add:
- Chili powder
- Cumin
- Lime zest
Buffalo Style
Toss cooked onion lightly in buffalo sauce.
34. Gluten-Free Method
Use:
- Gluten-free flour
- Gluten-free panko
Cooking process remains same.
35. Keto Method
Substitute breadcrumbs with:
- Crushed pork rinds
- Almond flour
Net carbs become significantly lower.
36. Vegan Method
Replace eggs with:
- Plant milk
- Flour slurry
Use vegan mayo for sauce.
37. Cheese-Stuffed Blooming Onion
Advanced variation.
Add shredded cheese between petals before cooking.
Cheddar works especially well.
38. Spicy Southern Version
Increase:
- Cayenne
- Black pepper
- Hot sauce
Add southern-style seasoning blend.
39. Smoky BBQ Version
Use:
- Smoked paprika
- BBQ rub
- Chipotle powder
Serve with barbecue sauce.
40. Storage Instructions
Refrigerate leftovers in airtight container.
Best consumed within:
- 2 to 3 days
41. Reheating Instructions
Reheat in air fryer at:
350∘F≈177∘C
for:
- 4 to 6 minutes
Avoid microwaving if possible.
42. Freezing Instructions
Freeze before or after cooking.
Before Cooking
Freeze breaded onion on tray first.
Then transfer to freezer bag.
After Cooking
Cool fully before freezing.
Reheat directly from frozen.
43. Nutritional Breakdown
Approximate per serving:
- Calories: 300–450
- Carbohydrates: 30–40g
- Protein: 5–8g
- Fat: 12–18g
- Fiber: 3–5g
Values vary based on ingredients.
44. Frequently Asked Questions
Can I Use Small Onions?
Yes, but blooming effect will be smaller.
Can I Make It Ahead?
Yes.
Bread onion and refrigerate before cooking.
Why Is My Onion Soggy?
Usually caused by:
- Too much moisture
- Insufficient oil
- Low cooking temperature
Can I Use Regular Breadcrumbs?
Yes, but texture may be less crispy.
Can I Bake It Instead?
Yes.
Bake at:
- 425°F
until golden and crispy.
45. Professional Chef Tips
Tip 1: Use Fresh Spices
Fresh spices dramatically improve flavor.
Old spices taste dull.
Tip 2: Spray Oil in Layers
Spray after each coating stage for enhanced crunch.
Tip 3: Rotate During Cooking
Even premium air fryers may have hot spots.
Tip 4: Avoid Excess Flour
Too much flour creates gummy patches.
Tip 5: Rest Before Serving
Immediate cutting releases steam and softens crust.
46. Final Thoughts
The air fryer blooming onion is one of the most satisfying homemade appetizers because it combines dramatic presentation with incredible flavor and texture. Every crispy petal delivers seasoned crunch followed by soft sweet onion inside. Although the process takes time and patience, the final result looks impressive enough for restaurants, parties, celebrations, family dinners, and special occasions.
The key secrets are:
- Selecting the correct onion
- Cutting carefully
- Drying thoroughly
- Coating evenly
- Using enough oil spray
- Cooking at proper temperature
- Allowing enough cooking time
Once you master the basic version, you can experiment endlessly with spices, cheeses, sauces, coatings, and textures to create your own signature blooming onion recipe.