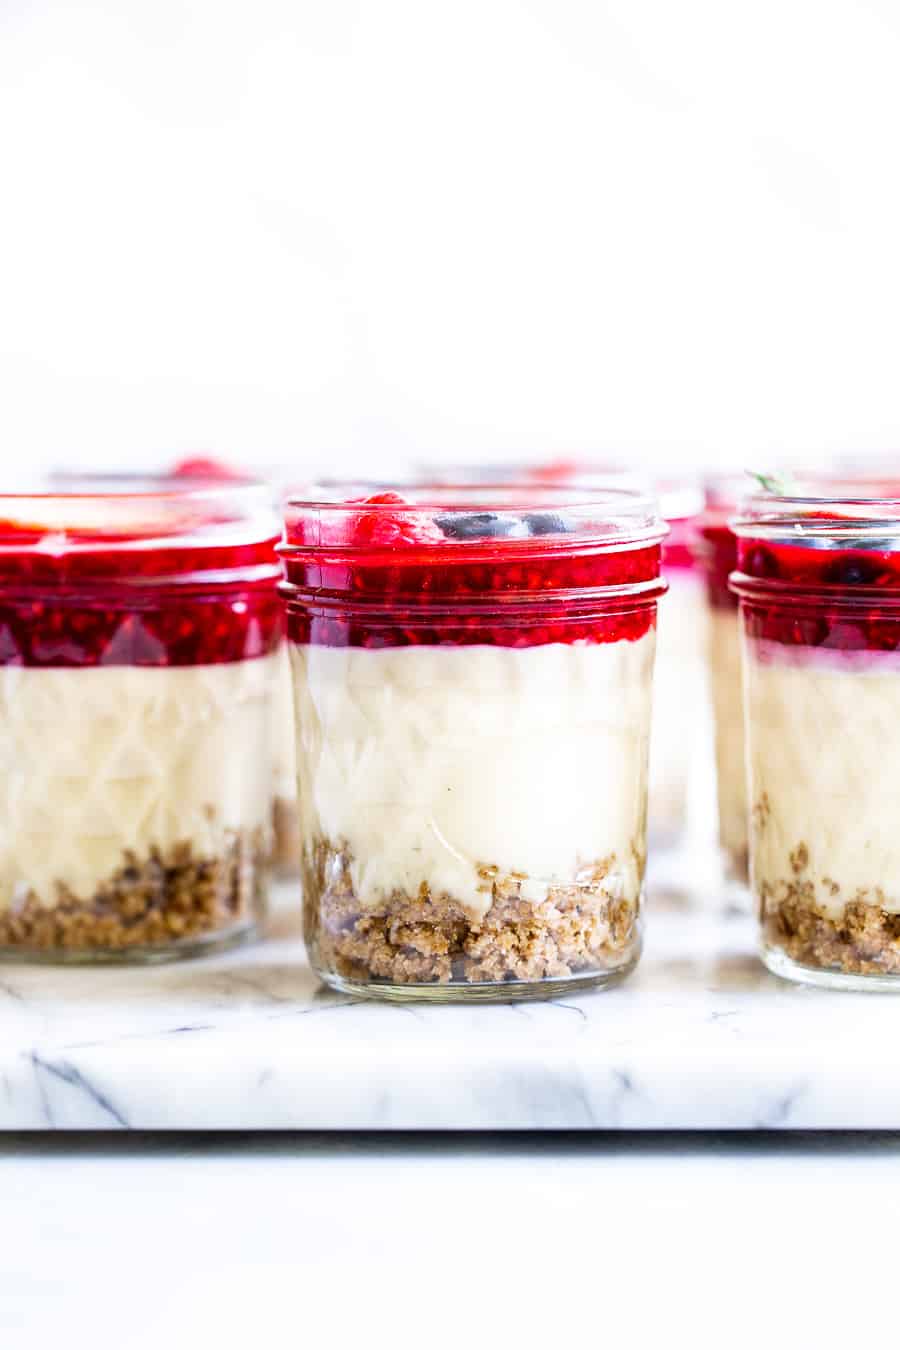
These creamy Cheesecake in a Jar creations offer a beautiful presentation with layers of cookie crust and strawberry sauce, perfect for holiday gifts or portion-controlled indulgence.
A Cheesecake Lover’s Dream:
Cheesecake is a constant source of inspiration for me, leading to creations of all shapes, sizes, and flavors. These Cheesecake in a Jar treats are a delightful addition, offering individual cheesecakes baked directly in glass jars with attractive layers of crust and fruit, ideal for gift-giving.
Why Choose Individual Cheesecake Jars?
- Perfect Gifts: Dress them up for a thoughtful and personalized present.
- Versatile Flavors: Customize each jar with unique toppings to suit individual preferences. Create a cheesecake topping bar for interactive fun.
- Easy Transport: Convenient for parties and potlucks, eliminating the need for slicing and serving.
- Portion Control: Enjoy a mindful indulgence with pre-portioned servings.
Which Mason Jars to Buy?
Use oven-safe glass mason jars, typically 6-8 ounces. Wider mouths make layering easier. The jars pictured here are 14-ounce jars (from store-bought jam), totaling 28 ounces. To determine the number of jars needed, divide the total ounces of batter (28) by the ounce capacity of your jars (6 or 8). Leave room at the top for toppings, as the cheesecake doesn’t rise significantly.
Ingredients:
- Cookie Crumbs: Oreo (or graham cracker, or other cookie).
- Butter: Binds the crust.
- Cream Cheese: Full-fat is recommended for optimal texture.
- Granulated Sugar: Balances the cream cheese tang.
- Egg: Standard large egg at room temperature.
- Vanilla: Adds flavor.
No-Bake Option:
For a no-bake version, check out the recipe for No-Bake Caramel Apple Cheesecake, then spoon it into jars with your choice of topping.
How to Make Cheesecake in a Jar:
- Crust: Combine crumbs and butter, press into the bottom of jars.
- Batter: Beat cream cheese and sugar until smooth. Beat in egg and vanilla. Transfer batter to jars, smoothing the tops.
- Water Bath: Place jars in an 8×8 pan, pour hot water halfway up the pan.
- Bake: Bake at 325°F for 20-25 minutes, or until the internal temperature reaches 150°F.
- Cool and Chill: Cool for 1 hour, then cover and refrigerate for at least 4 hours or overnight.
- Garnish: Add toppings before serving.
Storage: Refrigerate for up to 5-7 days.
Can You Can Cheesecake in a Jar?
No, these cheesecake jars are not shelf-stable and require refrigeration. Inform recipients to refrigerate them if not consumed immediately.
How to Garnish:
Customize each jar with individual toppings:
- Pie filling (cherry, blueberry, peach).
- Sauces (strawberry, caramel, ganache).
- Whipped cream (regular, peanut butter, chocolate).
Cute Gift Idea: Use an upside-down cupcake liner to decorate the jars. Place the center of the jar lid on the jar, put the cupcake liner upside down over the lid, and then screw the rim on top to secure the liner.
Cheesecake in a Jar FAQ:
- Water Bath? A water bath ensures even baking.
- Make Ahead? Yes, cheesecake is ideal for making up to 2 days in advance.
- No Mason Jars? Use two mini springform pans (see 4-inch cheesecake recipe for directions).
- Reuse Jars? Yes, as long as they are not cracked or damaged.
Cheesecake in a Jar
Yield: 2-4 jars
Prep Time: 20 minutes
Cook Time: 25 minutes
Chill Time: 4 hours
Total Time: 4 hours 45 minutes
Ingredients
- ⅔ cup cookie or graham cracker crumbs
- 2 tablespoons unsalted butter, melted
- 8 ounces full-fat cream cheese, room temperature
- ⅓ cup granulated sugar
- 1 large egg, room temperature
- 1 teaspoon vanilla extract
Toppings
- Strawberry sauce
- Cherry pie filling
- Blueberry pie filling
- Whipped cream
- Ganache
Instructions
- Preheat oven to 325°F and prepare an 8×8 pan with two 14-ounce jars. Heat water for a water bath.
- Mix the cookie crumbs and melted butter, divide between the jars, and press down firmly.
- Beat the cream cheese and sugar on medium-high speed until light and fluffy, then mix in the egg and vanilla.
- Divide the batter between the jars, place them in the 8×8 pan, and fill the pan halfway with boiling water. Bake for 20-25 minutes until the center reaches 150°F.
- Cool in the water bath for 15 minutes, then remove and cool at room temperature for 1 hour. Cover and refrigerate for at least 4 hours before serving with toppings.