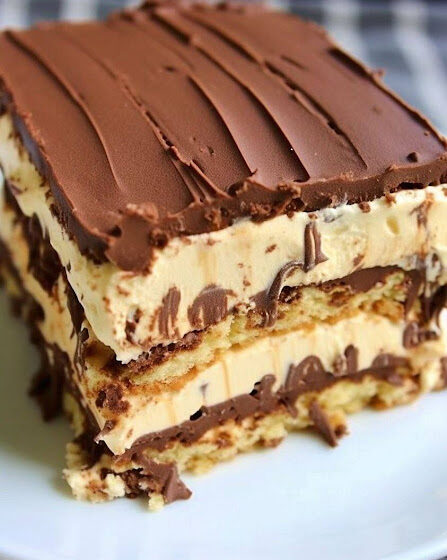
No-Bake Butter Éclair Cake is one of the most comforting, rich, creamy, luxurious chilled desserts ever created for people who love bakery-style sweets but want a much easier preparation method. It combines buttery cream filling, soft cake-like cracker layers, and smooth chocolate topping into a dessert that tastes like a cross between a classic French éclair, a layered custard cake, and a rich mousse dessert. Unlike traditional éclairs that require making pâte à choux pastry and pastry cream from scratch, this version is assembled in layers and chilled until magically transformed into a soft, elegant cake.
The beauty of this dessert lies in patience. What begins as crisp cracker layers slowly softens overnight into delicate pastry-like sheets. The butter-rich vanilla filling settles into smooth creamy layers while the chocolate topping firms into a fudgy glaze. Every bite becomes soft, velvety, buttery, chocolatey, and deeply satisfying.
This extended recipe is intentionally extremely detailed. It includes ingredient science, preparation methods, variations, troubleshooting, texture analysis, flavor balancing, professional techniques, historical background, presentation ideas, storage methods, serving techniques, and advanced dessert knowledge so you can master every aspect of making an unforgettable No-Bake Butter Éclair Cake.
History and Inspiration Behind Éclair Cake
The traditional éclair originated in France during the nineteenth century. A classic éclair consists of elongated choux pastry filled with pastry cream and topped with chocolate icing. The name “éclair” is often associated with the French word for lightning, possibly because the pastry is eaten very quickly due to how delicious it is.
The American-style éclair cake became popular decades later as home cooks searched for simpler desserts that recreated bakery flavors without complicated pastry techniques. Home bakers discovered that layering graham crackers with pudding and chocolate frosting produced a texture surprisingly similar to soft pastry after chilling overnight.
The butter-based version evolved from the original pudding-only recipes by incorporating whipped butter, cream cheese, and richer dairy ingredients. This transformed the dessert from a simple refrigerator cake into a luxurious bakery-quality layered confection.
Why People Love No-Bake Butter Éclair Cake
People love this dessert because it combines several irresistible qualities:
It requires no oven.
It can be made ahead.
It feeds many people.
It tastes better the next day.
It combines creamy vanilla and chocolate flavors.
It feels elegant while remaining easy to prepare.
It can be customized endlessly.
It has a nostalgic homemade quality.
It works for holidays, birthdays, family dinners, summer gatherings, and celebrations.
Most importantly, the texture becomes unbelievably smooth and soft after chilling.
Complete Ingredient List
For the Main Butter Vanilla Filling
2 cups whole milk
1 cup heavy cream
1 cup unsalted European-style butter, softened
8 ounces full-fat cream cheese, softened
1 1/4 cups granulated sugar
2 packages instant vanilla pudding mix, 3.4 ounces each
2 teaspoons pure vanilla extract
1 teaspoon butter extract
1/4 teaspoon fine sea salt
1 1/2 cups whipped topping or homemade whipped cream
For the Cake Layers
2 to 3 boxes graham crackers
Optional alternatives:
Butter crackers
Digestive biscuits
Vanilla wafers
Chocolate graham crackers
Shortbread cookies
For the Chocolate Fudge Glaze
1/2 cup unsalted butter
1/3 cup heavy cream
1/4 cup whole milk
1/3 cup cocoa powder
2 cups powdered sugar
4 ounces semisweet chocolate
1 teaspoon vanilla extract
Small pinch salt
Ingredient Science and Deep Explanation
Butter
Butter is one of the defining ingredients in this recipe. Since the dessert is not baked, the butter flavor remains extremely noticeable. High-fat European butter creates superior richness because it contains less water and more butterfat.
Butter contributes:
Creaminess
Flavor depth
Structure
Mouthfeel
Silky texture
When butter is beaten properly, it traps tiny air bubbles that make the filling light rather than heavy.
Cream Cheese
Cream cheese stabilizes the filling and prevents it from becoming overly sweet. Its slight tanginess balances the richness of butter and sugar.
Using cold cream cheese may create lumps. Softened cream cheese blends smoothly into the butter mixture.
Pudding Mix
Instant pudding mix contains modified starches that thicken the filling quickly. It also adds vanilla flavor and stability.
The pudding helps the dessert slice neatly after chilling.
Heavy Cream
Heavy cream provides luxurious richness and creates a softer, mousse-like consistency.
Graham Crackers
The crackers serve as the structural layers of the dessert. During refrigeration they absorb moisture from the filling and soften into cake-like sheets.
This transformation is one of the most fascinating aspects of refrigerator desserts.
Chocolate
Chocolate balances sweetness and creates contrast against the vanilla filling. Semisweet chocolate works best because it provides richness without excessive bitterness or sweetness.
Essential Equipment
9×13-inch baking dish
Mixing bowls
Whisk
Rubber spatula
Offset spatula
Electric mixer
Saucepan
Measuring cups
Fine mesh sieve optional
Sharp knife for slicing
Plastic wrap
Preparing the Kitchen
Before beginning:
Soften butter and cream cheese fully.
Chill heavy cream.
Organize all ingredients.
Clear refrigerator space.
Choose a flat storage area for chilling.
Proper preparation prevents rushed mistakes later.
Step-by-Step Ultra Detailed Instructions
Step 1: Preparing the Pudding Base
Pour the milk into a large bowl.
Add instant pudding mix gradually while whisking continuously.
Whisk for approximately 2 full minutes.
The mixture will begin thickening slowly.
Allow it to sit undisturbed for 5 minutes.
This resting time allows starch hydration and improves final texture.
If lumps appear, whisk thoroughly or strain through a sieve.
Step 2: Whipping the Butter
Place softened butter into a mixing bowl.
Beat using medium-high speed for 3 to 5 minutes.
The butter should become:
Lighter in color
Fluffy
Creamy
Smooth
This process is critical because properly aerated butter creates a luxurious filling texture.
Step 3: Adding Cream Cheese
Add softened cream cheese to the whipped butter.
Beat until completely smooth.
Scrape bowl sides frequently.
No lumps should remain.
Proper mixing creates a stable emulsion between butterfat and dairy solids.
Step 4: Sweetening the Filling
Gradually add sugar.
Adding slowly prevents graininess.
Beat for several more minutes until smooth.
The mixture should feel silky rather than gritty.
Step 5: Flavoring the Filling
Add:
Vanilla extract
Butter extract
Salt
The butter extract intensifies the buttery bakery flavor.
Salt sharpens sweetness and enhances vanilla notes.
Step 6: Combining the Pudding and Butter Mixtures
Slowly add pudding mixture into butter mixture.
Beat on low speed.
Do not overmix aggressively.
Overmixing may thin the filling.
The final texture should resemble thick mousse.
Step 7: Folding in Whipped Cream
Gently fold whipped topping or homemade whipped cream into the filling.
Use slow upward folding motions.
This preserves trapped air.
The filling becomes:
Lighter
Creamier
Silkier
More stable
Step 8: Preparing the Dish
Lightly grease the dish.
This prevents sticking and helps with serving.
Step 9: Building the First Layer
Arrange crackers in a single even layer.
Break crackers carefully to fit corners.
Avoid large gaps.
The tighter the arrangement, the cleaner the slices later.
Step 10: Adding Filling
Spread approximately one-third of the filling evenly.
Use an offset spatula.
Push filling gently into corners.
Maintain even thickness.
Step 11: Repeating the Layers
Continue layering:
Crackers
Filling
Crackers
Filling
Usually three cracker layers and three filling layers work best.
Finish with filling on top.
Step 12: Making the Chocolate Fudge Glaze
Combine butter, cream, and milk in saucepan.
Heat gently over medium-low heat.
Do not boil aggressively.
Whisk in cocoa powder slowly.
Add chopped chocolate.
Stir until melted completely.
Remove from heat.
Add powdered sugar gradually.
Whisk until glossy.
Add vanilla and salt.
Allow glaze to cool slightly.
The glaze should be thick yet pourable.
Step 13: Applying the Glaze
Pour glaze gently over chilled filling.
Spread carefully.
Avoid pressing too hard.
Create smooth edges.
Step 14: Refrigeration
Cover tightly.
Refrigerate minimum 8 hours.
Best results come after 12 to 18 hours.
During this time:
Crackers soften
Flavors blend
Filling firms
Glaze stabilizes
Texture Transformation During Chilling
At first assembly:
Crackers are crisp.
Filling is mousse-like.
Glaze is soft.
After several hours:
Moisture migrates from filling into crackers.
Crackers become tender.
The dessert behaves like layered cake.
This process is essential to the dessert’s success.
Flavor Development Over Time
The dessert tastes significantly better after resting overnight because:
Vanilla diffuses through layers.
Butter flavor deepens.
Chocolate mellows.
Sugar balances.
Dairy richness harmonizes.
Freshly assembled éclair cake tastes incomplete compared to fully chilled cake.
How to Achieve Bakery-Level Texture
Professional bakers focus on:
Even layer thickness
Proper ingredient temperatures
Slow folding techniques
Long refrigeration
Balanced sweetness
Clean slicing
The biggest difference between average and exceptional éclair cake is patience.
Homemade Whipped Cream Recipe
1 1/2 cups cold heavy cream
3 tablespoons powdered sugar
1 teaspoon vanilla
Beat until medium peaks form.
Do not overwhip.
Overwhipped cream becomes grainy.
Homemade Pastry Cream Alternative
For a fully homemade version without pudding mix:
2 cups milk
4 egg yolks
1/2 cup sugar
3 tablespoons cornstarch
2 tablespoons butter
1 teaspoon vanilla
Cook until thickened.
Cool completely before use.
The Science of Moisture Migration
One of the most interesting scientific processes in refrigerator cakes is moisture migration.
The filling contains water from milk and cream.
The crackers contain dry starch structures.
During refrigeration:
Water slowly transfers into the crackers.
The starch absorbs moisture.
The crackers soften evenly.
This creates cake-like layers without baking.
Common Mistakes
Using Cold Ingredients
Cold butter and cream cheese cause lumps.
Always soften ingredients properly.
Not Chilling Long Enough
This causes crunchy layers.
The cake needs time.
Overmixing
Overmixing can thin the filling.
Mix gently after combining components.
Thin Glaze
Too much liquid creates runny topping.
Balance liquids carefully.
Uneven Layers
Uneven spreading affects appearance and slicing.
Professional Serving Techniques
Dip knife in hot water.
Wipe between cuts.
Serve chilled.
Use flat spatula for lifting slices.
Decoration Ideas
Chocolate curls
Cocoa powder dusting
Whipped cream rosettes
Caramel drizzle
Fresh berries
Shaved white chocolate
Toasted almonds
Crushed butter cookies
Gold leaf for luxury presentation
Flavor Variations
Chocolate Butter Éclair Cake
Add cocoa powder to filling.
Use chocolate crackers.
Top with dark chocolate glaze.
Salted Caramel Éclair Cake
Add caramel between layers.
Sprinkle flaky sea salt on top.
Coffee Éclair Cake
Add espresso powder to filling and glaze.
Peanut Butter Éclair Cake
Mix peanut butter into filling.
Use chocolate peanut topping.
Strawberry Butter Éclair Cake
Add sliced strawberries.
Use strawberry glaze drizzle.
Cookies and Cream Éclair Cake
Add crushed chocolate sandwich cookies.
Use cookies-and-cream filling.
Banana Cream Éclair Cake
Layer banana slices.
Use banana pudding.
Coconut Butter Éclair Cake
Add coconut cream and toasted coconut.
Lemon Butter Éclair Cake
Use lemon pudding and lemon zest.
Pistachio Éclair Cake
Add pistachio paste and crushed pistachios.
Holiday Versions
Christmas Version
Add peppermint extract.
Decorate with crushed candy canes.
Thanksgiving Version
Add cinnamon and nutmeg.
Serve with caramel drizzle.
Easter Version
Decorate with pastel chocolate candies.
Summer Version
Add fresh berries and citrus zest.
Serving Ideas
Serve with:
Coffee
Espresso
Tea
Cold milk
Vanilla ice cream
Fresh strawberries
Chocolate sauce
Storage Instructions
Refrigerate tightly covered up to 5 days.
The texture is usually best between Day 1 and Day 3.
Freezing Instructions
Wrap tightly.
Freeze up to 2 months.
Thaw overnight in refrigerator.
Large Batch Catering Version
For parties:
Double ingredients.
Use catering trays.
Prepare 24 hours ahead.
Individual Dessert Cups
Layer components into jars or glasses.
Excellent for events and elegant presentations.
Why This Dessert Is Perfect for Summer
No oven heat.
Cold and refreshing.
Can be made ahead.
Easy to transport.
Feeds many guests.
Nutritional Characteristics
This dessert is rich and indulgent.
Contains:
Butterfat
Dairy
Sugar
Chocolate
It is designed as a luxurious celebration dessert rather than a light everyday sweet.
Pairing Recommendations
Coffee enhances chocolate.
Berries brighten richness.
Sea salt sharpens sweetness.
Dark chocolate balances vanilla filling.
Advanced Flavor Enhancements
Use vanilla bean paste.
Brown the butter slightly.
Add mascarpone cheese.
Use premium chocolate.
Infuse cream with coffee beans.
Add tiny amount of almond extract.
How Restaurants Elevate Similar Desserts
Professional pastry chefs often:
Use layered ganache
Pipe decorative cream
Add crunchy textures
Include salted caramel
Balance sweetness carefully
Use premium dairy products
Texture Comparison
Freshly Assembled:
Loose and crunchy
After 8 Hours:
Soft and creamy
After 24 Hours:
Perfect pastry-like texture
After 48 Hours:
Extremely soft and fully blended
Best Temperature for Serving
Serve slightly chilled.
Allow 10 minutes at room temperature before slicing.
Too cold:
Flavor becomes muted.
Too warm:
Layers soften excessively.
Understanding the Chocolate Glaze
The glaze functions as both decoration and flavor contrast.
Butter provides shine.
Cream provides softness.
Chocolate provides structure.
Powdered sugar provides sweetness and body.
Extra Rich French-Inspired Version
Use:
Mascarpone
Vanilla beans
Dark chocolate ganache
Brown butter
Pastry cream
European butter crackers
This version tastes closer to luxury pâtisserie desserts.
Children’s Version
Use milk chocolate glaze.
Add colorful sprinkles.
Use vanilla wafers.
Elegant Dinner Party Version
Decorate with:
Chocolate curls
Gold leaf
Fresh raspberries
Espresso dust
Serve on chilled dessert plates.
Rustic Homemade Version
Use thick homemade chocolate frosting.
Allow uneven rustic texture.
Serve directly from baking dish.
Why Overnight Resting Is Non-Negotiable
Without proper resting:
Crackers remain crunchy.
Flavors remain separate.
Texture feels unfinished.
After resting:
Everything becomes unified.
Flavor Balance Analysis
The dessert works because it balances:
Sweetness from sugar
Bitterness from chocolate
Tanginess from cream cheese
Richness from butter
Softness from cream
Vanilla warmth
Troubleshooting Table
Problem: Filling too soft
Cause: Warm ingredients
Solution: Chill filling before layering
Problem: Lumpy texture
Cause: Cold cream cheese
Solution: Beat longer
Problem: Hard crackers
Cause: Insufficient chilling
Solution: Refrigerate overnight
Problem: Runny glaze
Cause: Excess liquid
Solution: Add powdered sugar
Problem: Dry texture
Cause: Too few filling layers
Solution: Increase filling quantity
Expert Tips for Perfect Results
Use full-fat dairy.
Do not rush refrigeration.
Spread evenly.
Use quality chocolate.
Taste as you go.
Maintain clean layer edges.
Final Thoughts
No-Bake Butter Éclair Cake is far more than a simple refrigerator dessert. It is a remarkable transformation of humble ingredients into something luxurious, soft, creamy, rich, and deeply comforting. The combination of buttery vanilla filling, tender cake-like layers, and glossy chocolate topping creates a dessert that feels nostalgic yet elegant at the same time.
Its greatest strength is the contrast between simplicity and sophistication. Although it requires no baking and no advanced pastry techniques, the finished dessert tastes like something from a bakery display case. The long chilling process performs the magic, transforming crisp crackers into delicate pastry-like layers and blending every flavor into one harmonious dessert experience.
Whether served at birthdays, family gatherings, weddings, holidays, potlucks, dinner parties, or quiet evenings at home, No-Bake Butter Éclair Cake consistently impresses people because of its smooth texture, balanced sweetness, and rich flavor.
It is a dessert built on patience, creaminess, butter richness, and the wonderful transformation that happens when time and refrigeration work together.