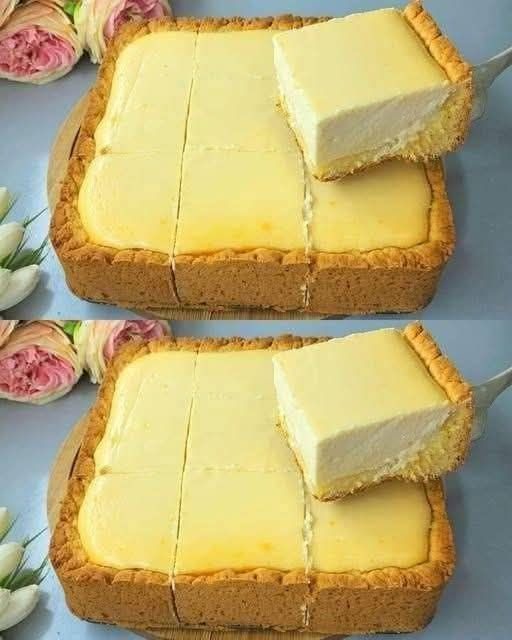
Torta della Nonna, meaning “Grandmother’s Cake,” is a beloved dessert from Tuscany. Despite its simplicity, it represents classic Italian baking: a delicate balance of textures and flavors. The outer shell is made of pasta frolla (Italian shortcrust pastry), which is tender yet slightly crisp. Inside lies a silky, rich pastry cream known as crema pasticcera. The tart is traditionally topped with pine nuts and dusted with powdered sugar after baking.
This dessert is not overly sweet. Instead, it focuses on harmony: buttery pastry, creamy custard, and the subtle nuttiness of pine nuts.
PART 1: UNDERSTANDING THE COMPONENTS
Before starting, it’s important to understand the three essential elements:
1. Pasta Frolla (Shortcrust Pastry)
This dough should be:
- Tender, not chewy
- Slightly crumbly but cohesive
- Rich with butter flavor
The key is minimal handling to avoid gluten development.
2. Crema Pasticcera (Pastry Cream)
This is a thick custard that should be:
- Smooth and lump-free
- Rich but not overly heavy
- Firm enough to slice after baking
3. Assembly and Baking
The tart is sealed with a top crust, which protects the custard and creates a slightly crisp surface that contrasts with the soft interior.
PART 2: INGREDIENTS IN DEPTH
For the Pasta Frolla
- 320 g all-purpose flour
- 150 g granulated sugar
- 150 g unsalted butter (cold, firm, cut into cubes)
- 2 whole eggs
- 1 egg yolk
- 1 teaspoon vanilla extract
- Zest of 1 lemon (finely grated)
- Pinch of salt
- Optional: ½ teaspoon baking powder
Ingredient Notes:
- Butter must be cold to create a flaky texture
- Lemon zest adds freshness and balances richness
- Egg yolk increases richness and softness
For the Crema Pasticcera
- 500 ml whole milk
- 4 egg yolks
- 100 g sugar
- 30 g cornstarch
- 1 teaspoon vanilla extract
- Lemon peel (large strips, no white pith)
Ingredient Notes:
- Whole milk gives proper richness
- Cornstarch stabilizes the custard
- Lemon peel infuses aroma without overpowering
For Topping
- 30 g pine nuts
- Powdered sugar for finishing
PART 3: MAKING THE PASTA FROLLA
Step 1: Mixing Dry Ingredients
Place flour, sugar, salt, and lemon zest in a bowl. Mix evenly so the zest distributes throughout the flour.
Step 2: Incorporating Butter
Add cold butter cubes. Using fingertips:
- Press and rub butter into flour
- Continue until mixture resembles coarse sand
Important detail:
You should still see tiny butter pieces. These create tenderness.
Step 3: Adding Eggs
Add eggs, yolk, and vanilla.
Mix gently using hands or a fork:
- Do not knead aggressively
- Stop as soon as dough forms
Step 4: Resting the Dough
Shape into a flat disk, wrap, and refrigerate.
Why this matters:
- Allows flour to hydrate
- Prevents shrinking during baking
- Firms butter again
Minimum: 1 hour
Ideal: 2–3 hours
PART 4: MAKING CREMA PASTICCERA
Step 1: Infusing Milk
Heat milk with lemon peel slowly.
Important:
- Do not boil
- Heat until steaming
Let sit for 10–15 minutes for flavor infusion.
Step 2: Egg Mixture
Whisk yolks and sugar:
- Mix until pale and slightly thick
Add cornstarch:
- Whisk until completely smooth
No lumps should remain.
Step 3: Tempering
Slowly pour warm milk into egg mixture while whisking constantly.
This prevents scrambling.
Step 4: Cooking Custard
Return mixture to saucepan.
Cook over medium-low heat:
- Stir constantly
- Scrape bottom and sides
Watch for:
- Thickening after several minutes
- Bubbles forming slowly
When done:
- Custard coats spoon
- Texture is smooth and thick
Step 5: Cooling
Transfer to bowl immediately.
Cover with plastic wrap touching surface:
- Prevents skin formation
Cool completely before use.
PART 5: ASSEMBLY
Step 1: Prepare Pan
Grease and lightly flour tart pan.
Step 2: Roll Base Dough
Take 2/3 of dough:
- Roll to 3–4 mm thickness
- Rotate dough frequently to avoid sticking
Transfer carefully to pan:
- Press gently into corners
- Avoid stretching
Step 3: Add Filling
Pour cooled custard:
- Spread evenly
- Avoid air pockets
Step 4: Top Layer
Roll remaining dough.
Place over tart:
- Seal edges carefully
- Trim excess
Tip:
Press edges with fingers or fork.
Step 5: Final Touches
- Prick surface lightly
- Scatter pine nuts evenly
PART 6: BAKING PROCESS
Oven Settings
- 180°C (350°F)
- Middle rack
Baking Time
- 35 to 45 minutes
What to Look For
- Golden top
- Slightly darker edges
- Pine nuts lightly toasted
Common Issues
- If browning too fast: cover with foil
- If pale: bake longer
PART 7: COOLING AND SERVING
Cooling is essential:
- Let tart cool fully in pan
- Remove only when firm
Dust with powdered sugar just before serving.
PART 8: TEXTURE AND FLAVOR ANALYSIS
A perfect Torta della Nonna should have:
- Crisp but tender crust
- Smooth, sliceable custard
- Light citrus aroma
- Slight crunch from pine nuts
PART 9: STORAGE AND SHELF LIFE
- Refrigerate up to 3 days
- Bring to room temperature before serving
- Do not freeze (custard texture may break)
PART 10: ADVANCED TIPS
- Chill assembled tart 20 minutes before baking to prevent shrinking
- Use blind baking if you prefer extra crisp bottom
- Sift powdered sugar for even finish
- Always strain custard if unsure about smoothness
PART 11: VARIATIONS
1. Open Tart Version
No top crust, only pine nuts on custard.
2. Ricotta Version
Mix custard with sweetened ricotta for a richer filling.
3. Chocolate Version
Add dark chocolate to custard.
4. Orange Version
Replace lemon zest with orange zest.