There are some cakes that require layers, frosting, and special decorating tools, but this yogurt cake proves that great baking doesn’t have to be complicated. With everyday pantry ingredients and a single mixing bowl for the wet ingredients and another for the dry, this loaf comes together quickly while delivering a wonderfully soft texture and rich flavor.
Greek yogurt is the ingredient that makes this cake stand out. It creates a tender crumb without making the cake heavy, while extra virgin olive oil replaces butter to keep every slice moist for days. The combination produces a cake with a delicate texture that is satisfying on its own and versatile enough to pair with many toppings.
This loaf is perfect for those moments when a homemade dessert is wanted without spending hours in the kitchen. It works equally well as a breakfast treat, an afternoon snack with tea or coffee, or a light dessert after dinner. Since the recipe relies on common ingredients, it’s easy to prepare whenever the craving for fresh cake strikes.
Why This Yogurt Cake Turns Out So Well
- A successful loaf cake depends on balancing moisture, structure, and flavor. This recipe achieves that balance using ingredients that each play an important role.
- Greek yogurt provides richness while adding enough moisture to keep the cake soft without making it dense. Because yogurt is naturally acidic, it also reacts with the baking soda, helping the batter rise evenly during baking. The result is a light texture with a fine crumb.
- Extra virgin olive oil contributes another layer of moisture. Unlike butter, olive oil stays liquid even after the cake cools, helping the loaf remain fresh for several days. Choosing a smooth and mild olive oil allows the cake to taste rich without becoming overpowering.
- Eggs strengthen the batter and support the cake as it rises in the oven. They also help create an even crumb that slices neatly after cooling.
- Sugar not only sweetens the cake but also contributes to its soft texture by locking in moisture. Vanilla extract rounds everything out with a gentle sweetness that complements the yogurt beautifully.
Everyday Ingredients That Make a Difference
- One of the best features of this recipe is its short ingredient list. Each ingredient has a purpose, making it unnecessary to include anything extra.
- All-Purpose Flour
- Flour provides the framework that holds the loaf together. Using all-purpose flour creates a cake that is light while still having enough structure to support the moist batter.
- Baking Powder and Baking Soda
- The combination of these two leavening agents gives the loaf an even rise. Together they create a fluffy interior and help prevent the cake from becoming too compact.
- Salt
- Although used in a small amount, salt enhances every other flavor in the recipe. It balances the sweetness and makes the vanilla and yogurt taste more pronounced.
- Greek Yogurt
- Greek yogurt gives the cake its signature texture. Its thick consistency produces a rich batter while adding a gentle tang that keeps the sweetness from becoming overwhelming.
- Granulated Sugar
- Granulated sugar dissolves easily into the yogurt mixture and helps produce a soft crumb with a lightly golden crust.
- Eggs
- Eggs bring the batter together and help create a cake that is stable enough to slice cleanly after cooling.
- Extra Virgin Olive Oil
- Instead of butter, olive oil supplies moisture and tenderness. It also gives the loaf a delicate richness that improves as the cake rests.
- Vanilla Extract
- A small amount of vanilla adds warmth and depth without overpowering the simple flavors of the cake.
Why Yogurt Is the Secret Ingredient
- Many traditional cakes depend on butter or sour cream for moisture, but yogurt offers several advantages. Besides contributing creaminess, it naturally improves the cake’s texture during baking.
- Because yogurt contains acidity, it reacts with baking soda to produce tiny air bubbles throughout the batter. These bubbles expand in the oven, creating a lighter loaf with a softer crumb.
- Another benefit is the subtle tanginess yogurt brings. Instead of tasting overly sweet, the finished cake has a balanced flavor that makes every bite enjoyable. This also makes the cake an excellent base for serving with fruit, yogurt, or other toppings.
- The moisture from yogurt continues working even after baking. While some cakes dry out by the following day, this loaf stays tender, making it ideal for preparing ahead of time.
Preparing Before You Mix
- Although the batter comes together quickly, a few simple preparation steps make baking much easier.
- Start by preheating the oven so it reaches the correct temperature before the batter is ready. A properly heated oven helps the cake rise evenly from the beginning of baking.
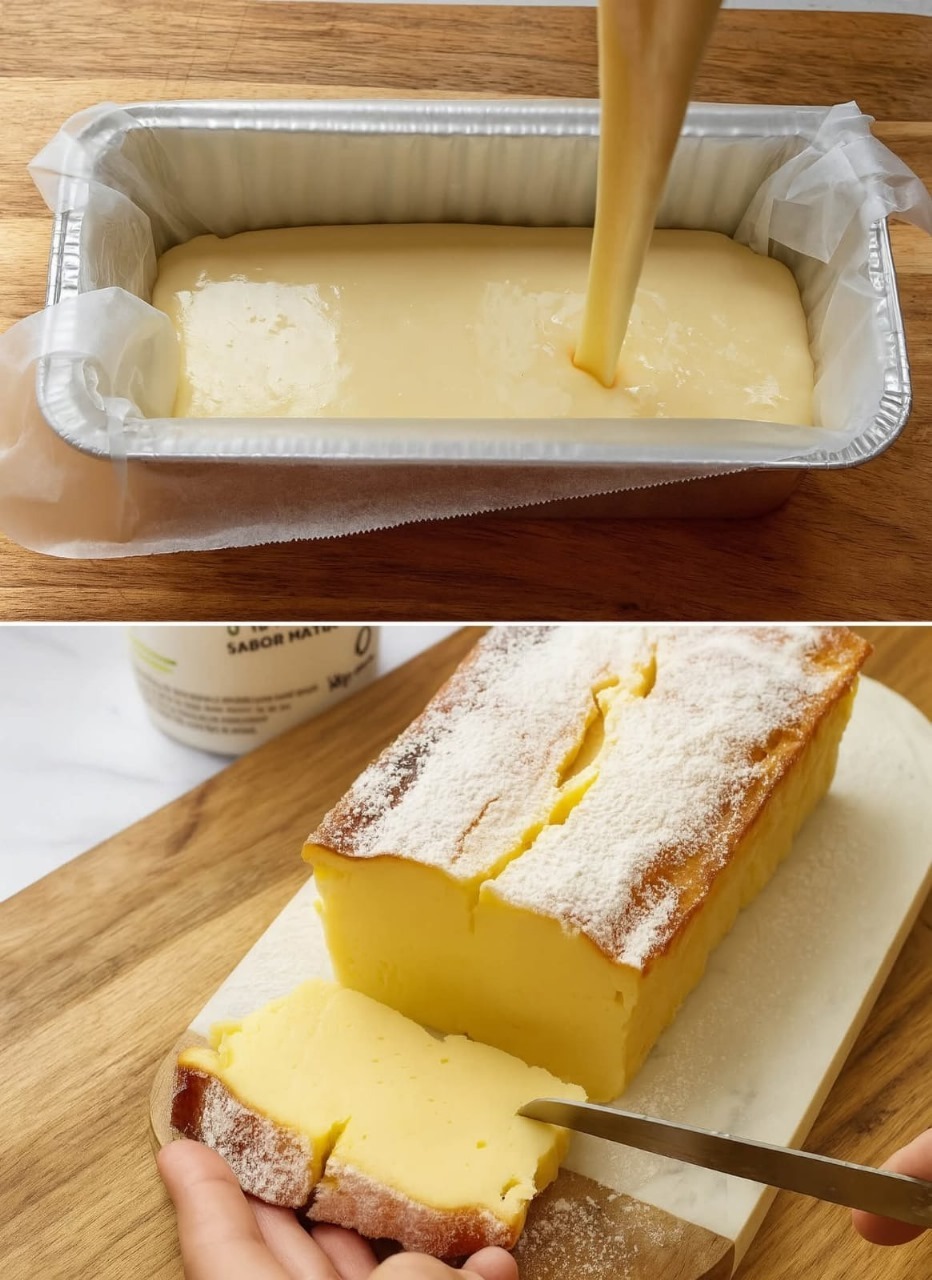
- Next, prepare the loaf pan by lightly coating it with olive oil or baking spray. Lining the bottom and two long sides with parchment paper creates handles that make lifting the finished cake out of the pan effortless after baking.
- Measure every ingredient before beginning to mix. Having everything ready helps the batter come together smoothly without overmixing, which is one of the easiest ways to maintain a soft, tender texture.
- Finally, use separate bowls for the dry and wet ingredients before combining them. This simple step ensures the baking powder, baking soda, and salt are evenly distributed throughout the flour before they are added to the yogurt mixture, resulting in a cake that bakes evenly from edge to center.
Getting the Batter Just Right
- One of the reasons this yogurt cake is so dependable is that the batter comes together with very little effort. There is no need for an electric mixer or complicated baking techniques. A whisk, a rubber spatula, and two mixing bowls are all that is needed to create a smooth batter.
- Begin by whisking the dry ingredients together until everything is evenly combined. This simple step distributes the baking powder, baking soda, and salt throughout the flour so the cake rises evenly while baking.
- In a separate large bowl, whisk the Greek yogurt, granulated sugar, eggs, extra virgin olive oil, and vanilla extract until the mixture becomes smooth and creamy. The sugar should begin dissolving into the wet ingredients, creating a silky base for the batter.
- Add the dry ingredients to the wet mixture and gently fold everything together with a rubber spatula. Mix only until the flour disappears. Overmixing develops the gluten in the flour, which can make the finished cake firmer than desired. A few small lumps in the batter are perfectly acceptable and will disappear during baking.
- Once combined, the batter should be thick, smooth, and easy to spread into the prepared loaf pan.
Baking the Cake Evenly
- After pouring the batter into the prepared pan, gently smooth the surface with the spatula. This helps the cake bake into an even loaf with a nicely rounded top.
- Bake the cake in a preheated 350°F oven for 50 to 55 minutes. During baking, the batter slowly rises, developing a beautiful golden crust while staying moist inside.
- Avoid opening the oven door too early. Frequent temperature changes can interrupt the rising process and may cause the center to sink. It’s best to wait until the baking time is nearly complete before checking for doneness.
- The easiest way to test the cake is by inserting a toothpick into the center. If it comes out clean, or with only a few dry crumbs attached, the cake is ready. If wet batter remains on the toothpick, continue baking for a few more minutes before checking again.
- Every oven bakes a little differently, so begin checking near the end of the recommended baking time while allowing the cake to finish as needed.
Cooling Makes a Difference
- As tempting as it is to slice into a freshly baked cake, allowing it to cool properly improves both the texture and flavor.
- Leave the cake in the loaf pan for about 10 minutes after removing it from the oven. This short resting period helps the structure firm up, making it easier to remove without breaking.
- Using the parchment paper overhang, carefully lift the cake onto a wire rack. Cooling on a rack allows air to circulate around the loaf, preventing the bottom from becoming soggy.
- Once completely cooled, the cake slices cleanly with a soft, even crumb that holds together beautifully.
Easy Ways to Serve Yogurt Cake
- One of the best things about this recipe is its versatility. The cake is flavorful enough to enjoy plain, but it also pairs beautifully with simple toppings.
- A light dusting of powdered sugar gives the loaf an elegant finish without adding unnecessary sweetness. For an extra creamy touch, serve each slice with a spoonful of lightly sweetened Greek yogurt.
- Fresh fruit also makes an excellent companion. Seasonal berries, sliced peaches, fresh figs, or citrus segments add natural sweetness and bright flavors that complement the delicate taste of the cake.
- If serving as dessert, the loaf also pairs nicely with a scoop of frozen yogurt or ice cream. The warm flavors of vanilla and olive oil create a wonderful balance with chilled toppings.
- Whether served for breakfast, afternoon coffee, or dessert, this cake easily fits into almost any occasion.
Simple Ways to Change the Flavor
- The basic recipe creates a wonderfully balanced cake, but it also serves as an excellent starting point for different flavor combinations while keeping the same easy preparation.
- For a fresh citrus flavor, lemon zest and a small amount of lemon juice can be added to brighten the cake.
- Blueberries fold easily into the finished batter and create bursts of sweetness throughout every slice. Lemon and blueberries also work beautifully together.
- For a richer version, part of the flour can be replaced with cocoa powder, and chopped dark chocolate or chocolate chips may be stirred into the batter.
- Those who enjoy nutty flavors can replace a portion of the flour with almond flour and add a little almond extract. A sprinkle of sliced almonds over the batter before baking creates a lightly crisp topping.
- Another interesting option is adding a small amount of herbes de Provence, which gives the loaf delicate floral and herbal notes that pair surprisingly well with the yogurt.
- These simple additions allow the same dependable recipe to feel new each time it is baked.
Helpful Tips for the Best Results
- A few small details can make an already reliable recipe even better.
- Measure the flour carefully to avoid a dry cake.Use full-fat Greek yogurt for the richest texture.Choose a mild extra virgin olive oil with a smooth flavor.Mix the batter only until the ingredients are combined.Bake until the center is fully set before removing the cake from the ovenCool completely before slicing for the cleanest pieces.Store the cooled cake tightly wrapped at room temperature for up to four days to help retain its moisture.
A Simple Cake You’ll Bake Often
- This homemade yogurt cake is proof that excellent baking doesn’t require complicated methods or a long list of ingredients. The combination of Greek yogurt and extra virgin olive oil creates a loaf that is exceptionally moist, tender, and full of flavor while remaining simple enough for everyday baking.
- Whether enjoyed plain, lightly dusted with powdered sugar, or served alongside Greek yogurt and fresh fruit, every slice has a soft texture and balanced sweetness that never feels too rich. The straightforward preparation also makes it an ideal recipe for both new and experienced bakers.
- With pantry staples, minimal preparation, and consistently reliable results, this yogurt cake is the kind of recipe that fits every season and every occasion. It is easy enough for a weekday bake, attractive enough to serve guests, and versatile enough to customize with your favorite flavors whenever you want something a little different.

Low Calorie Greek Yogurt Cake
This Homemade Yogurt Cake is soft, moist, and lightly sweet with a delicate crumb. Made with Greek yogurt and extra virgin olive oil instead of butter, it has a tender texture that stays fresh for several days. It is easy enough for everyday baking and delicious served plain, dusted with powdered sugar, or alongside Greek yogurt and fresh fruit.
10
servings5
minutes50
minutes273.3
kcal55
minutesIngredients
1½ cups (180g) all-purpose flour
1½ teaspoons baking powder
½ teaspoon baking soda
½ teaspoon kosher salt
1 cup (227g) Greek yogurt
1 cup (200g) granulated sugar
3 large eggs
½ cup extra virgin olive oil
1 teaspoon vanilla extract
Powdered sugar, for dusting
Lightly sweetened Greek yogurt
Fresh fruit
Directions
- Preheat the oven to 350°F (175°C). Lightly grease a 9 x 5-inch loaf pan with olive oil or baking spray. Line the bottom and both long sides with parchment paper, leaving an overhang to make lifting the cake easier after baking.
- In a medium mixing bowl, whisk together the all-purpose flour, baking powder, baking soda, and kosher salt until evenly combined.
- In a separate large mixing bowl, whisk together the Greek yogurt, granulated sugar, eggs, extra virgin olive oil, and vanilla extract until the mixture is smooth and well blended.
- Add the dry ingredients to the wet ingredients. Using a rubber spatula, gently fold everything together just until no dry streaks of flour remain. Do not overmix the batter.
- Pour the batter into the prepared loaf pan and spread the top evenly with the spatula.
- Bake for 50 to 55 minutes, or until the top is lightly golden and a toothpick inserted into the center comes out clean or with a few dry crumbs.
- Remove the cake from the oven and let it cool in the pan for 10 minutes.
- Using the parchment paper overhang, carefully lift the cake out of the pan and transfer it to a wire rack. Allow it to cool completely before slicing.
- If desired, dust the top with powdered sugar and serve with lightly sweetened Greek yogurt and fresh fruit. Store any leftovers tightly wrapped at room temperature for up to 4 days.
Notes
- Use a mild-flavored extra virgin olive oil for the best taste.
- Mix the batter only until combined to maintain a soft texture.
- Let the cake cool completely before slicing for neat, even pieces.
- Store the cake tightly wrapped at room temperature for up to 4 days.
- Flour substitutions: Whole wheat pastry flour, half whole wheat flour with half all-purpose flour, or a gluten-free one-to-one flour blend can be used. These substitutions may produce a slightly denser cake.
Nutrition Facts
- Calories: 273.3kcal
- Fat: 12.4g
- Saturated Fat: 2g
- Trans Fat: 0.01g
- Polyunsaturated Fat: 1.5g
- Monounsaturated Fat: 8.4g
- Cholesterol: 50.1mg
- Sodium: 261.4mg
- Potassium: 67.7mg
- Carbohydrates: 35.3g
- Fiber: 0.5g
- Sugar: 20.8g
- Protein: 5.7g
- Vitamin A: 72.5mcg
- Calcium: 68.1mg
- Iron: 1.3mg