Introduction
Gluten-free peanut butter cookies are one of the most satisfying cookies to bake because they naturally rely on peanut butter for much of their structure, flavor, and richness. Unlike many gluten-free baked goods that require complicated flour blends and specialty ingredients, peanut butter cookies adapt beautifully to gluten-free preparation while maintaining a texture and flavor that many people actually prefer over traditional wheat-based versions.
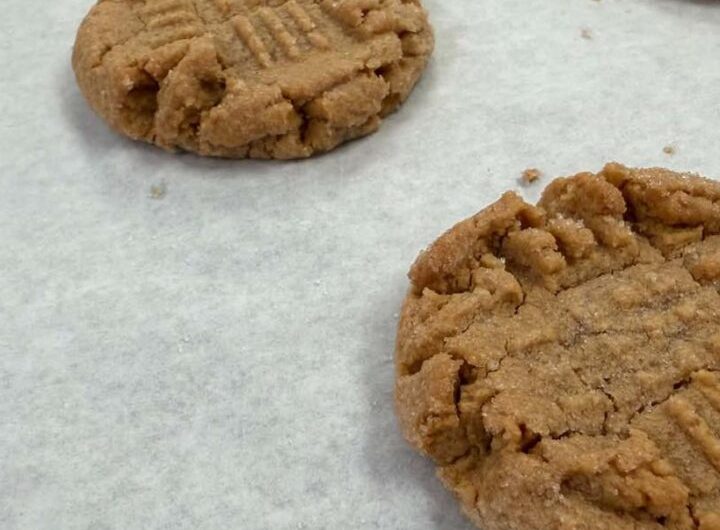
A well-made gluten-free peanut butter cookie should have a rich roasted peanut aroma, a tender crumb, lightly crisp edges, and a soft center. The flavor should be balanced, allowing the peanut butter to remain the dominant taste while sweetness enhances rather than overwhelms the cookie. The best versions offer a contrast between the slightly crunchy exterior and the moist interior, creating a cookie that remains enjoyable several days after baking.
This comprehensive recipe has been developed to create bakery-style gluten-free peanut butter cookies with exceptional flavor, texture, and consistency. Every ingredient has a purpose, every step contributes to the final result, and numerous variations are included so the recipe can be adapted to different preferences and occasions.
History of Peanut Butter Cookies
Peanut butter cookies have been a beloved dessert in North America for generations. Peanut butter itself became increasingly popular during the late nineteenth and early twentieth centuries, eventually becoming a household staple. As peanut butter gained popularity, bakers began incorporating it into cakes, breads, candies, and cookies.
The famous crisscross fork pattern commonly associated with peanut butter cookies emerged because peanut butter dough tends to be denser than many other cookie doughs. Pressing the dough with a fork helped flatten the cookies and encouraged more even baking. Over time, the distinctive pattern became a visual hallmark of peanut butter cookies and remains one of the most recognizable cookie designs today.
Gluten-free peanut butter cookies became especially popular because peanut butter naturally contributes structure and richness, making the absence of gluten less noticeable than in many other baked goods. As gluten-free baking techniques evolved, bakers discovered that peanut butter cookies could achieve excellent results with minimal compromise in taste or texture.
What Makes This Recipe Special
This recipe focuses on creating cookies that are:
- Richly flavored
- Perfectly balanced in sweetness
- Soft in the center
- Slightly crisp around the edges
- Easy to shape
- Suitable for freezing
- Consistent from batch to batch
- Adaptable for numerous flavor variations
The inclusion of both gluten-free flour and almond flour creates a more sophisticated texture than recipes relying solely on peanut butter and sugar. The result is a cookie with depth, tenderness, and structure.
Yield
Approximately 30 medium cookies
Approximately 20 large bakery-style cookies
Approximately 50 small tea cookies
Preparation Time
Ingredient preparation: 15 minutes
Mixing time: 15 minutes
Chilling time: 1 hour
Baking time: 12 minutes per batch
Cooling time: 20 minutes
Total time: Approximately 2 hours
Ingredient List
Main Dry Ingredients
3 cups gluten-free all-purpose flour blend
1 cup almond flour
3 tablespoons tapioca starch
2 teaspoons xanthan gum if not included in flour blend
1½ teaspoons baking soda
1 teaspoon baking powder
1 teaspoon fine sea salt
Main Wet Ingredients
1½ cups creamy peanut butter
¾ cup unsalted butter softened
1 cup packed light brown sugar
¾ cup granulated sugar
3 large eggs
2 tablespoons milk
2 teaspoons pure vanilla extract
1 teaspoon peanut extract optional
Optional Additions
1 cup chocolate chips
1 cup chopped roasted peanuts
½ cup peanut butter chips
½ cup toffee bits
½ cup chopped dark chocolate
¼ cup finely chopped peanuts for garnish
Flaky sea salt for finishing
Detailed Ingredient Analysis
Peanut Butter
Peanut butter is the defining ingredient of this recipe. Its quality directly influences the final flavor and texture.
Commercial creamy peanut butter generally produces the most reliable results because stabilizers help maintain a consistent texture. Natural peanut butter can also be used, but it should be thoroughly stirred before measuring.
The roasted peanut flavor becomes more pronounced during baking. Choosing a peanut butter with a deep roasted flavor results in superior cookies.
Gluten-Free Flour Blend
A high-quality gluten-free flour blend typically contains combinations of:
- Rice flour
- Potato starch
- Tapioca starch
- Sorghum flour
- Millet flour
These ingredients work together to replicate some of the properties normally provided by wheat flour.
Almond Flour
Almond flour contributes:
- Moisture
- Richness
- Tenderness
- Improved mouthfeel
- Nutty complexity
Its natural oils help prevent dryness and enhance shelf life.
Brown Sugar
Brown sugar provides moisture through its molasses content. It contributes:
- Soft texture
- Caramel notes
- Enhanced chewiness
- Rich color
Granulated Sugar
Granulated sugar helps:
- Create crisp edges
- Encourage spreading
- Improve browning
- Balance moisture levels
Eggs
Eggs serve multiple functions:
- Binding
- Structure
- Moisture retention
- Emulsification
- Leavening support
Vanilla Extract
Vanilla acts as a flavor enhancer. Although peanut butter remains the dominant flavor, vanilla helps round out sweetness and adds aromatic depth.
Equipment Needed
Large mixing bowl
Medium mixing bowl
Electric hand mixer or stand mixer
Rubber spatula
Cookie scoop
Measuring cups
Measuring spoons
Kitchen scale
Parchment paper
Baking sheets
Cooling racks
Step 1: Preparing Ingredients
Before beginning, remove butter and eggs from refrigeration approximately one hour before baking.
Room-temperature ingredients blend more effectively and produce a smoother dough.
Measure all ingredients accurately.
Organize ingredients in the order they will be used.
Line baking sheets with parchment paper.
Preheat oven to 350°F (175°C).
Step 2: Mixing Dry Ingredients
Place gluten-free flour blend into a medium bowl.
Add almond flour.
Add tapioca starch.
Add xanthan gum.
Add baking soda.
Add baking powder.
Add salt.
Whisk continuously for approximately one minute.
This step helps distribute ingredients evenly and prevents pockets of leavening agents.
Set aside.
Step 3: Creaming Butter and Sugars
Place softened butter into a large bowl.
Add brown sugar.
Add granulated sugar.
Using an electric mixer, beat for 4 to 5 minutes.
The mixture should become:
- Lighter in color
- Fluffier in texture
- Smooth and creamy
Proper creaming incorporates air into the dough and contributes to a lighter cookie.
Step 4: Incorporating Peanut Butter
Add peanut butter gradually.
Beat until fully incorporated.
Scrape down the bowl several times.
Continue mixing for another 2 minutes.
The mixture should become extremely smooth and uniform.
The aroma at this stage should be rich and distinctly peanut-forward.
Step 5: Adding Eggs and Flavorings
Add eggs one at a time.
Mix thoroughly after each addition.
Add milk.
Add vanilla extract.
Add peanut extract if using.
Mix until completely smooth.
The batter should appear glossy and thick.
Step 6: Combining Wet and Dry Components
Reduce mixer speed.
Add dry ingredients in four separate additions.
Mix only until combined.
Avoid excessive mixing.
Gluten-free doughs can become dense if overworked.
Use a spatula to fold the dough several times by hand.
The finished dough should be thick and slightly sticky.
Step 7: Incorporating Mix-Ins
At this stage you may add:
Chocolate chips
Roasted peanuts
Peanut butter chips
Toffee bits
Chopped dark chocolate
Fold gently until evenly distributed.
Avoid crushing mix-ins.
Step 8: Chilling the Dough
Cover the bowl tightly.
Place in the refrigerator for at least 60 minutes.
For maximum flavor development, chill for 4 hours.
For the richest flavor possible, chill overnight.
During chilling:
- Flour hydrates
- Flavors deepen
- Dough firms
- Spreading decreases
- Texture improves
Many professional bakers consider chilling one of the most important steps.
Step 9: Portioning the Dough
Remove chilled dough.
Use a cookie scoop.
Portion into balls weighing approximately 35 to 40 grams each.
Place on prepared baking sheets.
Leave sufficient spacing.
Cookies will spread during baking.
Step 10: Creating the Signature Pattern
Using a fork:
Press gently across the surface.
Rotate ninety degrees.
Press again.
This creates the traditional crisscross design.
The pattern also promotes more even baking.
Step 11: Optional Finishing Touches
Sprinkle tops with:
Chopped peanuts
Chocolate chunks
Sea salt flakes
Crushed roasted peanuts
Mini chocolate chips
These additions improve visual appeal and flavor complexity.
Step 12: Baking
Bake one sheet at a time.
Place sheet in center of oven.
Bake for 10 to 12 minutes.
For softer cookies:
Bake 10 minutes.
For slightly firmer cookies:
Bake 12 to 13 minutes.
Edges should appear lightly golden.
Centers should remain slightly soft.
Do not overbake.
The cookies continue to set after removal from the oven.
Step 13: Cooling
Allow cookies to remain on baking sheet for 10 minutes.
Transfer carefully to a cooling rack.
Cool completely.
Proper cooling develops final texture and flavor.
Professional Baking Secrets
Professional bakers often:
Weigh every ingredient.
Use high-quality peanut butter.
Chill dough overnight.
Bake in small batches.
Rotate baking sheets halfway through baking.
Allow complete cooling before storage.
Store cookies with parchment between layers.
These practices dramatically improve consistency.
Texture Science
A successful gluten-free peanut butter cookie balances several competing factors:
Too much flour creates dryness.
Too little flour causes spreading.
Too much sugar creates fragility.
Too little sugar reduces tenderness.
Excessive baking causes dryness.
Insufficient baking causes collapse.
The proportions in this recipe are designed to maintain equilibrium between these factors.
Flavor Variations
Triple Peanut Butter Cookies
Add:
1 cup peanut butter chips
½ cup chopped peanuts
2 tablespoons peanut butter drizzle
Result:
Intense peanut flavor throughout.
Peanut Butter Chocolate Chunk Cookies
Add:
1 cup chopped dark chocolate
½ cup chocolate chips
Result:
Rich chocolate contrast.
Peanut Butter Espresso Cookies
Add:
2 teaspoons instant espresso powder
Result:
Deeper roasted flavor profile.
Peanut Butter Cinnamon Cookies
Add:
1½ teaspoons cinnamon
¼ teaspoon nutmeg
Result:
Warm bakery-style aroma.
Peanut Butter Honey Cookies
Replace some sugar with honey.
Result:
Enhanced moisture and floral sweetness.
Peanut Butter Oat Cookies
Add certified gluten-free oats.
Result:
Heartier texture.
Peanut Butter Coconut Cookies
Add shredded coconut.
Result:
Tropical flavor notes.
Peanut Butter Caramel Cookies
Add caramel pieces.
Result:
Soft caramel pockets throughout.
Storage Guide
Store cookies in airtight containers.
Room temperature storage:
Up to 5 days.
Refrigerated storage:
Up to 10 days.
Frozen storage:
Up to 3 months.
Always cool completely before storage.
Freezing Cookie Dough
Portion dough into balls.
Freeze on trays.
Transfer frozen portions to freezer bags.
Label with date.
Bake directly from frozen.
Add 2 to 4 minutes baking time.
Serving Suggestions
Serve with:
Milk
Coffee
Tea
Hot chocolate
Peanut butter mousse
Chocolate pudding
Vanilla ice cream
Chocolate ice cream
Coffee ice cream
Fruit parfaits
Cookie platters
Dessert boards
Ice cream sandwiches
Dessert buffets
Holiday trays
Gift boxes
Bake-sale assortments
Family gatherings
Picnics
Birthday celebrations
Festive occasions
Final Thoughts
A truly exceptional gluten-free peanut butter cookie should not feel like a substitute for a traditional cookie. It should stand on its own as a dessert worthy of being baked repeatedly because of its outstanding flavor, texture, and aroma. By combining quality peanut butter, carefully balanced gluten-free ingredients, proper mixing techniques, adequate chilling time, and attentive baking, these cookies achieve a bakery-quality result that appeals to both gluten-free and non-gluten-free eaters alike. The deep roasted peanut flavor, tender crumb, subtle sweetness, and versatile nature of the recipe make it a reliable favorite for everyday baking, holiday celebrations, special events, gifting, and sharing with family and friends.