There is something timeless about a batch of homemade peanut butter cookies fresh from the oven. Their rich aroma fills the kitchen, the tops are decorated with the familiar crisscross pattern, and each bite delivers a satisfying crunch followed by the unmistakable flavor of creamy peanut butter. These gluten-free peanut butter cookies are every bit as delicious as the traditional version, proving that gluten-free baking can produce cookies with incredible texture, flavor, and appearance.
This recipe focuses on creating cookies that are crisp around the edges, crunchy throughout, and packed with peanut butter in every bite. Instead of relying heavily on flour, the dough is built around peanut butter itself, allowing its natural flavor to shine. The result is a cookie that feels rich without being heavy and crisp without becoming dry.
One of the best things about these cookies is how simple they are to prepare. The dough comes together with everyday pantry ingredients, requires very little hands-on time, and bakes into beautiful golden cookies that stay crisp for several days. Whether they are made for an afternoon snack, packed into lunch boxes, shared with family, or served alongside a cup of coffee, they always disappear quickly
Why I Love Making These Cookies at Home
- Whenever I want a dependable cookie recipe that delivers consistent results, this is one of my first choices. The dough is easy to mix, requires no complicated techniques, and produces cookies with an incredible homemade appearance.
- Unlike many gluten-free cookies that can become sandy or crumbly, these have a pleasant crisp texture thanks to the balance of peanut butter, butter, sugars, and gluten-free flour. The peanut butter provides richness while the flour simply gives enough structure to hold everything together.
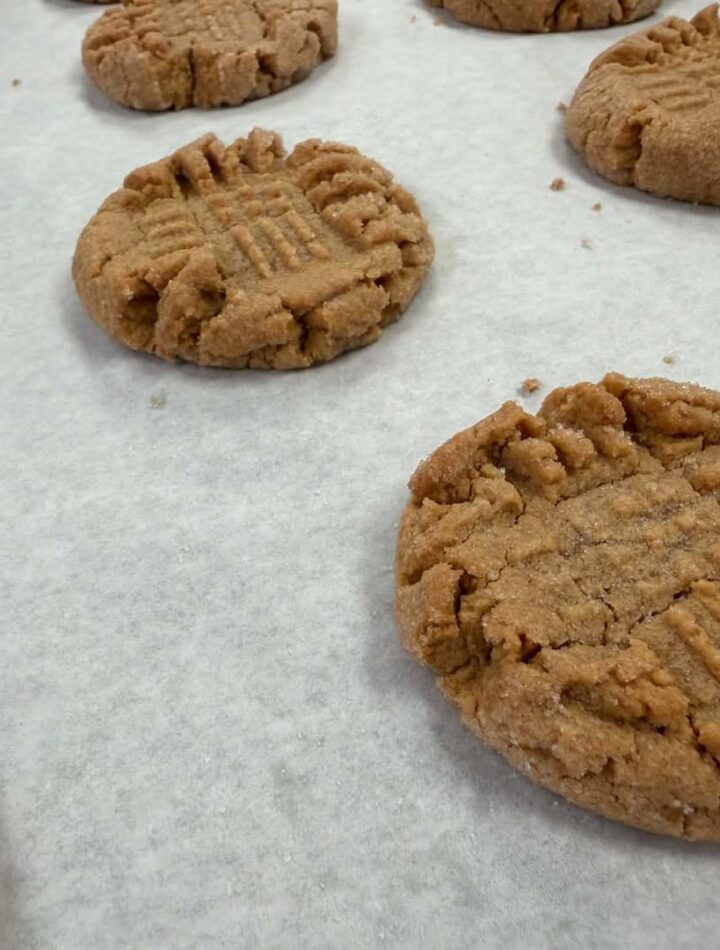
- The classic fork pattern pressed onto each cookie is more than decoration. It helps flatten the dough into an even thickness so every cookie bakes uniformly from edge to center. It also gives these cookies the traditional appearance everyone recognizes immediately.
What Makes These Cookies Different
- The biggest difference between these cookies and many other peanut butter cookie recipes is the generous amount of peanut butter used in the dough. Rather than letting flour dominate, peanut butter becomes the main ingredient.
- Using so much peanut butter creates several benefits:
- Deep roasted peanut flavor.
- Crisp and crunchy texture.
- Beautiful golden color.
- Rich aroma while baking.
- Tender crumb that isn’t dry.
- Because peanut butter naturally contains fat, the cookies develop a wonderfully delicate texture that becomes crisp as they cool.
Choosing the Right Gluten-Free Flour
- A good gluten-free flour blend is one of the most important ingredients in this recipe. It provides structure without overpowering the peanut butter flavor.
- A blend that already contains finely ground rice flour works especially well because it creates a smoother cookie without any gritty texture. If your flour blend does not already include xanthan gum, adding it separately helps bind the dough and prevents the cookies from becoming too fragile.
- Since the flour acts mainly as support rather than the main ingredient, it allows the peanut butter flavor to remain the star of every bite.
The Importance of Using the Right Peanut Butter
- Creamy, no-stir peanut butter works best for this recipe. It has a smooth consistency that blends easily with butter and creates an evenly mixed dough.
- Natural peanut butter that separates into oil and solids can make the dough greasy, difficult to shape, and unpredictable during baking. A stable creamy peanut butter keeps the dough smooth, holds its shape, and produces consistently crunchy cookies.
- Because peanut butter is the dominant flavor, choosing one you already enjoy eating will always produce the best tasting cookies.
Butter Adds Richness
- Butter contributes more than flavor. It softens the dough enough for easy mixing, helps the cookies spread slightly during baking, and creates a crisp finish once cooled.
- Melting the butter together with the peanut butter also makes combining the ingredients much easier and creates an even consistency throughout the dough.
Sweeteners That Work Together
- Using both granulated sugar and light brown sugar creates a balanced cookie.
- Granulated sugar gives sweetness while encouraging crisp edges.
- Brown sugar contributes moisture, color, and a light caramel flavor that pairs naturally with roasted peanuts.
- Together they create cookies that are crunchy without becoming overly hard.
Eggs Help Everything Hold Together
- Eggs provide structure while helping the cookies rise slightly during baking.
- They also smooth out the dough, making it easier to portion and shape. Once baked, they help the cookies maintain their round shape while remaining pleasantly crisp.
Vanilla Makes the Flavor Richer
- Only a small amount of vanilla is needed, yet it makes a noticeable difference. It softens the roasted peanut flavor and adds warmth that makes each bite taste more complete.
- Even though peanut butter remains the dominant flavor, vanilla quietly enhances every ingredient.
Mixing the Dough
- The process begins by gently melting the peanut butter with butter until perfectly smooth.
- Meanwhile, the dry ingredients are mixed thoroughly so every cookie bakes evenly. Brown sugar should be broken apart before mixing because small lumps can remain throughout the dough if ignored.
- Once the warm peanut butter mixture is poured into the dry ingredients, the dough will initially appear thick and uneven. After adding the beaten eggs and vanilla, everything transforms into a smooth, soft cookie dough that is sticky but easy to handle.
- If it feels overly soft, allowing it to rest for several minutes or chilling briefly gives the flour time to absorb excess oil.
Shaping the Cookies
- Uniform cookies bake more evenly, so measuring each portion of dough is helpful.
- Rolling each portion between the palms creates smooth balls before gently flattening them into thick disks.
- Rather than pressing too hard from above, gently shaping the edges with your hands keeps the cookies round and prevents cracking.
- The traditional crosshatch pattern is created using a fork dipped lightly in sugar or water. Pressing once, rotating the fork ninety degrees, and pressing again creates the familiar pattern seen on classic peanut butter cookies.
- Besides adding decoration, these lines help the cookies bake evenly all the way through.
Baking Until Perfectly Crisp
- The cookies bake in a moderately hot oven until lightly golden.
- During the final few minutes, lowering the oven temperature slightly can prevent the bottoms from becoming too dark while allowing the centers to finish baking.
- Although the cookies may still feel soft when removed from the oven, they continue firming as they cool. This cooling period is essential because it transforms them from delicate cookies into wonderfully crunchy treats.
- Allowing them to rest on the baking tray before transferring them to a cooling rack helps preserve their shape.
Serving Suggestions
- These cookies are delicious all on their own, but they are equally enjoyable with a variety of drinks and desserts.
- Serve them alongside cold milk, hot coffee, tea, or hot chocolate. They also make a wonderful addition to cookie platters during holidays or family gatherings.
- They can even be crushed over vanilla ice cream or layered into dessert parfaits for added crunch.
Storage Tips
- Once completely cool, store the cookies in an airtight glass container.
- Keeping moisture away allows them to stay crisp for several days. If stored properly, they remain fresh at room temperature for about five days.
- For longer storage, freeze the cooled cookies inside a freezer-safe container. They thaw beautifully at room temperature whenever a homemade treat is needed.
- The cookie dough can also be frozen after shaping. Simply thaw before baking and continue with the recipe as usual.
Gluten-Free Peanut Butter Cookies
These homemade gluten-free peanut butter cookies are crisp, crunchy, and packed with rich peanut butter flavor in every bite. Made with a generous amount of creamy peanut butter and just enough gluten-free flour for structure, they bake into beautifully golden cookies with the classic crosshatch design. They are easy to prepare, require simple pantry ingredients, and stay crisp for days when stored properly.
24
servings10
minutes18
minutes184
kcal28
minutesIngredients
1½ cups (385 g) smooth, creamy no-stir peanut butter
4 tablespoons (56 g) unsalted butter, chopped
1½ cups (210 g) all-purpose gluten-free flour blend
½ teaspoon xanthan gum (omit if your flour blend already contains it)
1 teaspoon baking soda
¼ teaspoon kosher salt
½ cup (100 g) granulated sugar
½ cup (109 g) packed light brown sugar
2 large eggs (about 100 g out of the shell), beaten and at room temperature
1 teaspoon pure vanilla extract
Extra granulated sugar for dipping the fork or sprinkling over the cookies (optional)
Directions
- Preheat your oven to 350°F (175°C) and line two large baking trays with parchment paper.
- Place the creamy peanut butter and chopped butter in a microwave-safe bowl or small saucepan. Heat gently until melted and smooth, then let the mixture cool for a few minutes.
- In a large mixing bowl, whisk together the gluten-free flour, xanthan gum (if needed), baking soda, salt, and granulated sugar. Add the light brown sugar and break up any lumps until the mixture is evenly combined.
- Pour the melted peanut butter mixture into the dry ingredients and stir until partially combined.
- Add the beaten eggs and vanilla extract. Mix until a thick, soft, and sticky dough forms. If the dough feels too soft or greasy, let it rest for a few minutes or refrigerate it for about 10 minutes.
- Scoop about 2 tablespoons of dough (approximately 1 ounce) for each cookie. Roll each portion into a smooth ball using your hands
- Gently flatten each ball into a disk about ½ inch thick and place them on the prepared baking trays, leaving about 1½ inches of space between each cookie.
- Lightly wet the tines of a fork and, if desired, dip the fork into granulated sugar. Press the fork onto the top of each cookie, then rotate it 90 degrees and press again to create the classic crisscross pattern.
- Bake one tray at a time for 15–18 minutes, or until the cookies are lightly golden. If the bottoms begin to brown too quickly, lower the oven temperature to 325°F (163°C) for the last few minutes of baking.
- Remove the baking tray from the oven and allow the cookies to cool on the tray for 5 minutes before transferring them to a wire rack. They will become crisp and crunchy as they cool completely.
Notes
- Use smooth, creamy no-stir peanut butter for the best texture and flavor. Natural peanut butter that separates into oil and solids can make the dough greasy and crumbly.
- If your gluten-free flour blend already contains xanthan gum, omit the additional xanthan gum listed in the ingredients.
- If the dough feels too soft or sticky after mixing, let it rest for a few minutes or chill it for about 10 minutes before shaping.
- For evenly sized cookies, use a cookie scoop or measure about 2 tablespoons of dough for each cookie.
- Wetting the fork before pressing the cookies helps prevent sticking. Dipping the fork in a little granulated sugar also gives the tops a light sparkle and extra crunch.
- Bake just until the cookies are lightly golden. They will continue to firm up and become crisp as they cool on the baking sheet.
- Allow the cookies to cool completely before storing to maintain their crunchy texture.
- Store the cookies in an airtight container at room temperature for up to 5 days or freeze them for up to 3 months
Nutrition Facts
- Calories: 184kcal
- Fat: 10g
- Saturated Fat: 3g
- Trans Fat: 0.1g
- Polyunsaturated Fat: 2g
- Monounsaturated Fat: 5g
- Cholesterol: 19mg
- Sodium: 152mg
- Potassium: 103mg
- Carbohydrates: 19g
- Fiber: 1g
- Sugar: 10g
- Protein: 4g
- Vitamin A: 78mcg
- Calcium: 14mg
- Iron: 0.4mg