Whenever I need something warm, filling, and ready in minutes, I make this Air Fryer Cheese on Toast. It is one of those recipes that proves simple ingredients can create something incredibly satisfying. With just bread, butter, cheddar cheese, and an optional splash of sauce, you can prepare a crispy, cheesy snack without much effort.
Using an air fryer makes the whole process easier than traditional grilling. Instead of standing nearby to make sure the bread does not burn, I simply prepare the slices, place them into the basket, and let the air fryer do the work. The bread becomes crisp while the cheese melts into a bubbly golden topping.
This recipe works for breakfast, a light lunch, an afternoon snack, or even a quick evening bite. Since it takes less than ten minutes from start to finish, it is perfect for busy days when there is little time to cook.
Why the Air Fryer Works So Well
- The air fryer circulates hot air around the bread, allowing it to toast evenly while melting the cheese at the same time. The butter helps the bread develop a beautiful golden crust, while the cheddar becomes soft, creamy, and lightly browned on top.
- Unlike using a grill, there is less risk of ending up with burnt toast and unmelted cheese. The cooking is more even, giving reliable results with very little attention.
- Another advantage is that the air fryer heats quickly. There is no long waiting time, making this recipe ideal whenever hunger strikes unexpectedly.
Simple Ingredients with Great Flavor
- One of my favorite things about this recipe is that every ingredient has a purpose.
- The sandwich bread creates a sturdy base that becomes crisp on the outside while staying soft inside. Standard sandwich bread works perfectly because it holds the butter and cheese without becoming too heavy.
- Butter adds richness while helping the bread toast evenly. As it melts into the bread during cooking, it creates a delicious buttery flavor and crisp texture.
- Cheddar cheese is the star ingredient. Its naturally rich and slightly sharp flavor melts beautifully, creating a smooth layer that covers the toast from edge to edge. Using freshly grated cheese helps it melt more evenly than pre-shredded varieties.
- For extra flavor, Worcestershire sauce or hot sauce can be added. This step is optional, but a light drizzle brings another layer of taste without overpowering the cheese.
Preparing Everything Before Cooking
- Since this recipe cooks very quickly, I always prepare everything before switching on the air fryer.
- I grate the cheddar cheese first so it is ready to use. Having the cheese prepared ahead of time makes assembling the toast much easier.
- Next, I lay the bread slices on a clean work surface. This gives enough room to spread the butter evenly and add the cheese without making a mess.
- Because the recipe uses only a few ingredients, taking a minute to prepare everything helps the entire process run smoothly.
- Butter the Bread
- The first step is spreading butter over one side of each slice of bread.
- I try to cover the surface evenly from edge to edge. This ensures every bite develops a crisp texture while cooking.
- Even coverage also helps prevent dry spots, giving both slices the same golden finish.
- There is no need for a thick layer. A light, even coating works perfectly.
- Cover with Cheddar Cheese
- Once the bread is buttered, I sprinkle the grated cheddar over the top.
- Rather than piling all the cheese in the center, I spread it evenly across the entire slice. This helps every bite contain melted cheese while allowing the surface to brown evenly.
- The cheese should cover the bread well without falling over the edges too much.
- Freshly grated cheddar creates a soft, creamy texture as it melts and develops small golden spots during cooking.
- Add Extra Flavor
- If I want a slightly stronger flavor, I drizzle a little Worcestershire sauce or hot sauce over the cheese.
- Only a small amount is needed because cheddar already has plenty of flavor.
- The sauce blends into the melting cheese during cooking and adds just enough extra taste without taking away from the classic cheese toast.
- This step is completely optional, making it easy to adjust the recipe according to personal preference.
Air Frying the Cheese Toast
Arrange the Bread Properly
Once the bread is prepared, I carefully place both slices into the air fryer basket.
The cheese side always faces upward, and I make sure the slices are lying flat without overlapping. Leaving enough space around each slice allows the hot air to circulate freely, helping both pieces cook evenly.
- If the slices overlap, one piece may cook more slowly while the other browns too quickly. Keeping them in a single layer produces the best texture.
Cook Until Golden
- The air fryer cooks the toast in only a few minutes.
- During cooking, several things happen at the same time. The butter crisps the bread, while the cheddar gradually melts into a smooth layer. As the cheese continues heating, bubbles begin to appear and the top develops a light golden color.
- Different air fryer models cook slightly differently, so I simply look for melted, bubbling cheese and crisp bread instead of relying only on the clock.
- The finished toast should have:
- Crisp, golden bread
- Fully melted cheese
- Lightly browned bubbles on top
- Soft, creamy center beneath the cheese
These signs show that the toast is ready to serve.
Cooling Before Serving
- As tempting as it is to eat immediately, I let the cheese toast rest for about a minute after removing it from the basket.
- This short cooling time allows the melted cheese to settle slightly, making it easier to slice and eat without the cheese sliding off.
- The toast also becomes a little crispier during this brief rest.
Serving Ideas
- Although delicious on its own, Air Fryer Cheese on Toast fits into many different meals throughout the day.
- For breakfast, it pairs well with fresh fruit or a cup of tea.
- As a quick lunch, two slices provide a satisfying meal that requires very little preparation.
- It also makes an excellent afternoon snack when something warm and comforting is needed.
- During busy evenings, this simple toast can be served as a light meal when there is no time for more complicated cooking.
Tips for the Best Results
- A few simple habits make this recipe even better every time.
- Grate the Cheese Fresh
- Freshly grated cheddar melts smoothly and creates a creamier topping than packaged shredded cheese.
- Spread the Butter Evenly
- Even butter coverage helps every part of the bread brown at the same rate.
- Keep the Cheese on the Bread
- Try to spread the cheese evenly without letting too much fall over the sides. This keeps cleanup easier and prevents burnt cheese inside the basket.
- Avoid Overcrowding
- Leave space around the slices so hot air can circulate properly.
- Watch Near the End
- Since every air fryer is different, checking the toast near the end of cooking helps prevent over-browning.
Why This Recipe Is Worth Making
- This recipe is proof that everyday ingredients can become something comforting with very little work.
- The combination of crispy bread and melted cheddar has been popular for generations because it is simple, satisfying, and full of flavor.
- Using an air fryer makes preparing it even easier. There is less waiting, less monitoring, and consistently good results.
- It is also an excellent recipe for beginners because there are very few steps and very little preparation required.
Easy to Fit Into Any Day
- One reason I return to this recipe often is its flexibility.
- When breakfast needs to be ready quickly, this toast comes together in minutes.
- If lunch needs to be simple, it is filling without requiring lots of ingredients.
- For an afternoon snack, it satisfies hunger while feeling warm and comforting.
Even after a busy day, it provides a quick homemade meal without much cleanup.
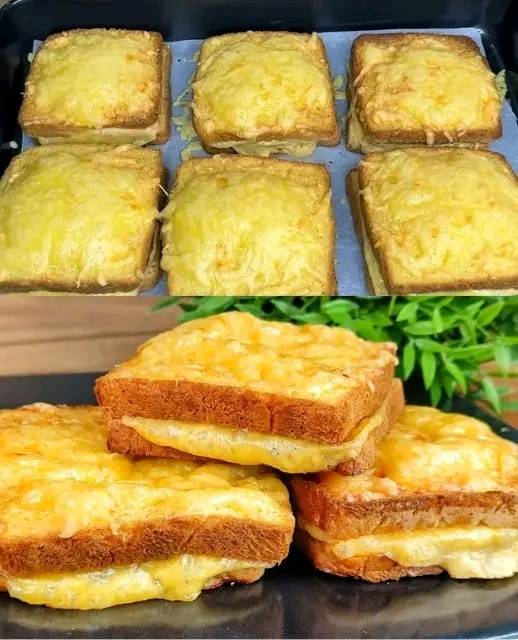
Air Fryer 3-Ingredient Cheese Toast
Air Fryer Cheese on Toast is a quick and comforting snack made with buttered sandwich bread, melted cheddar cheese, and an optional drizzle of Worcestershire sauce or hot sauce. The air fryer creates crisp toast with perfectly melted, lightly golden cheese in just a few minutes.
1
servings2
minutes5
minutes420
kcal7
minutesIngredients
2 slices sandwich bread
1 slice butter
80 g (⅔ cup) cheddar cheese, grated
Worcestershire sauce or hot sauce, to taste
Directions
- Lay the bread slices on a clean surface and spread butter evenly over one side of each slice.
- Sprinkle the grated cheddar cheese evenly across the buttered side.
- If desired, lightly drizzle Worcestershire sauce or hot sauce over the cheese.
- Place the bread into the air fryer basket with the cheese side facing up in a single layer.
- Air fry for 5–6 minutes, or until the cheese is melted, bubbly, and lightly golden while the bread is crisp.
- Carefully remove the toast from the air fryer.
- Let it cool for about 1 minute before serving warm.
Notes
- Freshly grated cheddar melts more smoothly than pre-shredded cheese.
- Do not overlap the bread slices in the air fryer basket.
- Cooking time may vary slightly depending on your air fryer model.
- Use only a small amount of Worcestershire sauce or hot sauce so the cheese remains the main flavor.
Nutrition Facts
- Serving Size: 2 g
- Total number of serves: 1
- Calories: 420kcal
- Fat: 25g
- Saturated Fat: 14g
- Cholesterol: 65mg
- Sodium: 720mg
- Carbohydrates: 28g
- Fiber: 2g
- Sugar: 3g
- Protein: 20g
- Calcium: 450mg