The classic chocolate frosty is a highly celebrated frozen treat that occupies a unique space between standard milkshakes and traditional scoopable soft-serve ice cream. Its legendary status is built entirely on a precise structural balance, which means it should never feel like a heavy, overly rich dessert or a runny, quickly melting chocolate drink. Instead, a genuine copycat frosty must deliver a mild and subtle chocolate flavor, a velvet-like creaminess on the tongue, and a semi-frozen consistency that is sturdy enough to eat with a spoon. Achieving this perfect texture at home requires understanding how dairy fat and temperature interact, preventing large ice crystals from forming while keeping the overall mixture light, airy, and beautifully smooth.
The Crucial Differences Between a Frosty and a Milkshake
Many people mistake this iconic dessert for a standard milkshake, but the two treats are prepared and structured in completely different ways. A typical chocolate milkshake relies on blending pre-made hard ice cream with liquid milk, which often results in a beverage that is easy to sip through a straw but melts rapidly into a sweet liquid. A frosty, on the other hand, is kept in a semi-frozen, suspended state where tiny ice crystals and air bubbles are thoroughly whipped throughout the liquid base. This specific structural difference gives the frosty its signature body, ensuring that it remains thick, cold, and scoopable for a much longer period of time without ever separating or becoming watery.
Why Whole Milk is the Ideal Base for Frozen Treats
When preparing this homemade copycat dessert, selecting the correct dairy liquid is absolutely fundamental to achieving a rich and authentic mouthfeel. Whole milk serves as the primary liquid base for this recipe because it provides an ideal ratio of natural dairy fat to liquid content, which is necessary for a smooth freeze. If you attempt to substitute whole milk with low-fat or skim milk, your frosty will lose its creamy integrity and quickly freeze into hard, unpleasant sheets of ice. The fat present in whole milk acts as a natural barrier against large crystal growth, ensuring the final mixture remains wonderfully soft, scoopable, and satisfyingly thick.
The Essential Role of Heavy Cream in Enhancing Creaminess
To elevate the liquid base and replicate that famous diner-style mouthfeel, incorporating heavy cream is a step you simply cannot skip. Heavy cream significantly increases the overall fat content of the recipe, which is the secret weapon for blocking ice crystal formation during the freezing process. This added fat coats the tongue and gives the frozen treat a luxurious, velvety texture that feels premium and incredibly satisfying. However, balance is incredibly important here, as adding too much heavy cream can cause the mixture to feel heavy, greasy, or taste like frozen butter, which is why sticking to the exact ratio is key.
How Sweetened Condensed Milk Creates a Silky Structure
Sweetened condensed milk is perhaps the most critical ingredient in this entire recipe because it performs multiple tasks simultaneously to ensure success. Because most of its water content has been evaporated, condensed milk introduces highly concentrated milk solids and sugar without adding excess water that would otherwise freeze into hard ice. This thick, sweet liquid lowers the freezing point of your frosty mixture, which prevents it from turning into a solid block of ice in your freezer. Furthermore, it contributes a subtle, caramelized dairy undertone that mimics the unique flavor profile of the commercial version perfectly.
Selecting the Right Cocoa Powder for a Authentic Taste
A common mistake when making chocolate desserts at home is using an overpowering, dark, or bitter chocolate base, which actually ruins the authentic frosty profile. A true copycat frosty relies on a very mild, nostalgic chocolate taste that is pleasant and not overly rich or dark. Using standard, unsweetened cocoa powder provides the perfect level of cocoa flavor while adding a very gentle bitterness that cuts through the sweetness of the condensed milk. By whisking this powder thoroughly into your liquid ingredients, you achieve a light, balanced chocolate color and flavor that appeals to everyone without overwhelming the delicate dairy notes.
While sweetened condensed milk provides a large amount of sweetness, adding a controlled amount of granulated sugar is essential for both flavor and physical structure. In the science of frozen desserts, sugar acts as an incredibly effective antifreeze agent by binding with water molecules and lowering the temperature at which ice forms. This means that granulated sugar keeps the dessert soft and pliable even at sub-zero temperatures, allowing it to maintain its iconic scoopable texture rather than turning rock-hard. Additionally, the granules dissolve completely during the cooking phase, contributing to a stable syrup base that improves the overall viscosity and thickness of the treat.
The Hidden Impact of Vanilla Extract and Salt
Many home cooks overlook vanilla extract and salt when making a chocolate-based dessert, but these two ingredients are secret weapons for flavor depth. Pure vanilla extract adds a warm, aromatic back-note that works behind the scenes to soften the sharp edges of the cocoa powder and round out the dairy. This subtle vanilla hint is actually a signature characteristic of the drive-thru original, giving it that familiar, comforting taste profile. Meanwhile, a tiny pinch of fine sea salt plays a crucial chemical role by heightening the natural sweetness of the sugars and cutting through the heavy fats, ensuring the flavor never tastes flat or cloying.
Optional Stabilizers for a True Commercial Consistency
If you want to take your homemade dessert to a truly professional level, utilizing minor stabilizers like cornstarch or xanthan gum can make a massive difference. Cornstarch acts as an excellent thickening agent when gently heated with dairy, absorbing excess moisture and creating a smooth, pudding-like base that holds its shape beautifully. Xanthan gum, which is widely used in commercial ice creams, provides incredible elasticity and prevents water molecules from separating and forming ice crystals during storage. Adding a small splash of chocolate syrup can also boost the moisture level and deepen the color, giving the final product a glossy finish.
Essential Kitchen Tools for Making a Perfect Frosty
Having the right kitchen equipment on hand will drastically improve your chances of achieving that flawless, airy texture without any unwanted lumps. A high-powered blender is absolutely essential for the final phase because its rapidly spinning blades force air into the semi-frozen base, creating the signature light texture. A fine-mesh whisk is equally important during the initial mixing stages to ensure that dry powders dissolve completely into the liquids without leaving tiny, bitter pockets of cocoa. Finally, using a wide, shallow container for the freezing phase allows the cold air to penetrate the mixture evenly, speeding up the freezing process significantly.
Step 1: The Importance of a Thorough Dry Mix
The very first step in crafting this legendary frozen treat involves thoroughly combining your dry ingredients, including the cocoa powder, granulated sugar, salt, and cornstarch. Cocoa powder is naturally hydrophobic, meaning it tends to repel water and form stubborn, dry clumps if it comes into direct contact with liquids too quickly. By whisking the cocoa powder with the coarse granulated sugar first, you physically separate the cocoa particles, allowing them to disperse evenly later on. Taking an extra minute to ensure this dry mixture is completely uniform sets the foundation for a perfectly smooth, velvety texture without any gritty residue.
Step 2: Creating a Smooth and Lump-Free Slurry
Once your dry ingredients are perfectly combined in your saucepan, it is time to introduce a small fraction of your whole milk to create a concentrated slurry. Pouring all the liquid into the dry powder at once causes the cocoa to float to the top, making it incredibly difficult to blend smoothly. Instead, trickling in just a few tablespoons of milk while whisking vigorously creates a thick, uniform paste that breaks down any remaining micro-clumps. This step ensures that every single grain of cocoa is thoroughly hydrated and integrated, which guarantees a consistent chocolate flavor throughout the entire batch.
Step 3: The Gentle Heating and Activation Phase
With the smooth chocolate slurry established, you can now pour in the rest of your primary liquids and place the saucepan over a reliable medium heat source. It is absolutely vital that you stir the liquid constantly with a spatula and never let the mixture reach a aggressive, rolling boil, which could curdle the delicate dairy proteins. This heating phase serves to completely dissolve the granulated sugar crystals and fully activate the thickening properties of the cornstarch. You will know this phase is successful when the liquid transforms into a smooth, glossy coat that clings gently to the back of your spoon.
Step 4: Integrating the Cold Dairy and Aromatics
After removing the thickened chocolate base from the stove, you must immediately stir in the remaining cold ingredients, including the heavy cream, sweetened condensed milk, and vanilla extract. Adding these rich dairy components after the cooking phase prevents their delicate fats and volatile flavor compounds from breaking down due to high heat. Whisking everything together at this stage creates a beautifully uniform, pale-chocolate liquid that smells intensely of warm vanilla and sweet cream. For an absolutely flawless, restaurant-quality result, you can pass this liquid through a fine-mesh strainer to catch any microscopic particles.
Step 5: The Essential Cooling and Maturation Phase
Skipping the refrigeration process is one of the main reasons home cooks end up with a runny, unappealing dessert, so patience is required during this stage. The warm chocolate mixture must be placed in the refrigerator for at least two to four hours until it is completely chilled throughout. This cooling phase allows the dairy fats to firm up and mature, which significantly improves how well the liquid will trap air during the subsequent blending process. Attempting to freeze a warm or room-temperature liquid results in large, coarse ice crystals that completely destroy the desired velvet-like consistency.
Step 6: Managing the Controlled Manual Freezing Process
Once the chocolate liquid is thoroughly chilled, transfer it into a wide, shallow metal or glass container and place it flat in your freezer. Every twenty to thirty minutes, you must open the freezer and use a sturdy spatula to vigorously scrape the frozen edges into the center. This manual intervention replicates the constant motion of a commercial ice cream churn, breaking up ice sheets before they can grow too large. Repeating this scraping and stirring process for over an hour keeps the texture remarkably fine, ensuring that the final dessert remains soft and pleasant to eat.
Step 7: Identifying the Ideal Semi-Frozen Consistency
Recognizing the exact moment to pull your mixture from the freezer requires paying close attention to its changing physical state and density. You are not trying to create a solid, frozen block of chocolate ice, nor do you want a watery liquid with a few floating ice pieces. The ideal target is a thick, scoopable slush that holds its shape when mounded but still yields easily to a spoon. It should look dull rather than shiny, indicating that thousands of microscopic ice crystals have successfully formed uniformly throughout the sweet dairy base.
Step 8: The Final High-Powered Blending Stage
When the perfect semi-frozen state is reached, quickly scrape the mixture out of the container and drop it directly into your high-speed blender jar. Secure the lid tightly and process the mixture in short, powerful pulses to break up the slush and incorporate a massive amount of microscopic air bubbles. This specific blending action turns the icy slush into a light, fluffy, and incredibly creamy dessert that mirrors the authentic drive-thru experience. If the mixture appears too thick to spin, add a tablespoon of milk; if it seems thin, return it to the freezer briefly.
Step 9: Setting the Ultimate Spoonable Body
For the absolute best presentation and texturing, give your freshly blended frosty a quick, final rest in the freezer for about thirty to forty-five minutes. The intense friction from the blender blades generates a small amount of heat, which can soften the outer edges of the mixture during processing. Placing the blended dessert back into a cold environment allows those whipped fats and air pockets to firm up and lock into place. This final setting step ensures that your treat has that signature, heavy body that sits perfectly on a spoon without dripping.
Advanced Texture Science Behind Frozen Desserts
The mesmerizing texture of a perfect frosty is governed entirely by the delicate scientific relationship between fats, sugars, air, and ice crystal growth. Dairy fat from the heavy cream and whole milk coats the air bubbles introduced during blending, preventing them from collapsing and keeping the dessert light. At the same time, the high concentration of natural sugars acts as a physical barrier, getting in the way of freezing water molecules to keep the crystals incredibly small. When these elements are perfectly balanced through timed temperature drops and mechanical agitation, the result is a smooth, stable emulsion.
Exploring Simple and Tasty Flavor Variations
Once you have mastered the fundamental base of this classic dessert, you can easily customize the flavor profile to suit your personal cravings. For those who prefer an intensely dark and robust chocolate experience, folding in a small amount of melted high-quality dark chocolate during the liquid phase works beautifully. If you want a lighter, more nostalgic dairy flavor, simply reduce the cocoa powder slightly and double the amount of pure vanilla extract. Another fantastic variation is adding a few tablespoons of malted milk powder to the dry mix, which injects a spectacular, old-school diner flavor.
Troubleshooting Common Homemade Frosty Issues
If your final dessert turns out unpleasantly icy, it is usually because the fat content was too low or the mixture was not stirred enough during freezing. You can easily fix an icy texture by letting it thaw slightly, adding a splash of heavy cream, and running it through the blender again. If the mixture is too thin and runny, it simply means it needs more time in the coldest part of your freezer before the final blend. A grainy texture is almost always caused by poorly dissolved cocoa powder, which can be avoided in future batches by utilizing the stove-top heating method.
Proper Storage and Whipping Techniques for Leftovers
If you happen to have any leftover frosty, store it immediately in an airtight container with a piece of plastic wrap pressed directly onto the surface. Because home freezers are kept at incredibly low temperatures, the dessert will inevitably freeze solid if left untouched for several hours or days. To enjoy it again, remove the container from the freezer and let it sit on your kitchen counter for roughly fifteen minutes to soften. Once it reaches a workable temperature, scoop it back into your blender and process it briefly to restore that fluffy, airy consistency.
Expert Tips for Achieving Professional Results
To guarantee an absolute masterpiece on your very first try, consider chilling your blender jar and serving glasses in the freezer before you begin. Working with ice-cold equipment prevents the friction of the blender blades from melting the delicate, semi-frozen structure of your frosty during the final whip. Furthermore, always rely on high-quality, unsweetened cocoa powder rather than sugary instant chocolate drink mixes, which introduce artificial fillers and disrupt the sugar balance. Keep your flavor additions balanced and focused on the quality of the dairy, as simplicity is the true secret behind this timeless frozen favorite.
The Fast Alternative and Final Takeaway
For those days when you are short on time and cannot wait for the traditional freezing process, a quick shortcut version can be utilized. This method involves blending high-quality vanilla bean ice cream with whole milk, cocoa powder, and a splash of chocolate syrup until smooth, then freezing it for just twenty minutes. While this fast alternative satisfies a sudden craving, it lacks the precise density and unique air-incorporation of the heated and manually scraped authentic method. Ultimately, taking your time with the multi-step process rewards you with a genuinely perfect, spoonable chocolate frosty that tastes exactly like the original.
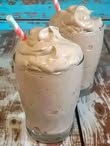
Classic Homemade Chocolate Frosty
A thick, velvety, and perfectly spoonable copycat version of the famous fast-food frozen treat. This recipe utilizes a precisely balanced dairy base to achieve a smooth, semi-frozen consistency with a mild, nostalgic chocolate flavor without the need for an ice cream maker.
Preparation & Cooking Duration
- Prep Time: 15 minutes
- Chilling Time: 3 hours
- Freezing Time: 1 hour 30 minutes
- Total Time: 5 hours 15 minutes
Ingredients
- 2 cups whole milk
- 1/2 cup heavy cream
- 1/2 cup sweetened condensed milk
- 1/3 cup unsweetened cocoa powder
- 1/2 cup granulated sugar
- 1 teaspoon pure vanilla extract
- 1/8 teaspoon fine salt
- Optional Thickener: 1 teaspoon cornstarch
- Optional Stabilizer: 1/4 teaspoon xanthan gum
- Optional Flavor Boost: 2 tablespoons chocolate syrup
Step-by-Step Instructions
1. Combine the Dry Ingredients In a medium saucepan, thoroughly whisk together the unsweetened cocoa powder, granulated sugar, fine salt, and cornstarch (if using) until the mixture is uniform and completely free of large clumps.
2. Form the Starting Paste Pour a few tablespoons of the whole milk into the dry mixture. Whisk vigorously to create a smooth, thick paste, ensuring no dry pockets of cocoa powder remain at the bottom of the pan.
3. Heat the Liquid Base Gradually pour in the remaining whole milk while whisking constantly. Place the saucepan over medium heat and cook, stirring continuously, for 3 to 5 minutes until the sugar dissolves completely and the liquid thickens slightly. Do not let it boil. Remove from heat.
4. Introduce the Cold Dairy Immediately whisk in the heavy cream, sweetened condensed milk, pure vanilla extract, and optional chocolate syrup until fully integrated. For maximum smoothness, pour the mixture through a fine-mesh strainer into a shallow container.
5. Chill Thoroughly Cover the container and place it in the refrigerator for 2 to 4 hours, or until the liquid chocolate base is completely cold.
6. Freeze and Scrape Transfer the chilled mixture into a shallow metal baking pan and place it flat in the freezer. Every 20 to 30 minutes, open the freezer and use a sturdy spatula to vigorously scrape the frozen edges into the center, breaking up ice crystals. Repeat this for 1 to 1.5 hours until it reaches a thick slush consistency.
7. Final Aeration Blend Transfer the semi-frozen slush directly into a high-powered blender. Process on high speed in short bursts until the mixture becomes completely smooth, thick, and beautifully aerated.
8. Final Rest and Serve Pour the blended mixture into chilled glasses. For a firmer, authentic spoonable body, place the glasses in the freezer for an additional 30 minutes before serving with a spoon.
Nutritional Information
Serving Size: 1 cup (Recipe makes approximately 4 servings)
- Calories: 340 kcal
- Total Fat: 16g
- Saturated Fat: 10g
- Cholesterol: 55mg
- Sodium: 140mg
- Total Carbohydrates: 44g
- Dietary Fiber: 1.5g
- Sugars: 41g
- Protein: 6g
Recipe Production Notes
- Ice Crystal Prevention: If the mixture accidentally freezes completely solid because it was left in the freezer too long, simply let it sit on the counter for 10 to 15 minutes to soften, then blend it with an extra tablespoon of whole milk to restore the original texture.
- Equipment Tip: Always freeze your blender jar and serving glasses for 15 minutes before the final step. This prevents the cold frosty from melting prematurely when it touches the equipment.
- Dairy Substitutions: Avoid using skim milk, almond milk, or oat milk in this specific recipe. The lower fat and higher water contents in plant-based milks will cause the frosty to become unpleasantly icy and thin.