Making your own bakery-style English muffins at home is an incredibly rewarding kitchen project that yields far superior results than any store-bought alternative. These classic stovetop breakfast breads are famous for their incredibly soft, airy interior, beautifully chewy crust, and the legendary air pockets that catch melted butter perfectly. Unlike traditional oven-baked rolls, these griddle-cooked gems develop a distinct texture by cooking slowly on a hot surface, resulting in a delightfully crisp exterior while keeping the inside beautifully tender, light, and wonderfully moist.
The Advantages of Using a Thermomix
Utilizing your Thermomix to prepare this yeast dough completely transforms and simplifies the entire bread-making process by removing all the tedious guesswork. The machine expertly handles precision temperature control, swift ingredient mixing, and powerful kneading to develop the ideal gluten structure without wearing out your arms. By automating these technical stages, you can consistently achieve the perfect level of hydration, an even rise, and that highly sought-after soft texture with absolutely minimal physical effort or culinary stress in your home kitchen.
Why Stovetop Baking Creates Superior Texture
Traditional English muffins are uniquely characterized by the fact that they are cooked on a hot flat surface rather than baked in a dry oven. This direct contact cooking method allows the dough to expand outward and upward rapidly, trapping moisture inside while forming a thin, crisp crust on the bottom and top. The slow, controlled heat of a griddle or cast-iron skillet ensures that the interior of the dough cooks through completely, remaining incredibly tender and preventing the bread from drying out.
How Liquid Temperature Affects Yeast Activation
Proper yeast activation is absolutely critical to achieving a light and airy muffin structure with plenty of interior air pockets. Using your smart kitchen appliance allows you to heat the milk to the exact optimal temperature of thirty-seven degrees Celsius, which wakes up the yeast perfectly without damaging it. If the liquid is too cold, the fermentation process will be sluggish and slow, whereas excessively hot liquid will instantly kill the yeast cells and leave you with dense, heavy, and flat dough rounds.
The Role of Warm Milk in Yeast Doughs
The choice of liquid in your bread dough plays a massive role in determining the final softness, flavor, and crumb structure of your muffins. This recipe utilizes full-fat milk as the primary liquid base, which provides essential richness, natural sugars, and dairy proteins that contribute to a tender crumb. The fat content in whole milk coats the flour proteins gently, preventing the gluten from becoming too tough and ensuring that each bite of your toasted muffin remains amazingly soft.
Why Fresh Butter and Eggs Make a Difference
Incorporating real butter and a fresh egg into your yeast mixture elevates these homemade griddle breads from basic sandwich rolls to rich, luxurious breakfast treats. Butter adds a wonderful depth of flavor and tenderizes the dough by shortening the gluten strands, which helps create a melt-in-your-mouth bite. The egg provides structural stability, natural emulsifiers, and a beautiful golden hue, ensuring that the dough rises evenly on the griddle and maintains its pillowy shape when handled.
Selecting the Perfect Flour for the Best Crumb
Choosing the right type of flour is a crucial step that directly impacts the overall chewiness and density of your finished griddle cakes. This recipe calls for standard all-purpose flour, which provides a moderate protein level that is ideal for producing a soft, tender interior with a delicate bite. If you prefer a much chewier, artisanal-style muffin, you can easily substitute bread flour, but all-purpose flour remains the ultimate choice for achieving that traditional, pillowy, and classic supermarket-style soft texture.
The Essential Science of Salt and Sugar
Salt and sugar are not just added to this bread dough for flavor enhancement; they play vital scientific roles in the fermentation and structure-building process. A single tablespoon of white sugar provides the necessary food for the yeast to consume, which speeds up fermentation and produces the carbon dioxide bubbles needed for a great rise. Meanwhile, fine sea salt controls the yeast activity so it does not ferment too quickly, while simultaneously strengthening the gluten network to trap those precious air bubbles.
The Surprising Purpose of Semolina and Cornmeal
Dusting your proofed dough rounds with fine semolina flour or coarse cornmeal is a classic step that serves both a functional and cosmetic purpose. The gritty coating acts as a natural barrier that prevents the soft, sticky dough from sticking to your rising sheets and your hot cooking surface. Additionally, it gives the exterior of the muffins that iconic, rustic bakery appearance and provides a delightful, crunchy texture that contrasts beautifully with the incredibly soft and airy interior crumb.
Preparing Your Appliance and Workspace for Success
Before you begin combining ingredients, it is highly recommended to set up an organized and clean workspace to make the cooking process smooth and enjoyable. Make sure your appliance bowl is thoroughly cleaned, free of grease, and completely dry so that the flour does not stick to the sides. Using the integrated digital scale of your machine ensures highly accurate measurements of both dry and liquid ingredients, which is the ultimate key to achieving consistent bread-baking success every time.
Activating the Yeast with Precision Warmth
The very first step of this recipe involves warming your liquid and sugar together to create the ultimate welcoming environment for your yeast cells. By running the machine on low speed for three minutes at a precise temperature, you create a perfectly uniform warm liquid base. Once you add the yeast and let it rest quietly for five minutes, you should observe a light, frothy foam developing on the surface, which indicates that the yeast is active, healthy, and ready to rise.
Emulsifying the Wet Ingredients and Fats
After your yeast has fully activated and become nicely frothy, it is time to introduce the rich, softened butter and the large egg into the warm mixture. Mixing these ingredients together at a moderate speed for just a few seconds ensures that the egg and fat are completely emulsified into the liquid. This brief step prevents any streaks of egg white or unmixed butter clumps from forming in your final dough, which guarantees an incredibly consistent texture throughout the entire batch.
Adding Dry Ingredients and the Kneading Phase
Once the wet base is completely smooth, you will add the measured flour and salt before initiating the powerful built-in kneading function of your appliance. After a quick initial stir to combine the elements into a shaggy mass, the machine will work the dough vigorously for six minutes to develop the gluten. This intensive kneading process transforms the rough mixture into a highly elastic, smooth, and slightly tacky dough that is fully capable of holding shape and rising beautifully.
Managing the Critical First Bulk Rise
After the kneading phase is complete, the dough must undergo its first bulk fermentation, which is where the complex, yeasty flavors and crucial air pockets develop. You can leave the dough directly inside the machine bowl or transfer it to a lightly oiled glass bowl, covering it tightly to prevent a dry skin from forming. Allowing the dough to rest in a warm, draft-free spot for an hour will give the yeast ample time to produce carbon dioxide and double the dough size.
Gentle Handling Techniques for Delicate Yeast Dough
When the bulk fermentation is complete, you must handle the expanded dough with extreme gentleness to avoid crushing the delicate pockets of air inside. Instead of aggressively punching the dough down like standard sandwich bread, you should softly tip it onto a lightly floured work surface. Using a gentle hand preservation technique ensures that the natural air bubbles remain trapped within the gluten structure, which is the absolute secret to achieving those legendary deep nooks and crannies.
Rolling and Cutting the Rounds for Uniformity
To shape your muffins, gently roll the soft dough out to an even thickness of about one to one and a half centimeters using a light rolling pin. It is critical not to roll the dough too thin, or your finished muffins will be flat, nor too thick, or they will remain raw and gooey in the center during cooking. When cutting out the rounds with a metal cutter, press straight down firmly without twisting, as twisting seals the edges and prevents an even rise.
Coating the Dough with Gritty Semolina
Once your round shapes are perfectly cut, prepare a clean baking sheet by dusting it generously with a layer of fine semolina or yellow cornmeal. Place each dough round carefully onto the prepared tray, then sprinkle another light dusting of the gritty flour directly over the tops of the muffins. This double-sided coating ensures that the exterior remains dry, non-sticky, and ready for the griddle, while imparting that classic, professional bakery texture that everyone loves to feel.
Why the Second Rise is Absolutely Essential
Many home bakers make the mistake of rushing straight to the cooking stage, but allowing the shaped dough to undergo a second proof is absolutely vital for success. Covering the muffins loosely with a clean tea towel and letting them rest for forty-five minutes allows the gluten to relax and the yeast to puff up the dough once more. This final rest creates an incredibly light, airy structure that ensures your griddle cakes cook up high, fluffy, and tender rather than dense and heavy.
Preparing Your Cooking Surface for Low Heat
Cooking these traditional breakfast breads requires a heavy-bottomed skillet, a cast-iron frying pan, or a reliable electric griddle that distributes heat perfectly across the surface. It is absolutely essential to preheat your dry pan over very low heat for several minutes before you even think about adding the delicate dough rounds. Cooking on low heat is the key to success because it allows the interior of the muffin to bake fully without burning the semolina-crusted exterior to a crisp.
The Art of Griddling and Flipping Muffins
Once your cooking surface is gently warmed, lightly grease it with a tiny amount of butter or oil and carefully place your puffed dough rounds inside, leaving ample space between them. Cook the first side slowly for about six to seven minutes without moving them, allowing a beautiful golden-brown crust to form. Carefully slide a thin spatula underneath and flip them over in one gentle motion, making sure not to press down on them, and cook the other side for another six minutes.
How to Verify the Internal Doneness
Because these breads are cooked on a stovetop, checking for internal doneness is crucial to ensure you do not bite into raw, gummy dough. You can perform a classic tap test by gently tapping the top of a cooked muffin; it should sound completely hollow if it is fully baked through. Alternatively, you can insert an instant-read kitchen thermometer into the center of a test muffin, aiming for an internal temperature reading of approximately ninety-three to ninety-six degrees Celsius.
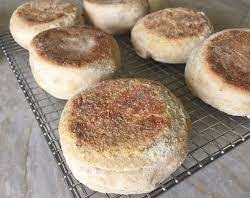
Proper Cooling Techniques on a Wire Rack
Once your golden-brown griddle breads are finished cooking, transfer them immediately onto a wire cooling rack rather than stacking them on top of one another. Allowing them to cool in a single layer lets steam escape freely from all sides of the bread, preventing the bottoms from becoming soggy and wet. Letting the muffins cool completely to room temperature is essential because the interior crumb is still setting, and cutting them warm can ruin the soft texture.
The Essential Fork Splitting Technique
To truly appreciate the incredible texture of your homemade breakfast breads, you must absolutely banish kitchen knives when it is time to open them up. Instead, insert the tines of a metal dinner fork all the way around the middle circumference of the muffin and gently pry the two halves apart. This traditional fork-splitting method preserves the beautiful, rough, and craggy interior surface, creating the perfect landscape of nooks and crannies to trap melted butter, honey, or jam.
Smart Storage Methods for Long-Lasting Freshness
If you happen to have leftover muffins, storing them correctly will ensure they remain incredibly fresh, soft, and delicious for days to come. Keep them in an airtight container or a zip-top plastic bag at room temperature for up to two days, or store them in the refrigerator for up to five days. For long-term storage, you can slice the cooled muffins in half, wrap them tightly in plastic wrap, and freeze them for up to two months.
The Best Reheating Methods for Crispy Edges
When you are ready to enjoy your stored breakfast breads, proper reheating is the key to restoring that fresh-from-the-griddle taste and texture. Popping a fork-split muffin directly into a standard toaster is the easiest and most effective method for creating wonderfully crispy, golden-brown edges while keeping the inside warm and soft. You can also toast them split-side down in a hot skillet with a little melted butter for a truly decadent, rich, and delicious breakfast treat.
Troubleshooting Common Yeast Baking Mistakes
If your muffins turn out a bit dense or do not rise as high as expected, a few simple adjustments can easily solve these common issues. Dense muffins are usually the result of rushing the proofing stages or using expired yeast, so always ensure your rising times are fully met in a warm spot. If the dough seems far too sticky during the mixing phase, do not hesitate to add extra flour one tablespoon at a time until it is manageable.
Creative Flavor Variations to Try Next
Once you have mastered the classic version of this recipe, you can easily customize the dough with various delicious flavor additions to suit your personal tastes. Consider mixing in fresh herbs like chopped rosemary, thyme, or a dash of garlic powder during the final kneading stage for a savory twist. You can also replace a portion of the white flour with whole wheat flour or add a handful of grated sharp cheddar cheese for a wonderful, savory cheese muffin.
Soft & Fluffy Thermomix English Muffins
Description
Create classic, bakery-quality English muffins right on your stovetop using the power and precision of your Thermomix. These warm, griddled breads feature a beautifully soft, pillowy interior packed with perfect butter-catching air pockets, finished with a rustic and crunchy semolina coating.
Duration
- Preparation Time: 20 minutes
- Rising/Proofing Time: 2 hours 15 minutes
- Cooking Time: 15 minutes
- Total Time: 2 hours 50 minutes
Ingredients
| Ingredient | Quantity | Purpose / Presentation |
| Whole Milk | 250ml | Liquid base for richness and soft crumb |
| Granulated Sugar | 1 tbsp (12g) | Sweetener to feed yeast and aid browning |
| Yeast (Active Dry or Instant) | 2 tsp | Leavening agent for airy rise |
| Unsalted Butter | 20g | Softened, to tenderize dough |
| Large Egg | 1 unit | At room temperature, for structure |
| All-Purpose Flour | 400g | Main flour base |
| Fine Salt | 1 tsp | To regulate rise and enhance taste |
| Semolina or Cornmeal | For dusting | Outer coating to prevent sticking |
Step-by-Step Instructions
1. Yeast Activation
- Pour the whole milk and granulated sugar into the clean Thermomix bowl.
- Heat for 3 minutes / 37°C / Speed 1.
- Add the yeast to the warmed milk mixture and let it stand undisturbed for 5 minutes until light foam bubbles on the surface.
2. Emulsify Wet Ingredients
- Add the softened unsalted butter and the room-temperature egg directly to the yeast mixture.
- Combine for 15 seconds / Speed 4 until fully emulsified without streaks.
3. Mix and Knead Dough
- Add the all-purpose flour and fine salt into the bowl.
- Mix for 15 seconds / Speed 5 to bring the ingredients into a shaggy dough.
- Activate Dough Mode (Kneading) and knead for 6 minutes. The dough should finish smooth, elastic, and slightly tacky.
4. First Rise (Bulk Fermentation)
- Transfer the dough into a lightly greased mixing bowl and cover it securely.
- Leave to rise in a warm, draft-free spot for 60 to 90 minutes until it doubles in size.
5. Shaping and Coating
- Gently tip the risen dough onto a lightly floured surface.
- Carefully roll the dough out to an even thickness of $1\text{ to }1.5\text{ cm}$.
- Using a round biscuit cutter, press straight down firmly without twisting to cut out the muffin rounds. Gather scraps gently to re-roll once.
- Dust a baking sheet generously with semolina or cornmeal. Place the dough rounds onto the sheet and sprinkle the tops with more semolina.
6. Second Rise
- Cover the prepared rounds loosely with a clean cloth.
- Allow them to rest and proof for 30 to 45 minutes until they look slightly puffed and light.
7. Stovetop Cooking
- Preheat a heavy skillet or griddle over low heat. Lightly grease with a small amount of butter or oil.
- Gently transfer the muffins to the skillet, leaving space between them.
- Cook the first side for 5 to 7 minutes until deep golden brown.
- Flip carefully with a spatula and cook the second side for another 5 to 7 minutes.
- Transfer the cooked muffins to a wire rack to cool completely before splitting.
Nutritional Information
Serving size: 1 muffin (based on a yield of 8 servings)
- Calories: 225 kcal
- Carbohydrates: 40 g
- Protein: 6.5 g
- Fat: 4 g
- Sodium: 295 mg