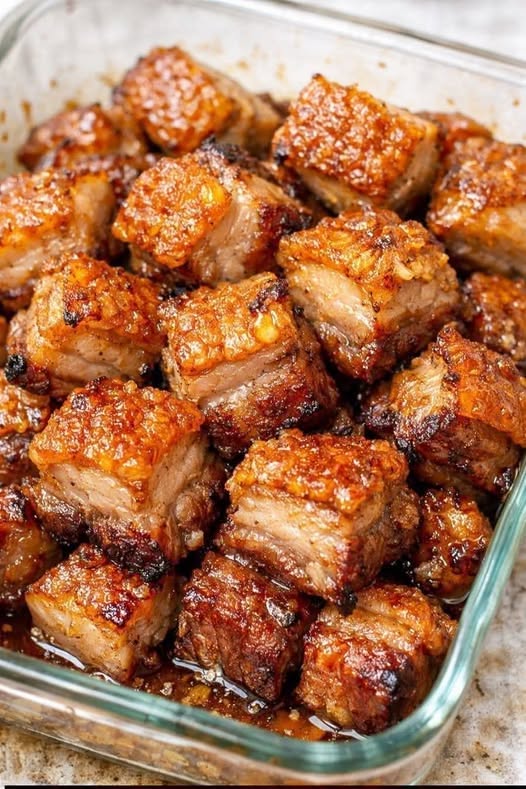
Crispy Air Fryer Pork Belly is one of those unforgettable dishes that instantly captures attention the moment it arrives at the table. The golden, crackling skin, the layers of juicy meat, and the rich, buttery fat create a combination of textures and flavors that few other cuts of meat can match. For generations, pork belly has been treasured in kitchens around the world because of its ability to transform from a relatively simple piece of meat into a spectacular meal when cooked properly. Whether enjoyed as the centerpiece of a family dinner, served in slices alongside vegetables, added to rice bowls, or presented as a special occasion dish, pork belly has earned a reputation for being both comforting and luxurious.
Traditionally, achieving perfectly crispy pork belly required a lengthy roasting process in the oven. Home cooks often spent hours carefully monitoring temperatures, adjusting cooking times, and hoping that the skin would become crisp without overcooking the meat. The air fryer has completely changed this process. Thanks to its powerful circulation of hot air, it can produce remarkably crispy crackling while keeping the meat underneath tender and juicy. The result is a dish that rivals restaurant-quality pork belly but requires less time and significantly less effort.
The beauty of pork belly lies in its structure. It consists of alternating layers of meat and fat topped with a thick layer of skin. During cooking, the fat slowly renders, basting the meat naturally from within and creating exceptional tenderness. At the same time, the skin dries and crisps into a crackling layer that provides a satisfying crunch with every bite. This contrast between crispy skin and succulent meat is what makes pork belly such a beloved dish across many cultures.
Another reason this recipe is so popular is its versatility. The finished pork belly can be served in countless ways. It can be sliced thick and served as a main course, diced into cubes for appetizers, layered into sandwiches, wrapped in flatbreads, served over noodles, or paired with fresh salads. The rich flavor of the pork complements both simple side dishes and more elaborate accompaniments. From roasted vegetables and mashed potatoes to steamed rice and stir-fried greens, pork belly works beautifully in a wide variety of meals.
The secret to exceptional crispy pork belly starts long before the cooking process begins. Choosing a quality piece of pork belly is essential. Look for a slab with even layers of meat and fat. The skin should be smooth, intact, and free from excessive moisture. Fresh pork belly with firm flesh and a balanced ratio of fat to meat typically produces the best results. Although highly marbled cuts may appear fatty, much of that fat renders during cooking, creating the rich texture that pork belly is known for.
Preparing the skin correctly is perhaps the most important step. Moisture is the greatest enemy of crispy crackling. The drier the skin, the better the final result. Many experienced cooks leave the pork belly uncovered in the refrigerator overnight. This allows the skin to dry thoroughly, resulting in dramatically improved crispiness. While this step is optional, it can make a noticeable difference in the finished dish.
Why This Cooking Method Works
- One of the biggest advantages of this method is that it removes several lengthy preparation steps without sacrificing quality. Instead of leaving the pork uncovered in the refrigerator overnight, moisture is drawn from the skin using a layer of fine salt during the first stage of cooking.
- The pork begins cooking slowly at a low temperature. This allows the fat to gradually render while keeping the meat tender. Once the salt crust is removed, the temperature is increased to finish roasting. The higher heat transforms the dried skin into crisp crackling while giving the edges of the pork a rich golden color.
- The combination of gentle cooking followed by high heat produces excellent texture throughout the entire piece of meat.
Choosing the Best Pork Belly
- The quality of the pork belly plays an important role in the finished dish. Look for a boneless piece with the skin still attached. A cut that has even thickness from one end to the other cooks more evenly and produces consistent crackling across the surface.
- A balanced ratio of meat and fat is also important. Too much fat can make the finished slices feel overly rich, while too little fat reduces the tenderness that makes pork belly so enjoyable. A center-cut piece usually offers the best balance and cooks evenly.
- Before seasoning, check that the pork fits comfortably inside your air fryer basket. Good airflow around the meat helps the crackling develop evenly.
Preparing the Skin
- The skin deserves the most attention because it determines whether the crackling becomes light and crisp.
- Start by making many small holes across the rind. A meat tenderizer works well, but a metal skewer also does the job. The holes should only go through the skin and into the fat layer, not into the meat beneath.
- These tiny openings allow rendered fat to escape during cooking. As the fat reaches the surface, it helps fry the skin naturally, creating the crisp texture that makes this dish special.
- Dry skin is equally important. Any remaining moisture slows browning and prevents the crackling from puffing properly. Pat the rind thoroughly with paper towels before continuing.
Seasoning the Meat
- The seasoning is intentionally simple so the flavor of the pork remains the highlight. A mixture of fine salt, sugar, garlic powder, and Chinese five spice creates a balanced combination of savory, slightly sweet, and aromatic flavors.
- Only the meat side receives the seasoning. Keeping the rind free from spices allows it to crisp without burning during the final roasting stage.
- If preferred, the pork belly can remain whole or be cut into two equal pieces. Smaller portions expose more edges to the seasoning and create extra caramelized surfaces during cooking.
- Rub the seasoning generously over every exposed part of the meat, making sure it reaches the sides as well. Press the mixture gently into the surface so it adheres evenly.
The Salt Bake
- Once the meat is seasoned, turn the pork skin-side up.
- Place it on a large sheet of foil and fold the edges upward to create a shallow tray around the pork. This simple barrier keeps the salt in place during the first stage of cooking and makes cleanup easier afterward.
- Brush the skin with white vinegar before covering it completely with a thick, even layer of fine salt. The vinegar lightly moistens the surface so the salt adheres well and begins drawing moisture from the rind almost immediately.
- Allow the pork to rest for about five minutes before cooking. During this short time, the salt starts absorbing surface moisture, which is one of the key steps in creating crisp crackling.
The First Stage of Cooking
- The pork cooks at a relatively low temperature during the first half of the process. This stage gently warms the meat while allowing the fat beneath the skin to soften and slowly render.
- As the pork cooks, the salt hardens into a firm crust across the surface. This crust continues pulling moisture from the rind while protecting it from browning too early.
- Using a paper liner underneath the air fryer basket can make cleanup much easier because pork belly releases a considerable amount of rendered fat during cooking. The liner catches most of this fat without interfering with air circulation.
- When the first cooking stage is complete, the salt should have formed a solid shell that lifts away easily. Any remaining salt can be brushed off with paper towels before the pork moves on to its final roasting stage, where the crackling develops its signature golden color and crisp texture.
Removing the Salt Crust
- After the first cooking stage, carefully remove the pork belly from the air fryer. By this point, the salt should have hardened into a solid crust. In many cases, it will lift away in one large piece, although it may also break into several sections. Either result is perfectly fine.
- If loose grains of salt remain on the surface, gently brush them away with paper towels. It is also worth wiping the sides of the pork to remove any salt that may have collected around the edges. This keeps the seasoning balanced and prevents the finished pork from tasting overly salty.
- Once the salt has been removed, discard both the salt crust and the foil. The skin should now feel noticeably drier than before cooking, which is exactly what is needed for crisp crackling.
Preparing for the Final Roast
- With the skin cleaned, lightly brush the entire rind with vegetable oil. Only a thin coating is needed. The oil helps the surface brown evenly while encouraging the crackling to become crisp and blistered.
- Return the pork belly directly to the air fryer basket without the foil. This allows hot air to circulate freely around the meat, helping every side cook evenly.
- The second cooking stage uses a much higher temperature. At this point, the meat is already mostly cooked, so the goal is to finish rendering the remaining fat while transforming the dry skin into crunchy crackling.
- As the temperature rises, small bubbles begin forming across the rind. The skin gradually changes from pale to golden brown and eventually develops the crisp texture that makes pork belly so satisfying.
Watching the Crackling
- Every air fryer cooks slightly differently, so the final roasting time may vary. Rather than relying only on the clock, keep an eye on the color of the skin during the last part of cooking.
- Start checking the pork after about twenty minutes. Continue checking every five minutes until the crackling reaches your preferred level of crispness.
- If one section begins browning much faster than the rest, loosely cover that area with a small piece of foil while allowing the remaining skin to continue crisping. This simple trick helps achieve even coloring without overcooking any portion.
- When finished, the crackling should feel firm and crisp when lightly tapped.
Let the Pork Rest
- Although it is tempting to slice into the pork immediately, allowing it to rest is an important part of the cooking process.
- Place the cooked pork belly on a wooden cutting board and let it rest for about fifteen minutes. During this time, the juices redistribute throughout the meat instead of running out onto the board.
- Resting also allows the crackling to firm up slightly, making it easier to cut neat slices without breaking apart.
- The meat stays moist, while each slice keeps its attractive layers of crisp skin, tender pork, and rendered fat.
Slicing the Pork Belly
- A very sharp knife makes slicing much easier.
- One useful technique is to turn the pork belly upside down so the crackling rests against the cutting board. This stabilizes the crisp skin and reduces the chance of it shattering while cutting.
- Slice through the meat first using steady pressure. When the knife reaches the crackling, press down firmly with both hands to cut cleanly through the crisp layer in one motion.
- This method creates even slices with intact crackling on every piece.
Serving Ideas
- Crispy pork belly is extremely versatile and can be served in many different ways.
- Serve it alongside vermicelli noodles with fresh herbs for a light yet satisfying meal. It also works well wrapped in rice paper together with crisp vegetables and herbs.
- Steamed rice is another excellent choice, allowing the rich pork to become the centerpiece of the meal. Simple vegetables, fresh cucumber, or lightly pickled vegetables provide a refreshing contrast to the richness of the meat.
- Because the pork is already well seasoned, elaborate side dishes are unnecessary. Simple accompaniments allow the crisp crackling and flavorful meat to stand out.
Helpful Tips for Success
- Choosing an evenly shaped piece of pork belly makes a noticeable difference. Uniform thickness allows the meat and skin to cook at the same rate, reducing the risk of overcooked edges or undercooked centers.
- If one end of the pork is thinner than the other, place a small piece of crumpled foil underneath the thinner side to level the surface. This helps the crackling brown more evenly.
- Avoid piercing through to the meat when making holes in the skin. The holes should stay within the rind and fat layer so the juices remain inside the meat while the fat renders through the surface.
- Keeping the skin as dry as possible before cooking is equally important. Moisture is the biggest obstacle to crisp crackling, so always pat the rind thoroughly dry before adding the vinegar and salt.
Preparing Ahead
- Although this recipe is designed to be completed in about an hour and fifteen minutes, a little advance preparation can improve both flavor and texture.
- Prick the skin and season the meat the night before if time allows. Store the pork uncovered in the refrigerator overnight. This extra drying time removes additional surface moisture while giving the seasoning more time to flavor the meat.
- The next day, simply continue with the salt bake and roasting steps.
Crispy Air Fryer Pork Belly
This crispy pork belly is cooked in the air fryer for juicy, flavorful meat and irresistibly crunchy crackling. A simple seasoning blend flavors the pork while a salt bake helps dry the rind before the final high-temperature roast.
4
servings15
minutes1
minute592
kcal1
minuteIngredients
1 kg (2.2 lb) pork belly, with rind
1 teaspoon fine salt
1 teaspoon sugar
1 teaspoon garlic powder
1 teaspoon Chinese five spice powder
15 ml (1 tablespoon) white vinegar
180 g (½ cup) fine salt
15 ml (1 tablespoon) vegetable oil
Directions
- Place the pork belly on a cutting board with the skin facing up. Using a meat tenderizer or a metal skewer, prick small holes all over the rind, making sure not to pierce into the meat.
- Turn the pork belly over so the meat side is facing up. If desired, cut it lengthwise into two equal pieces; otherwise, leave it whole.
- In a small bowl, combine the fine salt, sugar, garlic powder, and Chinese five spice powder. Rub the seasoning evenly over the meat side and edges only, leaving the skin unseasoned.
- Turn the pork belly skin-side up. If you cut it into two pieces, place them back together in their original shape. Set the pork on a large sheet of foil and fold the edges upward to create a shallow tray.
- Brush the skin evenly with the white vinegar, then cover the entire rind with an even layer of fine salt. Let it rest for 5 minutes.
- Place a paper liner underneath the air fryer basket if using one. Transfer the pork belly to the air fryer and cook at 120°C (248°F) for 30 minutes. If baking in a conventional oven, cook at the same temperature using the fan setting.
- Remove the pork from the air fryer. Once the salt has hardened into a crust, carefully lift it away and discard it. Brush away any remaining salt with paper towels and remove the foil.
- Lightly brush the skin with the vegetable oil. Return the pork belly directly to the air fryer basket and cook at 200°C (392°F) for 30–40 minutes, or until the crackling is golden and crisp. If using a conventional oven, roast at the same temperature with the fan setting.
- Transfer the cooked pork belly to a cutting board and let it rest for 15 minutes before slicing.
- Turn the pork belly meat-side down for easier cutting. Slice with a sharp knife, pressing firmly through the crackling in one steady motion. Serve immediately while the crackling is crisp.
Notes
- Choose a boneless, skin-on pork belly with an even thickness for the best results
- A balanced meat-to-fat ratio produces tender meat and crisp crackling.
- Only pierce the skin, not the meat beneath it.
- Pat the rind completely dry before adding the vinegar and salt.
- The salt layer helps remove moisture from the skin and is discarded after the first cook.
- Check the pork after 20 minutes during the final roast, as cooking times vary between air fryers.
- If part of the skin browns too quickly, loosely cover that section with foil.
- Resting the pork before slicing helps keep the meat juicy.
- For extra flavor, season the meat and prick the skin the night before, then refrigerate uncovered until ready to cook.
Nutrition Facts
- Total number of serves: 4
- Calories: 592kcal
- Fat: 60g
- Saturated Fat: 22g
- Polyunsaturated Fat: 6g
- Monounsaturated Fat: 28g
- Cholesterol: 82mg
- Sodium: 1632mg
- Potassium: 216mg
- Carbohydrates: 1g
- Fiber: 0.1g
- Sugar: 1g
- Protein: 11g
- Vitamin A: 12mcg
- Vitamin C: 0.5mg
- Calcium: 14mg
- Iron: 1mg