Introduction
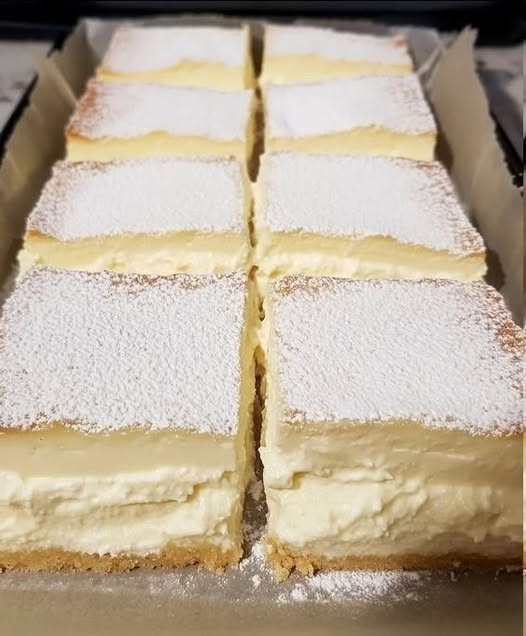
Custard Bars With Buttery Crust are one of those classic homemade desserts that never go out of style. They combine two of the most beloved elements in baking: a rich, tender, buttery shortbread-style crust and a silky, creamy custard filling. The result is a dessert that is simple in appearance yet incredibly satisfying in flavor and texture. Every bite offers a delicate balance between the crisp, buttery base and the smooth, velvety custard layer that gently melts in your mouth.
For generations, custard-based desserts have been a favorite in kitchens around the world. Their comforting flavor, creamy consistency, and versatility make them suitable for nearly every occasion. Custard bars take all the goodness of traditional baked custard and transform it into a convenient handheld dessert that can be sliced into neat squares and served at family gatherings, holidays, potlucks, afternoon tea parties, bake sales, and special celebrations.
One of the reasons these bars remain so popular is because they rely on simple pantry ingredients. Flour, butter, eggs, milk, cream, sugar, and vanilla come together to create a dessert that tastes elegant despite requiring very little specialized equipment. The buttery crust serves as the perfect foundation, providing both flavor and structure while complementing the smooth richness of the custard filling.
Unlike many modern desserts that rely on multiple layers, complicated techniques, or decorative toppings, custard bars celebrate simplicity. Their beauty lies in their clean layers, rich flavor, and luxurious texture. Whether served plain, dusted with powdered sugar, or accompanied by fresh fruit, these bars always leave a lasting impression.
The recipe below provides detailed instructions to help ensure success, even for beginner bakers. By following each step carefully, you can create bakery-quality custard bars right in your own kitchen.
Why You Will Love This Recipe
These bars have a rich and creamy texture.
The buttery crust melts in your mouth.
Simple ingredients create exceptional flavor.
Perfect for holidays and special occasions.
Easy to prepare in advance.
Suitable for beginner bakers.
Can be customized with different flavors.
Stores well in the refrigerator.
Slices neatly for serving.
Makes a large batch for sharing.
Elegant enough for guests.
Comforting enough for everyday desserts.
Excellent balance of sweetness.
Smooth and silky custard filling.
Pairs beautifully with coffee or tea.
Can be frozen for future enjoyment.
Classic dessert that never goes out of style.
Perfect combination of creamy and buttery textures.
Understanding the Components
The Buttery Crust
The crust serves as the foundation of the dessert. It resembles a shortbread cookie with its rich butter content and delicate crumb. The crust should be firm enough to support the custard filling while remaining tender enough to cut easily.
A properly prepared crust contributes flavor, texture, and stability. The butter provides richness, while the flour creates structure. Sugar adds sweetness and helps achieve a lightly golden finish.
The Custard Filling
Custard is traditionally made from eggs, milk, cream, sugar, and flavorings. During baking, the proteins in the eggs gently coagulate, transforming the liquid mixture into a smooth and creamy filling.
The addition of cream creates a richer custard with a luxurious mouthfeel. Vanilla enhances the flavor without overpowering the natural richness of the dairy and eggs.
The Finished Dessert
When assembled and baked correctly, the finished bars should have:
A lightly golden crust
A smooth and creamy custard layer
Clean, distinct layers
A silky texture
Balanced sweetness
Rich vanilla flavor
Beautiful presentation
Preparation Time
Preparation Time: 30 minutes
Crust Baking Time: 20 minutes
Custard Baking Time: 30 minutes
Cooling Time: 2 hours
Chilling Time: 4 hours
Total Time: Approximately 6 hours and 50 minutes
Yield: 16 to 20 bars
Difficulty Level: Easy to Intermediate
Ingredients
For the Buttery Crust
2½ cups all-purpose flour
1 cup unsalted butter, softened
½ cup granulated sugar
¼ teaspoon salt
1 teaspoon vanilla extract
For the Custard Filling
5 large eggs
2 cups whole milk
1 cup heavy cream
1¼ cups granulated sugar
⅓ cup all-purpose flour
¼ teaspoon salt
2 teaspoons pure vanilla extract
¼ teaspoon freshly grated nutmeg (optional)
Optional Garnishes
Powdered sugar
Fresh strawberries
Fresh raspberries
Fresh blueberries
Whipped cream
Lemon zest
Caramel sauce
Chocolate shavings
Equipment Needed
9 x 13-inch baking pan
Large mixing bowls
Medium mixing bowl
Electric mixer
Whisk
Rubber spatula
Measuring cups
Measuring spoons
Fine mesh strainer
Cooling rack
Sharp knife
Cutting board
Parchment paper
Step 1: Preparing the Baking Pan
Begin by preheating your oven to 350°F (175°C).
Proper preparation of the baking pan ensures easy removal and clean slicing later.
Lightly grease the baking pan with butter or nonstick spray.
Line the pan with parchment paper, allowing excess paper to hang over the edges.
Press the parchment paper into the corners.
Grease the parchment paper lightly.
Set the prepared pan aside.
Step 2: Making the Buttery Crust
Place softened butter into a large mixing bowl.
Beat the butter until smooth and creamy.
Add the granulated sugar.
Continue beating until the mixture becomes light and fluffy.
This process incorporates air into the dough and contributes to a tender texture.
Add vanilla extract.
Mix until evenly distributed.
In a separate bowl, combine flour and salt.
Gradually add the dry ingredients to the butter mixture.
Mix until a soft dough forms.
The dough should be crumbly yet easy to press together.
Transfer the dough into the prepared baking pan.
Use your hands to distribute it evenly.
Press firmly into an even layer.
Pay special attention to the corners.
A flat-bottomed measuring cup can help smooth the surface.
Prick the crust with a fork.
This prevents excessive bubbling during baking.
Step 3: Baking the Crust
Place the crust into the preheated oven.
Bake for approximately 18 to 22 minutes.
Monitor carefully during the final minutes.
The crust should develop a light golden color around the edges.
Avoid excessive browning.
Remove from the oven.
Place on a cooling rack.
Allow the crust to cool slightly while preparing the custard.
Step 4: Preparing the Custard Base
Crack the eggs into a large mixing bowl.
Whisk gently until completely blended.
Add sugar.
Continue whisking until smooth.
Add flour and salt.
Mix thoroughly.
Slowly pour in the milk while whisking continuously.
Gradually add the heavy cream.
Continue whisking until fully incorporated.
Add vanilla extract.
If using nutmeg, add it now.
Whisk until the mixture becomes silky smooth.
Avoid vigorous whisking that creates excessive foam.
For the smoothest custard possible, pour the mixture through a fine mesh sieve.
This removes any small egg particles.
The resulting custard will bake into a beautifully smooth filling.
Step 5: Filling the Pan
Carefully pour the custard mixture over the warm crust.
Pour slowly to avoid disturbing the crust.
The custard should spread evenly across the surface.
Tap the pan gently on the countertop several times.
This helps eliminate trapped air bubbles.
Inspect the surface.
Remove any visible bubbles with a spoon if desired.
Step 6: Baking the Custard
Place the filled pan into the oven.
Bake for 28 to 35 minutes.
The custard should appear set around the edges.
The center should retain a slight jiggle.
This gentle movement indicates proper baking.
Overbaking can result in a rubbery texture.
The top should remain mostly pale with minimal browning.
The internal temperature should reach approximately 175°F to 180°F (79°C to 82°C).
Remove from the oven immediately once done.
Step 7: Cooling the Custard Bars
Place the pan on a cooling rack.
Allow the bars to cool slowly.
Avoid moving the pan excessively while cooling.
Rapid movement can cause cracks.
Cooling gradually helps the custard finish setting.
Allow approximately two hours for complete cooling.
The custard will continue to firm during this period.
Step 8: Chilling for Perfect Texture
Transfer the cooled bars to the refrigerator.
Chill for at least four hours.
Overnight chilling provides the best results.
During refrigeration:
The custard becomes firmer.
The flavors develop further.
The bars become easier to slice.
The texture becomes smoother and creamier.
Step 9: Slicing and Presentation
Lift the chilled dessert from the pan using the parchment paper.
Place on a cutting board.
Use a long, sharp knife.
For clean slices:
Dip the knife in hot water.
Wipe dry.
Make one smooth cut.
Clean the knife between slices.
Cut into squares or rectangles.
Arrange on a serving platter.
Dust lightly with powdered sugar if desired.
Professional Baking Tips
Use room-temperature ingredients.
Measure flour accurately.
Do not overmix the custard.
Strain the filling before baking.
Avoid overbaking.
Allow proper cooling time.
Refrigerate thoroughly.
Use high-quality butter.
Choose pure vanilla extract.
Slice with a warm knife.
Store properly for maximum freshness.
Common Mistakes to Avoid
Using cold ingredients.
Skipping the crust pre-bake.
Overbaking the custard.
Removing from the refrigerator too soon.
Using low-fat milk.
Ignoring cooling times.
Adding too much flour.
Whisking too aggressively.
Using old eggs.
Cutting before chilling.
Flavor Variations
Lemon Custard Bars
Add:
2 tablespoons lemon juice
1 tablespoon lemon zest
The result is bright, refreshing, and slightly tangy.
Orange Custard Bars
Add:
1 tablespoon orange zest
2 tablespoons orange juice
Creates a fragrant citrus dessert.
Coconut Custard Bars
Replace one cup of milk with coconut milk.
Add one cup shredded coconut.
Produces a tropical flavor profile.
Cinnamon Custard Bars
Add:
1 teaspoon cinnamon
¼ teaspoon nutmeg
Perfect for autumn and holiday gatherings.
Almond Custard Bars
Replace vanilla with almond extract.
Top with sliced almonds.
Creates a sophisticated nutty flavor.
Maple Custard Bars
Replace part of the sugar with maple syrup.
Provides warmth and depth.
Honey Vanilla Custard Bars
Substitute a portion of the sugar with honey.
The flavor becomes richer and more floral.
Serving Suggestions
Serve chilled.
Serve with coffee.
Serve with tea.
Pair with fresh fruit.
Add whipped cream.
Serve alongside ice cream.
Include on dessert trays.
Offer at brunch gatherings.
Serve after holiday meals.
Enjoy as an afternoon snack.
Package as homemade gifts.
Include in picnic baskets.
Serve during family reunions.
Present at baby showers.
Feature at wedding dessert tables.
Storage Instructions
Store in an airtight container.
Keep refrigerated.
Consume within 5 days.
Separate layers using parchment paper.
Avoid exposure to strong odors.
Keep covered at all times.
Freezing Instructions
Wrap bars individually.
Use plastic wrap followed by foil.
Place in freezer-safe containers.
Freeze up to 2 months.
Thaw overnight in the refrigerator.
Do not thaw at room temperature.
Nutritional Information (Approximate Per Serving)
Calories: 320
Protein: 6 grams
Carbohydrates: 33 grams
Fat: 18 grams
Saturated Fat: 11 grams
Cholesterol: 110 milligrams
Sodium: 95 milligrams
Sugar: 20 grams
Fiber: 1 gram
Calcium: 8% Daily Value
Iron: 5% Daily Value
The Secret to Extraordinary Custard Bars
The secret to truly exceptional Custard Bars With Buttery Crust lies in patience. Great custard cannot be rushed. Every stage—from properly creaming the butter for the crust to carefully whisking the custard and allowing adequate chilling time—contributes to the final texture and flavor.
Many bakers are tempted to shorten the cooling and chilling stages, but these steps are essential. As the bars cool, the custard continues to set. During refrigeration, the flavors mature and the texture becomes remarkably smooth. What may seem like a simple dessert transforms into something luxurious after several hours of chilling.
Another important factor is ingredient quality. Fresh eggs, real butter, whole milk, heavy cream, and pure vanilla extract make a noticeable difference. Since the ingredient list is relatively short, every ingredient contributes significantly to the finished product.
Conclusion
Custard Bars With Buttery Crust are the perfect example of how simple ingredients can create an extraordinary dessert. The buttery shortbread-style crust provides a rich, tender base, while the creamy vanilla custard filling delivers a silky smooth texture that melts in your mouth. Elegant enough for special occasions yet easy enough for everyday baking, these bars are a timeless favorite that appeals to all ages. Whether served plain, dusted with powdered sugar, paired with fresh fruit, or enjoyed alongside a warm cup of coffee or tea, they offer a comforting homemade taste that never disappoints. With proper preparation, careful baking, and adequate chilling time, these custard bars become an unforgettable dessert that will quickly earn a place among your most treasured recipes.