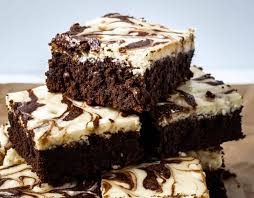
Forget the box of gluten-free brownie mix! This homemade gluten-free cheesecake brownie recipe delivers a rich, fudgy chocolate brownie base swirled with a tangy, sweet cream cheese layer. These brownies are so decadent and delicious, no one will ever guess they’re gluten-free
Why This Recipe is a Must-Try
- Ultimate Fudginess: A dense, moist chocolate brownie base that melts in your mouth.
- Tangy Cheesecake Swirl: A thick, creamy layer of cheesecake adds a delightful contrast.
- Easy to Make: Surprisingly simple and takes only about an hour, including baking time.
- Gluten-Free Perfection: Achieves the perfect brownie texture and flavor without any gluten.
Creating Your Gluten-Free Cheesecake Brownies: A Step-by-Step Guide
- Prep: Preheat your oven to 350°F (175°C).
- Cheesecake Filling: In a large bowl, combine cream cheese, sugar, and eggs. Beat until smooth and creamy.
- Brownie Batter: In a separate bowl, mix the dry ingredients: gluten-free flour (Bob’s Red Mill 1-to-1 or Cup4Cup recommended), cocoa powder, and sugar.
- Assemble: Line a baking pan with parchment paper or grease it. Pour most of the brownie batter into the pan, reserving a small amount. Pour the cream cheese filling evenly over the brownie batter.
- Swirl: Thin the reserved brownie batter with a tiny bit of water. Dollop it over the cream cheese filling. Use a fork or toothpick to swirl the brownie batter into the cream cheese for a marbled effect.
- Bake: Bake for 35-40 minutes, or until a toothpick inserted into the center comes out clean.
- Cool: Allow the brownies to cool completely before slicing and serving.
Tips and Tricks for Brownie Bliss
- Flour Choice is Key: For the best texture, use a 1-to-1 gluten-free baking flour like Bob’s Red Mill 1-to-1 or Cup4Cup. Almond flour, coconut flour, or rice flour are not recommended for this recipe.
- Mix-Ins: Enhance the flavor with chopped nuts (walnuts or macadamia nuts are great), or add chocolate chips to the cream cheese filling.
- Raspberry Swirl: For a fruity twist, swirl in raspberry coulis or your favorite berry jam instead of the brownie batter dollops.
- Less Cheesecake: If you prefer a less pronounced cheesecake flavor, halve the cream cheese filling recipe. Layer half the brownie batter, the cream cheese filling, and then the remaining brownie batter.
- No Cheesecake: If you’re not a fan of cheesecake, you can omit the cream cheese filling entirely and bake just the brownie batter for an extra-chocolatey treat.
- Serving Suggestion: These brownies are especially delicious chilled. Store them in the refrigerator or freezer for a fudgy texture. They can be frozen for up to four months or refrigerated for up to two weeks.
Making with Regular Flour
This recipe works perfectly well with regular all-purpose flour. Simply substitute the gluten-free flour with your preferred regular baking flour.
Gluten-Free Cheesecake Brownies
Recipe Ingredients
Cream Cheese Filling:
- 2 (8-ounce) packages cream cheese (full-fat, brick-style recommended)
- ⅔ cup granulated sugar
- 2 large eggs
- Optional: Chocolate chips
Brownie Batter:
- 1 cup (2 sticks) unsalted butter
- 2 cups granulated sugar
- 4 large eggs
- ¼ teaspoon salt
- 1 cup unsweetened cocoa powder
- 1 cup all-purpose gluten-free flour (or regular flour)
- Optional: Chopped walnuts
Detailed Recipe Instructions
- Preheat oven to 350°F (175°C).
- Cheesecake Filling: In a large bowl, blend cream cheese, sugar, and eggs until smooth.
- Brownie Batter: In a separate large bowl, using an electric mixer, blend butter, sugar, eggs, and salt.
- Add cocoa powder and nuts (if using) and stir until blended.
- Add flour and mix until just combined.
- Pour most of the brownie batter into a greased or parchment-lined baking pan, reserving a small amount for swirling.
- Pour the cream cheese filling over the brownie batter and smooth the surface.
- Thin the reserved brownie batter with a tiny bit of water and dollop it over the cream cheese. Swirl with a fork or toothpick.
- Bake for 35-40 minutes, or until a toothpick inserted into the center comes out clean.
- Cool completely before cutting and serving. Store in an airtight container at room temperature, in the refrigerator, or freezer.
Gluten-Free Cheesecake Brownies
24
servings30
minutes45
minutes1
hour10
minutesForget the box of gluten-free brownie mix! This homemade gluten-free cheesecake brownie recipe delivers a rich, fudgy chocolate brownie base swirled with a tangy, sweet cream cheese layer.
Ingredients
For the Cream Cheese Filling:
16 oz (2 packages) full-fat brick-style cream cheese, softened
2/3 cup white sugar
2 eggs
Optional: ½ cup chocolate chips
For the Brownie Batter:
1 cup (2 sticks) butter, melted
2 cups white sugar
4 eggs
¼ teaspoon salt
1 cup cocoa powder
1 cup all-purpose gluten-free flour (or regular flour)
Optional: ½ cup chopped walnuts
Directions
- Preheat oven to 350°F (175°C). Grease or line a 9×13-inch baking pan with parchment paper.
- In a large bowl, blend cream cheese, sugar, and eggs until smooth.
- In a separate bowl, mix melted butter, sugar, eggs, and salt using an electric mixer.
- Stir in cocoa powder and nuts, if using, then add flour and mix until a smooth batter forms.
- Pour the brownie batter into the prepared pan, reserving a small amount to swirl on top.
- Spread the cream cheese filling evenly over the brownie batter.
- Thin the reserved brownie batter with a small amount of water, dollop over the cream cheese layer, and swirl with a toothpick or fork.
- Bake for 35-40 minutes until the batter is set and a toothpick inserted in the center comes out clean.
- Let cool completely before cutting. Store in an airtight container at room temperature, in the fridge, or freeze for longer storage.