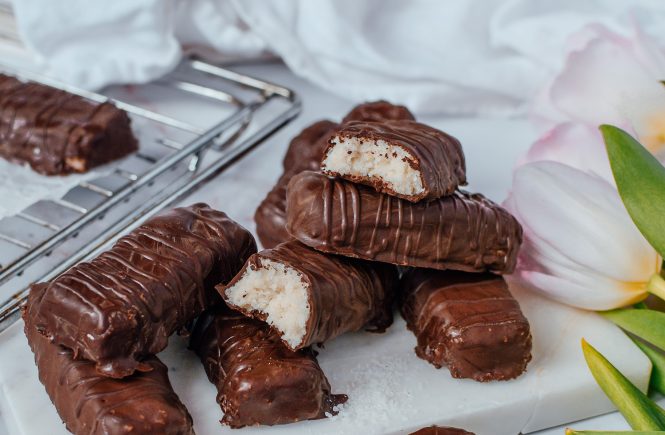
There are times when I want something sweet without reaching for traditional candy bars loaded with sugar. These homemade keto Bounty bars have become one of my favorite recipes because they are incredibly easy to prepare, require only a few pantry ingredients, and satisfy those chocolate and coconut cravings without making the recipe complicated.
The combination of a creamy coconut filling wrapped in a rich chocolate coating creates a dessert that feels special while still being simple enough to make at home. Since the bars are stored in the refrigerator or freezer, they are also perfect for preparing ahead of time whenever I need a quick low-carb snack or dessert.
Unlike many homemade candy recipes, these bars don’t require baking, fancy equipment, or difficult techniques. Everything comes together in just a few easy steps, making them suitable for beginners as well as experienced home cooks.
Why I Enjoy Making These Keto Bounty Bars
- One of the biggest reasons I return to this recipe is its simplicity. Every ingredient has a purpose, and together they create a coconut filling that is soft, creamy, and easy to shape.
- Once coated in melted chocolate and chilled until firm, each bite has the familiar contrast of smooth chocolate and tender coconut that makes homemade candy so enjoyable.
- Because these bars are prepared at home, it’s also easy to make them whenever a sweet craving appears without spending much time in the kitchen.
What Makes These Bars Special?
- These homemade bars offer everything I enjoy in a coconut dessert.
- Rich coconut flavor
- Smooth chocolate coating
- Low-carb ingredients
- No baking required
- Easy preparation
- Great for meal prep
- Freezer friendly
- Perfect portion size
- Every bite has a satisfying balance of creamy coconut and chocolate without being overly sweet.
A Homemade Dessert That Fits Busy Days
- Some desserts require baking, cooling, decorating, and several mixing bowls. This recipe keeps everything refreshingly simple.
- The filling is prepared in one bowl, shaped into bars, chilled, coated with chocolate, and chilled again until the chocolate sets.
- Most of the preparation time is simply waiting for the freezer to do the work.
- That makes these bars an excellent recipe to prepare during the weekend and enjoy throughout the week.
The Coconut Filling
- The filling is the heart of this recipe.
- A combination of coconut cream, melted coconut oil, desiccated coconut, and monkfruit sweetener creates a mixture that is rich while still holding together well after chilling.
- The desiccated coconut gives the filling its classic texture, while the coconut cream keeps every bite soft instead of dry.
- When mixed properly, the filling becomes thick enough to shape into small bars before freezing.
Getting the Right Texture
- One thing I’ve found while making this recipe is that the coconut mixture should feel sticky and hold together when pressed.
- If the mixture seems softer than expected after mixing, simply adding a little more desiccated coconut helps absorb the extra moisture.
- This small adjustment makes shaping much easier and helps the bars keep their form during chocolate coating.
- Since different brands of coconut cream can vary slightly, checking the consistency before shaping is always a good idea.
Choosing the Chocolate
- The chocolate coating completes these homemade bars.
- Using sugar-free chocolate chips or chocolate with high cocoa solids creates a rich coating that balances the sweetness of the coconut filling.
- After melting, the chocolate should be smooth enough for dipping.
- If it feels slightly thick, stirring gently until completely melted usually helps produce a smoother finish.
Shaping the Bars
- One of my favorite parts of this recipe is shaping the coconut mixture.
- There are several easy ways to do it.
- The mixture can be rolled into small rectangles by hand, pressed into silicone molds, or packed into an ice tray for evenly sized pieces.
- Keeping the bars similar in size helps them chill evenly and creates a consistent chocolate coating.
Why Chilling Is Important
- The freezer plays an important role in this recipe.
- After shaping the bars, chilling allows the coconut filling to become firm enough for dipping into melted chocolate.
- Without this step, the filling may become too soft while coating.
- After dipping, another short chill hardens the chocolate and creates the finished candy bar texture.
- These two chilling stages make the entire recipe much easier.
A Smooth Chocolate Coating
- Dipping each chilled coconut bar into melted chocolate creates a beautiful finish.
- Using a fork helps lift the coated bars from the chocolate while allowing excess chocolate to drip away.
- Placing them back onto parchment paper keeps the bottoms smooth and prevents sticking.
- As the chocolate cools, it forms a crisp shell around the creamy coconut filling.
Easy Ways to Add Variety
- Although the original recipe is delicious exactly as written, there are a few simple ways to change the flavor without changing the main ingredients.
- A drop of vanilla extract can add gentle sweetness.
- Almond extract provides a slightly different flavor profile.
- For an Almond Joy-style version, placing a whole almond on top of each coconut bar before coating with chocolate creates another delicious variation.
- If making the recipe dairy-free or vegan, vegan chocolate works just as well for coating.
- These small adjustments allow the recipe to suit different preferences while keeping the preparation almost identical.
Perfect for Preparing Ahead
- These bars are ideal for making in advance.
- Because they store so well, I often prepare a full batch instead of making only a few servings.
- Once chilled, they remain firm and ready whenever I want a quick dessert after dinner or a sweet afternoon snack.
- Preparing homemade treats ahead of time also means there’s always something satisfying available without needing to bake another dessert.
Refrigerator Storage
- Keeping these bars in the refrigerator helps maintain both the chocolate coating and the coconut filling.
- I like storing them in an airtight container so they stay fresh and don’t absorb flavors from other foods.
- They remain delicious for up to one week.
- The cool temperature also helps the coconut center stay firm while keeping the chocolate coating smooth.
Freezer Storage
- The freezer is another excellent option for longer storage.
- Once the bars have completely hardened, they can be transferred into a freezer-safe container or resealable freezer bag.
- Separating layers with parchment paper helps prevent sticking.
- They keep well for up to three months.
- When ready to enjoy, I simply remove one or two bars and let them sit at room temperature for a few minutes.
- They are also delicious eaten straight from the freezer if you prefer a firmer texture.
Great for Sharing
- These homemade keto Bounty bars are perfect for sharing with family and friends.
- Since the recipe makes around twenty small bars, there are plenty to enjoy throughout the week or serve at gatherings.
- Their neat size also makes portion control much easier than slicing larger desserts.
- Whether served after dinner, packed into lunchboxes, or enjoyed with a cup of coffee, they always disappear quickly.
Helpful Tips for Success
- A few simple tips help ensure the recipe turns out well every time.
- Use unsweetened desiccated coconut for the correct texture.
- Mix the filling thoroughly so every ingredient is evenly combined.
- Freeze the shaped bars until completely firm before dipping.
- Allow excess chocolate to drip away before placing each bar back onto parchment paper.
- Store the finished bars chilled to maintain their texture.
- These small details make a noticeable difference in the finished result.
Storage
- Refrigerator
- Store the bars in an airtight container to keep them fresh and prevent them from absorbing odors. They will stay fresh for up to 1 week.
- Freezer
- For longer storage, place the bars in a freezer-safe container or resealable freezer bag. Separate layers with parchment paper if stacking. Freeze for up to 3 months.
- Before serving, let the bars sit at room temperature for a few minutes, or enjoy them straight from the freezer for a firmer texture.
Keto Chocolate Nougat Bars
These Homemade Keto Bounty Bars are a delicious low-carb twist on the classic coconut chocolate treat. They feature a soft and creamy coconut filling coated in a rich layer of sugar-free chocolate. With only a handful of ingredients and no baking required, they’re perfect for keeping in the refrigerator or freezer whenever you want a quick keto-friendly dessert or snack.
20
servings15
minutes35
minutes126
kcal50
minutesIngredients
½ can coconut cream (tinned)
¼ cup coconut oil, melted
2 cups unsweetened desiccated coconut
2 tablespoons monkfruit sweetener
7 ounces sugar-free chocolate chips or chocolate with high cocoa solids
Directions
- Step 1: Prepare the Pan
Line an 8-inch square baking pan with parchment paper. Alternatively, use a silicone mold or an ice tray if you prefer evenly shaped bars. - Step 2: Make the Coconut Filling
In a medium mixing bowl, combine the coconut cream, melted coconut oil, unsweetened desiccated coconut, and monkfruit sweetener. Stir everything together until a thick, sticky mixture forms and the ingredients are evenly combined. - Step 3: Shape the Bars
Scoop portions of the coconut mixture and shape them into small rectangles about 2–3 inches long. If using silicone molds or an ice tray, firmly press the mixture into each cavity to create evenly sized bars. - Step 4: Chill
Arrange the shaped bars on a parchment-lined tray and place them in the freezer for 20–30 minutes, or until they become firm enough to handle. - Step 5: Melt the Chocolate
While the bars are chilling, melt the chocolate chips using a double boiler or microwave in 20-second intervals, stirring after each interval until the chocolate is completely smooth. - Step 6: Coat the Bars
Remove the chilled coconut bars from the freezer. Dip each bar into the melted chocolate, making sure it is fully coated. Lift each one with a fork, allowing the excess chocolate to drip back into the bowl. - Step 7: Set the Chocolate
Return the coated bars to the parchment-lined tray. Chill them in the refrigerator or freezer for another 10–15 minutes until the chocolate coating is completely firm. - Step 8: Serve
Once the chocolate has hardened, the homemade keto Bounty bars are ready to enjoy. Serve immediately or store for later.
Notes
- If the coconut mixture feels too wet, simply mix in a little more desiccated coconut until it becomes easy to shape.
- For extra flavor, stir a drop of vanilla extract or almond extract into the coconut mixture.
- If the melted chocolate seems too thick for dipping, add 1 teaspoon of coconut oil and stir until smooth.
- Vegan chocolate can be used to make this recipe suitable for a low-carb vegan option.
- For a variation inspired by Almond Joy or Mounds bars, place a whole almond on top of each coconut bar before dipping it into the chocolate.
- Keeping the bars chilled helps maintain the best texture and makes them easier to handle.
Nutrition Facts
- Serving Size: 1 g
- Total number of serves: 20
- Calories: 127kcal
- Fat: 12g
- Carbohydrates: 7g
- Fiber: 5g
- Protein: 1g