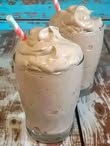
1. Understanding What a Chocolate Frosty Really Is
A Chocolate Frosty is not simply a chocolate milkshake or soft-serve ice cream. Its identity comes from a very specific balance of:
- Mild chocolate flavor (not overpowering)
- High creaminess without being overly rich
- Semi-frozen, spoonable consistency
- Smooth, slightly airy texture
- Low ice crystallization
Unlike traditional ice cream, which contains a high fat percentage and is churned continuously, a Frosty relies on partial freezing and blending to create its unique structure.
Unlike milkshakes, it is thicker and colder, but not fully frozen.
The goal is to recreate that exact middle ground.
2. Ingredient Breakdown and Their Roles
Understanding each ingredient is essential for mastering the texture and flavor.
Milk (2 cups, whole milk recommended)
Milk provides the liquid base. Whole milk is ideal because:
- It contains fat, which improves smoothness
- It prevents the mixture from becoming icy
- It balances richness without heaviness
Using low-fat milk will result in a thinner, icier Frosty.
Heavy Cream (1/2 cup)
Heavy cream increases fat content, which:
- Enhances creaminess
- Reduces ice crystal formation
- Gives a smoother mouthfeel
Too much cream will make it taste like melted ice cream instead of a Frosty, so balance is important.
Sweetened Condensed Milk (1/2 cup)
This is a key ingredient:
- Adds sweetness
- Contributes to thickness
- Helps prevent freezing solid due to sugar content
It also gives a subtle caramelized dairy flavor.
Cocoa Powder (1/3 cup)
Use unsweetened cocoa powder. This gives:
- Chocolate flavor
- Slight bitterness to balance sweetness
A Frosty traditionally uses a mild chocolate taste, so avoid overloading cocoa.
Sugar (1/2 cup)
Granulated sugar:
- Sweetens the mixture
- Lowers freezing point
- Helps maintain soft texture
Vanilla Extract (1 teaspoon)
Vanilla is critical even in chocolate recipes because:
- It rounds out the flavor
- Mimics the signature Frosty taste (which includes a vanilla note)
Salt (1/8 teaspoon)
Salt enhances all flavors and balances sweetness.
Optional Ingredients
Cornstarch (1 teaspoon)
Acts as a stabilizer and thickener, improving body.
Xanthan Gum (1/4 teaspoon)
Used in commercial frozen desserts:
- Prevents ice crystals
- Creates smooth, elastic texture
Chocolate Syrup (2 tablespoons)
Adds sweetness and boosts chocolate flavor without bitterness.
3. Equipment Considerations
Using the right tools affects results significantly.
- A blender with high power ensures smooth texture
- A whisk helps eliminate lumps early
- A shallow container helps freeze evenly
- A spatula helps scrape sides during freezing
4. Step-by-Step Process (Highly Detailed)
Step 1: Dry Mixing
Combine cocoa powder, sugar, salt, and cornstarch.
This step is often overlooked but very important because:
- Cocoa powder clumps easily when liquid is added
- Even distribution prevents grainy texture
Mix thoroughly until uniform.
Step 2: Creating a Slurry
Add a small portion of milk slowly while whisking.
This forms a paste-like mixture, ensuring:
- Cocoa dissolves evenly
- No dry pockets remain
Step 3: Heating Phase
Place mixture on medium heat.
Important notes:
- Do not boil
- Stir constantly
- Heat until slightly thickened
Why this matters:
- Dissolves sugar completely
- Activates cornstarch if used
- Deepens cocoa flavor
Remove from heat once it lightly coats the back of a spoon.
Step 4: Adding Remaining Liquids
Add remaining milk, cream, condensed milk, and vanilla.
Stir until fully combined.
Optional: strain for extra smoothness.
Step 5: Cooling Phase
Refrigerate for 2–4 hours.
This step:
- Improves blending later
- Prevents melting during processing
- Enhances texture consistency
Skipping this results in a thinner final product.
Step 6: Controlled Freezing
Pour into a shallow container and freeze.
Every 20–30 minutes:
- Stir vigorously
- Scrape edges into center
Repeat for about 1–1.5 hours.
This step mimics churning.
Step 7: Semi-Frozen Stage
You are aiming for:
- Thick slush
- Soft, scoopable texture
- Not fully solid
This stage is critical.
Step 8: Final Blending
Transfer to blender.
Blend until:
- Smooth
- Thick
- Creamy
Add optional ice cream if desired.
Adjust consistency:
- Too thick: add milk
- Too thin: freeze again
Step 9: Texture Setting
Optional final freeze for 30–45 minutes.
This improves:
- Body
- Authentic feel
5. Advanced Texture Science
A Frosty’s texture depends on:
Fat Content
Higher fat = smoother texture
Sugar Content
More sugar = softer freeze
Air Incorporation
Blending introduces air, creating lightness
Ice Crystal Control
Frequent stirring prevents large crystals
6. Flavor Customization
Strong Chocolate Version
Add melted dark chocolate
Light Chocolate Version
Reduce cocoa, increase vanilla
Malted Version
Add malt powder for a classic diner flavor
7. Troubleshooting Guide
Too Icy
Cause:
- Low fat
- No stirring
Fix:
- Add cream
- Blend again
Too Thin
Cause:
- Not frozen enough
Fix:
- Freeze longer
- Reduce liquid
Too Thick
Cause:
- Over-freezing
Fix:
- Add milk and blend
Grainy Texture
Cause:
- Poor mixing of cocoa
Fix:
- Strain mixture
- Blend longer
8. Storage and Reuse
Store in airtight container.
Before reuse:
- Let soften slightly
- Re-blend
This restores original texture.
9. Professional Tips
- Use chilled equipment for better results
- Blend in short bursts to control texture
- Avoid over-sweetening
- Keep cocoa balanced for authenticity
10. Simplified Quick Version (for comparison)
If you want a shortcut:
Blend:
- Ice cream
- Milk
- Cocoa powder
Freeze briefly and blend again.
This is faster but less authentic.
11. Final Notes
The key to a perfect Chocolate Frosty is patience and balance. It is not about making the richest chocolate dessert, but about achieving:
- Smoothness
- Mild flavor
- Perfect thickness
Once you master the base, you can adjust endlessly to match your preference.