Introduction to Turkish Bread
Turkish bread is one of the most comforting and satisfying breads in the world. It is known for its fluffy center, lightly chewy texture, golden crust, and rich aroma. In Turkey, bread is deeply connected to daily life and culture. Fresh bread is commonly served at breakfast, lunch, and dinner. Families enjoy it with tea, olives, soups, grilled meats, salads, cheese, honey, butter, and countless traditional dishes.
Traditional Turkish bread is often baked in stone ovens at very high temperatures, which creates a crispy exterior while preserving a soft and airy interior. However, modern kitchens now allow home cooks to recreate a very similar result using an air fryer. The air fryer has become popular because it cooks quickly, heats evenly, and creates beautiful browning without needing a large oven.
This Air Fryer Turkish Bread recipe is designed to give you a bakery-style result at home using simple ingredients and detailed instructions. The bread turns out soft, fluffy, slightly chewy, and deeply flavorful. It can be enjoyed fresh from the air fryer, toasted the next day, or used for sandwiches, wraps, and dipping into sauces.
This guide is intentionally extremely detailed so even beginners can confidently prepare the bread successfully. Every stage of the process is explained carefully, from activating yeast and kneading dough to proofing, shaping, air frying, storing, and troubleshooting.
By the end of this recipe, you will understand not only how to make Turkish bread, but also why each ingredient and technique matters.
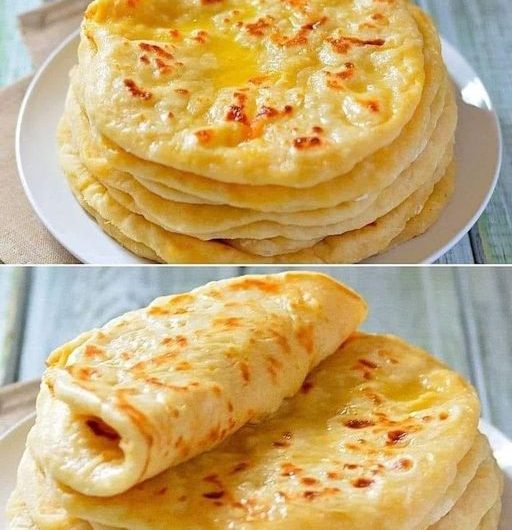
Characteristics of Authentic Turkish Bread
Good Turkish bread should have the following qualities:
- Puffy and airy interior
- Soft and moist crumb
- Light chewiness
- Thin but lightly crisp crust
- Rich aroma from yeast fermentation
- Beautiful golden surface
- Signature pressed pattern on top
- Flexible structure that folds easily
Unlike extremely crusty artisan breads, Turkish bread focuses more on softness and freshness. It is meant to be torn apart by hand and shared at the table.
Why Use an Air Fryer for Turkish Bread
Many people assume bread can only be baked properly in a traditional oven, but the air fryer is surprisingly effective for breads like Turkish bread.
Benefits of Air Fryer Bread Baking
Faster Cooking
Air fryers preheat quickly and cook bread faster than conventional ovens.
Excellent Browning
The circulating hot air creates a golden crust beautifully.
Energy Efficient
An air fryer uses less electricity than heating a large oven.
Crisp Exterior with Soft Interior
The rapid heat circulation seals moisture inside the bread.
Perfect for Small Batches
Ideal for families or individuals who want fresh bread without making huge quantities.
Convenient in Warm Weather
You avoid heating the entire kitchen with a large oven.
Total Time Required
Preparation Time
20 to 30 minutes
First Proofing
1 to 1½ hours
Shaping and Second Rise
30 minutes
Air Fryer Cooking Time
10 to 15 minutes per batch
Cooling Time
10 to 15 minutes
Total Time
Approximately 2½ to 3 hours
Yield
- 2 medium Turkish breads
- 6 to 8 servings
Ingredients for the Dough
Main Dough Ingredients
- 3½ cups all-purpose flour
- 2 teaspoons instant yeast
- 1 tablespoon sugar
- 1 teaspoon salt
- ¾ cup warm milk
- ½ cup warm water
- ¼ cup plain yogurt
- 3 tablespoons olive oil
- 1 large egg
Egg Wash
- 1 egg yolk
- 1 tablespoon milk
- 1 tablespoon olive oil
Optional Toppings
- Sesame seeds
- Nigella seeds
- Black sesame seeds
- Flaky salt
- Dried herbs
Detailed Ingredient Explanation
Flour
Flour forms the structure of the bread. All-purpose flour gives soft results, while bread flour creates slightly more chewiness.
Protein inside flour forms gluten when mixed and kneaded. Gluten traps gas produced by yeast, helping bread rise and become airy.
Yeast
Yeast is responsible for fermentation. It consumes sugar and produces carbon dioxide gas, causing the dough to expand.
Instant yeast is easiest because it can be added directly into ingredients.
Sugar
Sugar feeds the yeast and improves browning.
Salt
Salt strengthens gluten structure and balances flavor.
Milk
Milk enriches the dough and adds softness.
Yogurt
Yogurt contributes tenderness, moisture, and slight tanginess.
Olive Oil
Olive oil creates richness and prevents dryness.
Egg
Egg improves texture, color, and structure.
Equipment Needed
- Large mixing bowl
- Measuring cups
- Measuring spoons
- Dough scraper
- Rolling pin
- Pastry brush
- Air fryer
- Parchment paper
- Kitchen towel
- Cooling rack
Understanding Dough Temperature
Temperature is extremely important in bread making.
Ideal Liquid Temperature
Warm liquids should be around:
- 100°F to 110°F
- 38°C to 43°C
If liquids are too cold:
- Yeast activates slowly
If liquids are too hot:
- Yeast may die
A good test is touching the liquid with your finger. It should feel warm but comfortable.
Step 1: Activating the Yeast
In a large bowl combine:
- Warm milk
- Warm water
- Sugar
- Yeast
Mix gently.
Let the mixture rest for 5 to 10 minutes.
What You Should See
- Foam
- Tiny bubbles
- Slight expansion
These signs indicate active yeast.
If nothing happens:
- Your yeast may be expired
- The liquid may have been too hot or cold
Step 2: Mixing the Wet Ingredients
Add to the yeast mixture:
- Yogurt
- Olive oil
- Egg
Whisk thoroughly until smooth.
The mixture should appear creamy and slightly glossy.
Step 3: Adding Flour and Salt
Gradually add flour and salt.
Mix slowly using:
- Wooden spoon
- Silicone spatula
- Hands
The dough will begin rough and sticky.
Do not worry if it seems messy at first.
Step 4: Kneading the Dough
Transfer dough to a lightly floured surface.
Knead for 8 to 12 minutes.
Proper Kneading Technique
- Push dough forward with palm
- Fold dough back
- Rotate slightly
- Repeat continuously
During Kneading
The dough changes from:
- Sticky and rough
Into:
- Smooth
- Elastic
- Soft
- Stretchy
Windowpane Test
Take a small piece of dough and stretch it gently.
If it forms a thin membrane without tearing immediately, gluten has developed properly.
Importance of Gluten Development
Good gluten development creates:
- Air pockets
- Soft texture
- Better rise
- Flexible bread structure
Under-kneaded dough often creates dense bread.
Step 5: First Rise
Lightly oil a clean bowl.
Place dough inside.
Cover with:
- Kitchen towel
- Plastic wrap
Allow dough to rise in a warm environment for 1 to 1½ hours.
Ideal Rising Environment
Warm but not hot.
Possible locations:
- Near stove
- Inside turned-off oven with light on
- Warm kitchen corner
What Happens During Proofing
Yeast ferments sugars and releases gas.
This:
- Expands dough
- Builds flavor
- Improves texture
Signs Dough Is Ready
- Doubled in size
- Puffy appearance
- Slightly airy feel
Step 6: Degassing the Dough
Press dough gently to release excess gas.
Do not aggressively punch or tear it.
Gentle handling preserves structure.
Step 7: Dividing the Dough
Transfer dough onto work surface.
Divide into:
- 2 equal portions
Shape each into a smooth ball.
Cover and let rest for 10 minutes.
Why Resting Matters
Resting relaxes gluten, making shaping easier.
Without resting:
- Dough may shrink back
Step 8: Shaping the Turkish Bread
Flatten each dough ball into:
- Oval shape
or - Round shape
Thickness should be around:
- ½ inch
Traditional Appearance
Turkish bread is usually:
- Slightly thick
- Puffy
- Rustic looking
Avoid making it too thin.
Step 9: Creating the Signature Pattern
Using fingertips:
- Press lines gently into dough
Create:
- Diamond pattern
- Crosshatch design
- Parallel ridges
Purpose of the Pattern
The pattern:
- Prevents uneven puffing
- Helps toppings stick
- Creates authentic appearance
Step 10: Second Proofing
Place shaped dough onto parchment paper.
Cover lightly.
Allow to rise again for:
- 20 to 30 minutes
The dough should become slightly puffier.
Second proofing improves:
- Softness
- Airiness
- Final texture
Step 11: Preparing the Egg Wash
Mix:
- Egg yolk
- Milk
- Olive oil
Brush generously over dough.
Benefits of Egg Wash
Creates:
- Golden color
- Glossy finish
- Rich flavor
Step 12: Adding Toppings
Sprinkle:
- Sesame seeds
- Nigella seeds
- Herbs
Traditional Turkish breads often use nigella seeds because they add earthy flavor and beautiful appearance.
Step 13: Preheating the Air Fryer
Preheat air fryer to:
- 350°F
- 175°C
Preheat for:
- 3 to 5 minutes
Preheating ensures:
- Better oven spring
- Even cooking
Step 14: Air Frying the Bread
Carefully transfer bread into air fryer basket using parchment paper.
Cook at:
- 350°F
- 175°C
Cooking time:
- 10 to 15 minutes
Midway Check
After 8 minutes:
- Check browning
- Rotate if needed
Bread Is Ready When
- Surface becomes golden
- Bottom sounds hollow when tapped
- Crust feels lightly firm
Preventing Over-Browning
If top browns too quickly:
- Lower temperature slightly
- Cover loosely with foil if air fryer allows
Step 15: Cooling Properly
Remove bread carefully.
Place on cooling rack.
Allow to cool:
- 10 to 15 minutes
Cooling helps:
- Interior finish cooking
- Steam redistribute evenly
Cutting too early may create gummy texture.
Understanding Bread Texture
Exterior
Should be:
- Lightly crisp
- Thin crust
- Golden
Interior
Should be:
- Soft
- Moist
- Airy
- Slightly chewy
How to Achieve Ultra-Fluffy Bread
Use Enough Hydration
Softer dough creates softer bread.
Avoid Excess Flour
Too much flour creates heaviness.
Knead Thoroughly
Proper gluten traps air effectively.
Allow Full Proofing
Under-proofed bread becomes dense.
Use Fresh Yeast
Weak yeast causes poor rise.
Traditional Ways to Serve Turkish Bread
Turkish Breakfast
Serve with:
- Cheese
- Olives
- Tomatoes
- Cucumbers
- Honey
- Butter
- Tea
With Soups
Perfect alongside:
- Lentil soup
- Tomato soup
- Yogurt soup
With Kebabs
Excellent with:
- Chicken kebabs
- Beef kebabs
- Lamb dishes
As Sandwich Bread
Use for:
- Shawarma
- Grilled chicken
- Falafel
- Egg sandwiches
Dipping Bread
Dip into:
- Olive oil
- Hummus
- Garlic yogurt
- Spicy sauces
Garlic Butter Turkish Bread Variation
Additional Ingredients
- 3 tablespoons butter
- 3 garlic cloves
- Chopped parsley
Method
Brush garlic butter over warm bread after cooking.
This creates:
- Rich aroma
- Extra softness
- Restaurant-style flavor
Cheese Stuffed Turkish Bread
Filling Options
- Mozzarella
- Feta
- Cheddar
- Spinach and cheese mixture
Method
Place filling in center before shaping.
Seal edges carefully.
Cook slightly longer if needed.
Herb Turkish Bread
Add herbs into dough such as:
- Oregano
- Thyme
- Dill
- Basil
This variation pairs wonderfully with soups and grilled foods.
Whole Wheat Turkish Bread
Replace half the flour with:
- Whole wheat flour
You may need:
- Extra liquid
Whole wheat absorbs more moisture.
Spicy Turkish Bread
Add:
- Chili flakes
- Paprika
- Jalapeños
Excellent with grilled meats.
Sweet Turkish Bread Version
Add:
- Extra sugar
- Cinnamon
- Raisins
Serve with tea or coffee.
Bread Science Behind the Recipe
Fermentation
Yeast fermentation creates:
- Carbon dioxide
- Flavor compounds
Gluten Formation
Gluten traps gas bubbles.
Steam Creation
Moisture inside dough becomes steam during cooking, helping expansion.
Maillard Reaction
High heat creates browning and flavor on crust.
Why Air Fryers Cook Bread Differently
Air fryers circulate intense heat rapidly.
This:
- Creates quick crust formation
- Traps moisture inside
- Speeds cooking
Because air fryers are compact:
- Heat reaches bread faster
- Browning occurs more quickly
Common Bread Problems and Solutions
Problem: Bread Did Not Rise
Possible Causes
- Expired yeast
- Cold environment
- Hot liquids killed yeast
Solution
Use fresh yeast and warm ingredients.
Problem: Dense Bread
Causes
- Too much flour
- Insufficient proofing
- Under-kneading
Solution
Use softer dough and allow full rise.
Problem: Dry Bread
Causes
- Overcooking
- Too little liquid
Solution
Reduce cooking time slightly.
Problem: Burned Exterior
Causes
- Air fryer too hot
- Bread too close to heating element
Solution
Lower temperature.
Problem: Raw Center
Causes
- Bread too thick
- Cooking temperature too high
Solution
Cook longer at lower temperature.
Storing Turkish Bread
Room Temperature
Store in airtight container for:
- Up to 2 days
Refrigeration
Store up to:
- 5 days
Warm before serving.
Freezing
Wrap tightly.
Freeze for:
- Up to 2 months
Best Reheating Methods
Air Fryer Reheating
Heat at:
- 320°F
for: - 2 to 4 minutes
Oven Reheating
Wrap in foil.
Bake at:
- 300°F
for: - 8 minutes
Microwave Reheating
Use damp paper towel to prevent dryness.
Nutritional Information
Approximate per serving:
- Calories: 240
- Carbohydrates: 35g
- Protein: 7g
- Fat: 8g
- Fiber: 2g
Values vary depending on ingredients and toppings.
Tips from Experienced Bakers
Weigh Ingredients If Possible
Using a kitchen scale improves consistency.
Humidity Affects Flour
On humid days dough may need less liquid.
Dough Should Feel Soft
Very stiff dough usually creates heavy bread.
Patience Matters
Allowing enough rise time dramatically improves flavor and texture.
Making Restaurant-Style Turkish Bread
For more authentic flavor:
- Use olive oil generously
- Do not skip yogurt
- Create deep surface patterns
- Brush well with egg wash
Making Bread for Gatherings
Double the recipe easily for:
- Family dinners
- Parties
- Barbecues
- Ramadan meals
- Holiday gatherings
Turkish Bread and Cultural Importance
Bread holds deep importance in Turkish culture. It symbolizes:
- Hospitality
- Family
- Generosity
- Community
Fresh bread is often purchased daily and shared at every meal.
Making bread at home recreates this warm and comforting tradition.
Frequently Asked Questions
Can I use active dry yeast?
Yes. Dissolve first in warm liquid.
Can I prepare dough overnight?
Yes. Refrigerate after kneading.
Can I freeze baked bread?
Yes. Wrap tightly before freezing.
Can I make mini breads?
Yes. Reduce cooking time slightly.
Can I cook directly without parchment?
Yes, but parchment makes handling easier.
Why is my dough sticky?
Turkish bread dough should be somewhat soft and slightly sticky.
Final Thoughts
Air Fryer Turkish Bread is one of the most rewarding homemade bread recipes because it combines simplicity with incredible texture and flavor. The bread emerges warm, golden, fragrant, and beautifully fluffy. Every bite offers a perfect balance between softness and chewiness.
The air fryer method makes homemade bread accessible even for beginners. You do not need professional equipment or years of baking experience. With patience, proper proofing, and careful shaping, you can produce bakery-quality Turkish bread in your own kitchen.
Whether served alongside soups, grilled meats, breakfast spreads, dips, or sandwiches, this bread quickly becomes a favorite. The aroma alone transforms the kitchen into a warm and inviting space.
Once you master the basic recipe, you can experiment endlessly with herbs, cheese fillings, garlic butter toppings, seeds, and whole grains. Homemade Turkish bread is not only delicious but also deeply satisfying to prepare from scratch.
Freshly baked Turkish bread straight from the air fryer is soft, fluffy, flavorful, and comforting in every possible way.