Freshly baked Turkish bread has a texture that is difficult to resist. It has a soft, airy center, a lightly chewy bite, and a thin golden crust that makes every slice enjoyable. While this bread is often baked in traditional stone ovens, making it at home in an air fryer is an easy way to achieve a similar result without needing a large oven. The circulating hot air cooks the bread evenly, giving it a lovely color while keeping the inside tender and moist.
This recipe combines simple pantry ingredients with a straightforward bread-making process. Warm milk, yogurt, olive oil, and egg enrich the dough, producing a loaf that stays soft even after it cools. Once baked, the bread can be served alongside soups, grilled dishes, fresh salads, breakfast spreads, or used for sandwiches. It also tastes wonderful with a little butter while still slightly warm.
Whether you’re trying homemade bread for the first time or already enjoy baking, this recipe is simple to follow and produces dependable results every time.
Why You’ll Enjoy This Bread
- One of the reasons Turkish bread is so popular is its texture. Unlike crusty artisan loaves, this bread is made to be soft and flexible. It tears easily by hand, making it ideal for sharing around the table or pairing with a variety of meals.
- The dough creates a loaf with several qualities that make it stand out:
- Soft and fluffy inside
- Lightly chewy texture
- Thin golden crust
- Rich yeast flavor
- Moist crumb
- Flexible enough to fold without breaking
- Traditional patterned top
- Fresh homemade aroma
- These characteristics make it suitable for everyday meals, snacks, and special occasions alike.
Why Bake Turkish Bread in an Air Fryer?
- An air fryer is not only useful for crisp foods—it also works surprisingly well for bread. The compact cooking space and constant circulation of hot air allow the dough to bake evenly while creating a nicely browned crust.
- Some of the biggest advantages include:
- Faster Baking
- The air fryer reaches temperature quickly, reducing the overall baking time compared to a conventional oven.
- Even Browning
- The moving hot air helps the surface develop a beautiful golden finish without requiring extremely high temperatures.
- Soft Interior
- Because the bread cooks relatively quickly, moisture stays trapped inside, resulting in a tender crumb.
- Energy Efficient
- Heating an air fryer uses less electricity than preheating and running a full-sized oven, making it a practical option for smaller batches.
- Great for Small Families
- Instead of baking several large loaves, this recipe makes two medium Turkish breads that are easy to enjoy fresh.
- Comfortable During Warm Weather
- Using an air fryer keeps the kitchen much cooler than baking in a traditional oven.
- Preparation and Baking Time
- Making homemade bread requires some patience because the dough needs time to rise properly. Most of the total time is hands-off while the yeast develops flavor and creates the airy texture.
- Approximate timing:
- Preparation: 20–30 minutes
- First Rise: 1–1½ hours
- Shaping and Second Rise: 30 minutes
- Air Frying: 10–15 minutes
- Cooling: 10–15 minutes
- Total Time: About 2½–3 hours
- This recipe makes 2 medium Turkish breads, enough for approximately 6–8 servings.
Ingredients
For the Dough
- 3½ cups all-purpose flour
- 2 teaspoons instant yeast
- 1 tablespoon sugar
- 1 teaspoon salt
- ¾ cup warm milk
- ½ cup warm water
- ¼ cup plain yogurt
- 3 tablespoons olive oil
- 1 large egg
- For the Egg Wash
- 1 egg yolk
- 1 tablespoon milk
- 1 tablespoon olive oil
- Optional Toppings
- Sesame seeds
- Nigella seeds
- Black sesame seeds
- Flaky salt
- Dried herbs
These toppings are optional but add extra flavor and give the bread an attractive finish.
Understanding the Role of Each Ingredient
- Every ingredient contributes to the texture, flavor, and appearance of the finished bread.
- All-Purpose Flour
- Flour forms the structure of the dough. As it is mixed and kneaded, gluten develops, allowing the dough to trap air produced by the yeast. This creates the soft, airy interior that Turkish bread is known for.
- Instant Yeast
- Yeast is responsible for making the dough rise. During proofing, it produces tiny bubbles of carbon dioxide that expand throughout the dough, creating a light and fluffy texture after baking
- Sugar
- A small amount of sugar helps feed the yeast during the early stages of rising. It also encourages even browning, giving the bread its appealing golden crust.
- Salt
- Salt balances the overall flavor while strengthening the gluten structure. This helps the dough become easier to handle and improves the finished texture.
- Warm Milk
- Milk enriches the dough, making the bread softer and giving it a richer flavor. It also contributes to the tender crumb that stays moist after baking.
- Warm Water
- Warm water activates the yeast and combines with the other ingredients to form a smooth dough. Using water at the proper temperature encourages steady yeast activity.
- Plain Yogurt
- Yogurt adds moisture and helps keep the bread soft. It also provides a mild tang that complements the rich flavor of the dough without overpowering it.
- Olive Oil
- Olive oil keeps the dough supple while helping the finished bread remain soft for longer. It also adds a subtle richness that blends well with the other ingredients.
- Egg
- The egg enriches the dough and improves both texture and color. It helps create a softer loaf with a delicate crumb while contributing to an attractive finish after baking.
Gather Your Equipment Before Starting
- Having everything ready before mixing the dough makes the process much easier. You’ll need a large mixing bowl, measuring cups and spoons, a dough scraper, a rolling pin if desired, a pastry brush, parchment paper, an air fryer, a clean kitchen towel, and a cooling rack.
- Preparing these tools in advance allows you to focus on mixing, kneading, shaping, and baking without interruptions, making the entire bread-making process smoother and more enjoyable.
Preparing the Dough
- Making Turkish bread is a simple process when each step is given enough time. The dough develops its soft texture through proper mixing, kneading, and rising. Taking your time during these stages helps create bread that is light, fluffy, and full of flavor.
- Use the Right Liquid Temperature
- Before combining the ingredients, make sure the milk and water are warm rather than hot. The ideal temperature is 100°F–110°F (38°C–43°C).
- If the liquids are too cool, the yeast will activate slowly, causing the dough to rise poorly. If they are too hot, the yeast can be damaged, preventing the dough from rising altogether. The liquids should simply feel comfortably warm to the touch.
Step 1: Activate the Yeast
- In a large mixing bowl, combine the warm milk, warm water, sugar, and instant yeast. Stir gently until everything is mixed, then let the mixture sit for 5 to 10 minutes.
- As the yeast activates, you should notice a layer of foam forming on the surface along with tiny bubbles. The mixture may also expand slightly. These are all signs that the yeast is active and ready to use.
- If nothing changes after several minutes, the yeast may no longer be fresh, or the liquid temperature may not have been suitable.
Step 2: Mix the Wet Ingredients
- Once the yeast is active, add the plain yogurt, olive oil, and the large egg.
- Whisk everything together until the mixture becomes smooth and well blended. The mixture should have a slightly glossy appearance with no large streaks of yogurt or egg remaining.
- This combination adds richness to the dough and helps produce the soft texture Turkish bread is known for.
Step 3: Add the Dry Ingredients
- Gradually add the all-purpose flour and salt while stirring continuously.
- The dough will first appear rough and somewhat sticky. This is completely normal, so avoid adding extra flour too quickly. Continue mixing until all of the flour has been incorporated and a soft dough begins to form.
- A slightly sticky dough often produces a lighter and fluffier loaf after baking.
Step 4: Knead the Dough
- Transfer the dough to a lightly floured work surface.
- Knead it for about 8 to 12 minutes using a steady folding motion. Push the dough away with the palm of your hand, fold it back over itself, rotate it slightly, and repeat the process.
- As you continue kneading, the dough will gradually become smooth, soft, stretchy, and elastic.
- One easy way to check if the dough has been kneaded enough is the windowpane test. Gently stretch a small piece of dough between your fingers. If it stretches into a thin sheet without tearing immediately, the gluten has developed properly.
- Well-kneaded dough creates stronger structure, better rise, improved texture, and more air pockets throughout the finished bread.
Step 5: Allow the First Rise
- Lightly coat a clean bowl with a little oil.
- Place the dough inside and cover the bowl with plastic wrap or a clean kitchen towel.
- Leave it in a warm place for about 1 to 1½ hours, or until it has doubled in size.
- During this resting period, the yeast continues producing gas, which expands the dough while developing a richer flavor and a lighter texture.
- Avoid rushing this stage, as proper proofing has a major impact on the finished bread.
Step 6: Remove Excess Air
- Once the dough has doubled, gently press it down to release the larger air pockets.
- Handle the dough carefully instead of punching or tearing it. Gentle handling keeps much of the trapped air inside, helping the bread remain soft after baking.
Step 7: Divide and Rest
- Transfer the dough onto your work surface.
- Divide it into two equal portions and shape each one into a smooth ball.
- Cover the dough lightly and let it rest for about 10 minutes.
- This short resting period allows the gluten to relax, making the dough easier to shape without shrinking back.
Step 8: Shape the Bread
- Flatten each dough ball into either a round or oval shape.
- Aim for a thickness of approximately half an inch. Keeping the dough slightly thick allows it to rise nicely while baking, giving the bread its signature soft interior.
- Try to keep the thickness even across the entire surface so the bread cooks uniformly.
Step 9: Create the Traditional Pattern
- Using your fingertips, gently press lines into the dough to create the classic Turkish bread design.
- You can make diamond shapes, crosshatch lines, or simple parallel patterns.
- Besides giving the bread its traditional appearance, these shallow indentations encourage even baking, reduce uneven puffing, and help hold the toppings in place during cooking.
Step 10: Complete the Second Rise
- Place each shaped loaf onto parchment paper.
- Cover lightly and let the dough rise again for 20 to 30 minutes.
- Although this second rise is shorter than the first, it is equally important. It creates a lighter crumb, improves softness, and gives the bread a better final texture.
Step 11: Prepare the Egg Wash
- In a small bowl, mix together the egg yolk, milk, and olive oil until smooth.
- Brush the mixture generously over the surface of each loaf using a pastry brush.
- The egg wash gives the bread its attractive golden color, glossy finish, and slightly richer flavor once baked.
Step 12: Add the Toppings
- Sprinkle your preferred toppings evenly across the surface.
- Choose from:
- Sesame seeds
- Nigella seeds
- Black sesame seeds
- Flaky salt
- Dried herbs
- Nigella seeds are especially popular for traditional Turkish bread and add a pleasant aroma and mild flavor.
Step 13: Air Fry the Bread
- Preheat the air fryer to 350°F (175°C) for 3 to 5 minutes.
- Carefully transfer one prepared loaf into the air fryer basket using the parchment paper.
- Cook at 350°F (175°C) for 10 to 15 minutes.
- Around the 8-minute mark, check the bread. If your air fryer browns unevenly, rotate the bread to encourage even coloring.
- The bread is fully baked when the top is deep golden brown, the crust feels lightly firm, and the bottom produces a hollow sound when tapped.
Cool and Serve
- Remove the bread from the air fryer and place it on a cooling rack.
- Allow it to cool for 10 to 15 minutes before slicing. This short cooling period allows the steam inside the bread to redistribute, helping the crumb finish setting properly.
- Once cooled slightly, the bread is ready to enjoy with breakfast spreads, soups, grilled meats, fresh salads, sandwiches, or served alongside olive oil, hummus, garlic yogurt, and other favorite dips.
Helpful Tips for Success
- Use warm ingredients to encourage proper yeast activity.
- Avoid adding extra flour unless the dough is extremely wet.
- Knead thoroughly to develop a soft, elastic dough.
- Allow both rises to finish completely.
- Always preheat the air fryer before baking.
- Brush the bread generously with egg wash for the best color.
- Let the bread cool before slicing to preserve its texture.
- Store leftover bread properly and reheat it in the air fryer for a freshly baked taste.
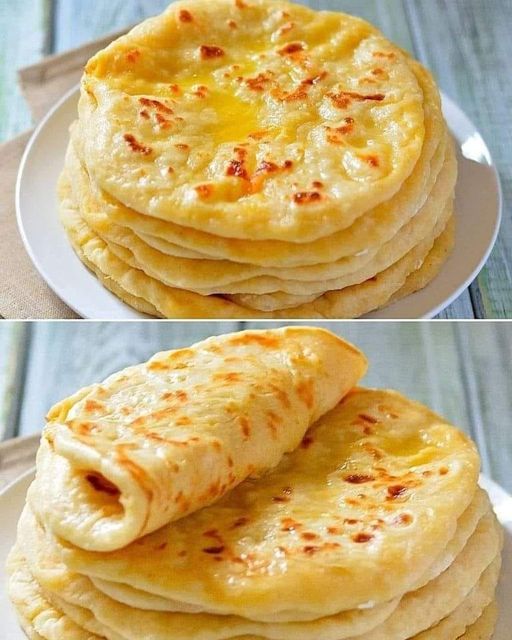
Air Fryer Turkish Bread Recipe – Soft, Fluffy, and Delicious
This Air Fryer Turkish Bread is soft, fluffy, and full of rich homemade flavor. Made with milk, yogurt, olive oil, and yeast, it bakes into a tender loaf with a light, airy crumb and a beautifully golden crust. It’s perfect for breakfast, sandwiches, soups, grilled dishes, or serving with your favorite dips.
6–8
servings20
minutes10
minutes260
kcal30
minutesIngredients
3½ cups all-purpose flour
2 teaspoons instant yeast
1 tablespoon sugar
1 teaspoon salt
¾ cup warm milk
½ cup warm water
¼ cup plain yogurt
3 tablespoons olive oil
1 large egg
1 egg yolk
1 tablespoon milk
1 tablespoon olive oil
Directions
- In a large mixing bowl, combine the warm milk, warm water, sugar, and instant yeast. Stir gently and let the mixture rest for 5–10 minutes until foamy.
- Add the plain yogurt, olive oil, and egg. Whisk until the mixture is smooth and fully combined.
- Gradually mix in the all-purpose flour and salt until a soft dough forms.
- Transfer the dough to a lightly floured surface and knead for 8–12 minutes, or until smooth, soft, and elastic.
- Lightly oil a clean bowl, place the dough inside, cover, and let it rise in a warm place for 1–1½ hours, or until doubled in size.
- Gently press the dough to release excess air without handling it roughly.
- Divide the dough into two equal portions and shape each into a smooth ball. Cover and let them rest for 10 minutes.
- Flatten each ball into a round or oval shape about ½ inch thick.
- Press a traditional diamond or crosshatch pattern over the surface using your fingertips.
- Place the shaped dough on parchment paper, cover lightly, and allow it to rise for another 20–30 minutes.
- In a small bowl, mix the egg yolk, milk, and olive oil. Brush the mixture generously over the tops of the loaves.
- Sprinkle with sesame seeds, nigella seeds, black sesame seeds, flaky salt, dried herbs, or your preferred combination of toppings.
- Preheat the air fryer to 350°F (175°C) for 3–5 minutes.
- Carefully transfer one loaf into the air fryer basket using the parchment paper. Air fry at 350°F (175°C) for 10–15 minutes, checking after about 8 minutes and rotating if needed for even browning.
- The bread is ready when the crust is golden brown and the bottom sounds hollow when tapped.
- Remove the bread from the air fryer and cool on a wire rack for 10–15 minutes before slicing and serving.
Notes
- Use warm milk and warm water (100°F–110°F / 38°C–43°C) for proper yeast activation.
- If the yeast does not become foamy after 5–10 minutes, replace it before continuing.
- Keep the dough slightly soft for a lighter, fluffier texture.
- Allow both rising stages to finish fully for the best results.
- Preheating the air fryer helps the bread bake evenly.
- Cool the bread before slicing to prevent a gummy texture.
- Store leftover bread in an airtight container at room temperature and reheat in the air fryer for a fresh-baked texture.
Nutrition Facts
- Calories: 260kcal
- Fat: 8g
- Saturated Fat: 2g
- Trans Fat: 0g
- Monounsaturated Fat: 5g
- Cholesterol: 40mg
- Sodium: 310mg
- Potassium: 115mg
- Carbohydrates: 39g
- Fiber: 2g
- Sugar: 3g
- Protein: 8g
- Calcium: 55mg
- Iron: 2mg