Microwave mug bread is a quick, practical, and satisfying bread recipe designed for situations when you want fresh bread but do not have the time, ingredients, or equipment required for traditional bread making. Conventional bread often involves yeast, kneading, proofing, shaping, and baking in an oven for extended periods. Mug bread, on the other hand, simplifies the process dramatically while still producing a warm, soft bread that can be enjoyed in many different ways.
This comprehensive recipe explores every aspect of microwave mug bread, from ingredient selection and preparation techniques to troubleshooting, storage, variations, serving suggestions, nutritional considerations, and advanced customization methods. Whether you are a beginner cook or an experienced baker looking for a fast alternative, this detailed guide provides everything needed to master microwave mug bread.
What Is Microwave Mug Bread?
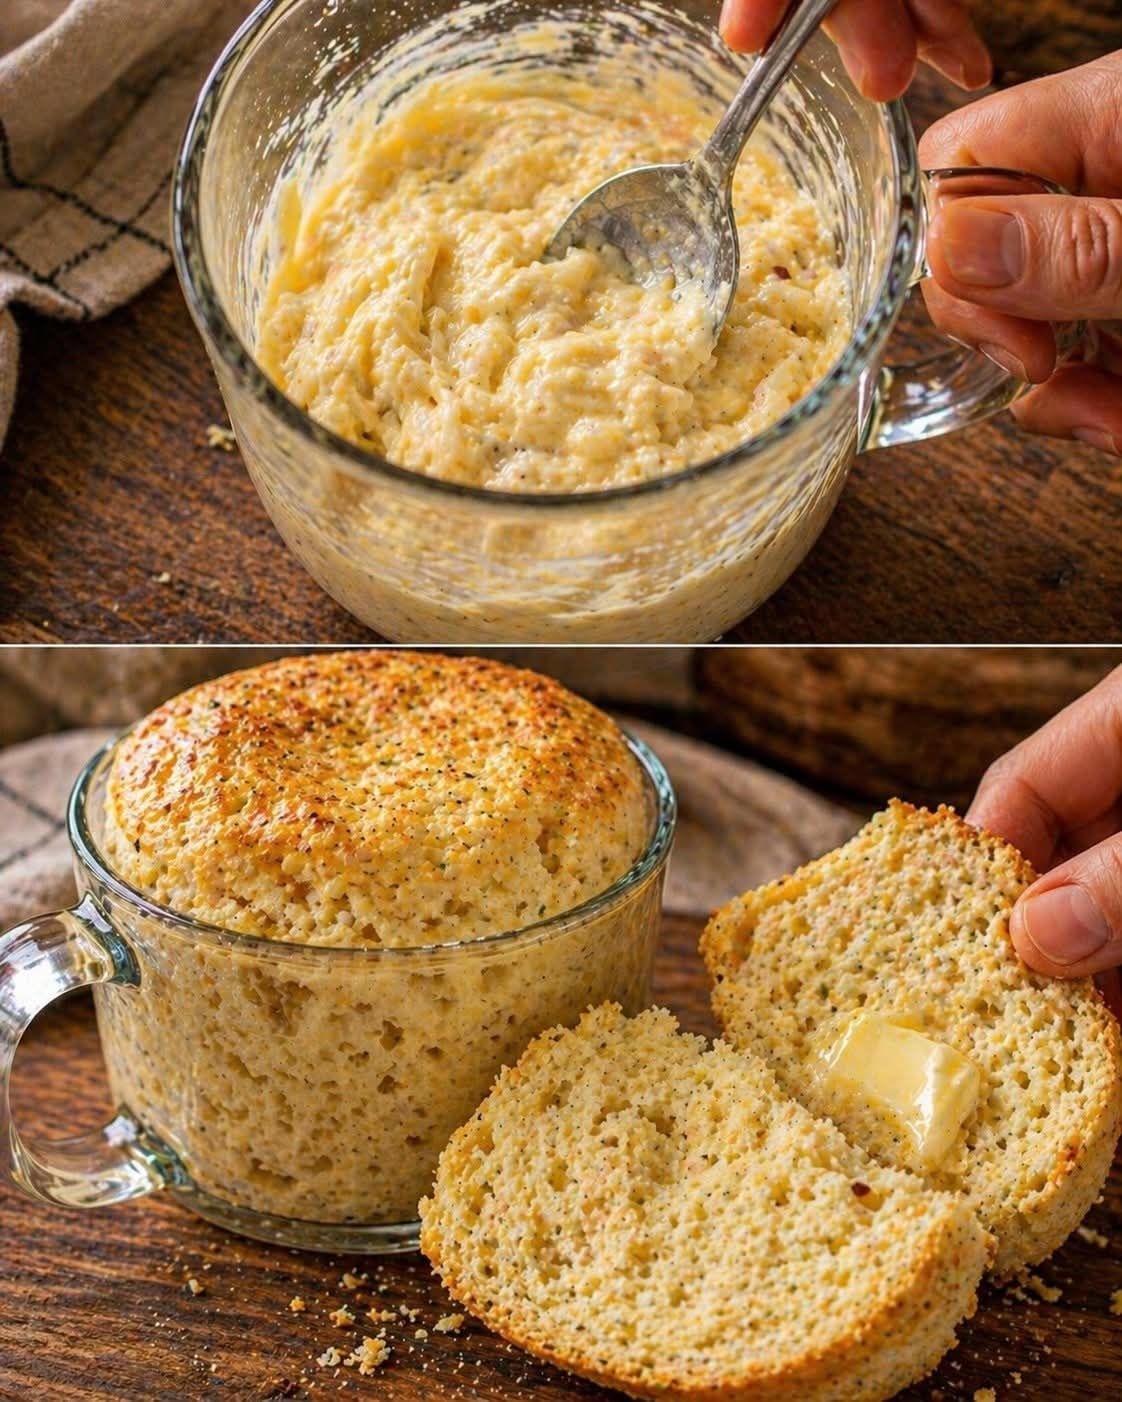
Microwave mug bread is a small batch bread prepared directly inside a microwave-safe mug. Instead of relying on yeast fermentation, the bread typically uses baking powder as the leavening agent. The ingredients are mixed in the mug, cooked in the microwave, and ready to eat within minutes.
The bread is especially useful when:
- You need a single serving of bread.
- You do not want to bake an entire loaf.
- You have limited kitchen equipment.
- You are living in a dormitory, hostel, apartment, or temporary accommodation.
- You want a quick accompaniment for soups, stews, or breakfast dishes.
- You need fresh bread immediately.
Although the texture differs from traditional oven-baked bread, microwave mug bread offers convenience that few other bread recipes can match.
History and Evolution of Mug Recipes
The popularity of mug recipes increased significantly with the widespread use of microwave ovens. Initially, mug cakes became popular because they provided a fast way to satisfy dessert cravings. Over time, cooks adapted the concept to savory foods including mug pizzas, mug muffins, mug omelets, and mug breads.
Microwave mug bread emerged as a practical solution for people seeking fresh bread without investing substantial time or effort. Today, countless variations exist, ranging from simple white bread recipes to sophisticated versions featuring herbs, cheeses, vegetables, seeds, and specialty flours.
Characteristics of Good Microwave Mug Bread
A successful microwave mug bread should possess the following qualities:
- Soft interior texture.
- Even cooking throughout.
- Pleasant bread aroma.
- Mild flavor that pairs well with other foods.
- Light structure with small air pockets.
- Sufficient moisture without becoming gummy.
- Easy release from the mug.
- Stable shape after cooking.
Achieving these characteristics depends on ingredient ratios, mixing technique, microwave power, and cooking time.
Ingredient List
Basic Ingredients
4 tablespoons all-purpose flour
1/4 teaspoon baking powder
1/8 teaspoon salt
1/2 teaspoon sugar
3 tablespoons milk
1 tablespoon vegetable oil or melted butter
Optional Ingredients
Garlic powder
Onion powder
Italian seasoning
Dried oregano
Dried thyme
Dried basil
Black pepper
Chili flakes
Parmesan cheese
Cheddar cheese
Mozzarella cheese
Sesame seeds
Flaxseeds
Sunflower seeds
Pumpkin seeds
Fresh herbs
Grated vegetables
Honey
Cinnamon
Nutmeg
Equipment Required
Microwave-safe mug
Measuring spoons
Mixing spoon
Small whisk (optional)
Microwave oven
Cooling rack or plate
Knife for slicing
Butter knife for serving
Understanding Each Ingredient in Detail
Flour
Flour forms the foundation of the bread. It provides structure and determines much of the final texture.
All-purpose flour is the most commonly used option because it balances protein content and tenderness.
Different flour choices affect the bread significantly.
All-Purpose Flour
Produces a balanced texture.
Easy to find.
Reliable and versatile.
Bread Flour
Contains more protein.
Creates a slightly chewier texture.
May require additional liquid.
Whole Wheat Flour
Adds fiber and nutrients.
Creates a denser texture.
Produces a nuttier flavor.
Oat Flour
Adds softness.
Provides mild sweetness.
May require adjustments to liquid levels.
Gluten-Free Flour Blend
Suitable for individuals avoiding gluten.
Results vary depending on the blend used.
Baking Powder
Baking powder acts as the primary leavening agent.
When heated, baking powder releases gases that create air pockets inside the bread.
Fresh baking powder is essential.
Old baking powder may result in:
- Dense bread.
- Poor rise.
- Heavy texture.
- Reduced softness.
Salt
Salt plays a much larger role than many people realize.
Functions include:
- Enhancing flavor.
- Balancing sweetness.
- Strengthening structure.
- Improving overall taste perception.
Even a small amount contributes significantly.
Sugar
Sugar is optional but beneficial.
Advantages include:
- Improved flavor.
- Better moisture retention.
- Slight tenderness.
- Enhanced browning flavor notes.
The bread will not taste sweet with the amount used in this recipe.
Milk
Milk provides moisture and contributes to texture.
Different milk options include:
Whole milk
Low-fat milk
Skim milk
Soy milk
Almond milk
Oat milk
Coconut milk
Each produces slightly different results.
Oil or Butter
Fat contributes tenderness and softness.
Oil generally produces softer bread.
Butter provides richer flavor.
Olive oil contributes a subtle savory note.
Detailed Preparation Process
Step 1: Selecting the Mug
Choose a mug that holds at least 12 ounces.
This is important because the batter expands during cooking.
A mug that is too small may cause overflow.
The ideal mug should:
- Be microwave safe.
- Have straight or slightly sloped sides.
- Be clean and dry.
- Allow room for expansion.
Step 2: Greasing the Mug
Apply a thin coating of oil or butter.
Benefits include:
- Easier removal.
- Reduced sticking.
- Better appearance.
- Improved cleanup.
Step 3: Combining Dry Ingredients
Add:
Flour
Baking powder
Salt
Sugar
Mix thoroughly.
Proper distribution of baking powder ensures even rising.
Take time during this step because uneven mixing can produce inconsistent texture.
Step 4: Adding Wet Ingredients
Pour in:
Milk
Oil or melted butter
Mix carefully.
Scrape the sides and bottom of the mug.
Continue mixing until no dry flour remains.
Step 5: Evaluating Consistency
The batter should resemble thick cake batter.
Signs of correct consistency:
- Smooth appearance.
- Thick but stirrable texture.
- No dry patches.
- No excessive liquid pooling.
Step 6: Microwave Cooking
Place the mug in the center of the microwave.
Cook on high power.
Typical cooking times:
700-watt microwave: 2 to 3 minutes
900-watt microwave: 1 minute 45 seconds to 2 minutes 15 seconds
1000-watt microwave: 1 minute 30 seconds to 2 minutes
1200-watt microwave: 1 minute 20 seconds to 1 minute 45 seconds
Cooking times vary considerably.
Step 7: Checking Doneness
Indicators of fully cooked bread include:
- Dry surface.
- Firm center.
- Slight springiness when touched.
- No wet batter visible.
If necessary, continue cooking in 10-second intervals.
Step 8: Cooling
Allow the bread to cool briefly.
This resting period:
- Stabilizes structure.
- Improves texture.
- Makes removal easier.
- Prevents burns.
Step 9: Removing from the Mug
Run a knife gently around the edge.
Invert onto a plate.
Tap lightly if necessary.
The bread should release easily.
Texture Science
Microwave cooking differs dramatically from oven baking.
Traditional ovens:
- Heat from outside inward.
- Create crust formation.
- Encourage gradual expansion.
Microwaves:
- Heat water molecules directly.
- Cook rapidly.
- Produce minimal crust.
As a result, mug bread generally has:
- Softer exterior.
- More uniform interior.
- Less browning.
- Greater moisture retention.
Understanding this difference helps manage expectations.
Flavor Variations
Garlic Herb Bread
Add:
1/4 teaspoon garlic powder
1/2 teaspoon dried oregano
1/2 teaspoon dried basil
1/4 teaspoon dried thyme
This creates a flavorful bread suitable for soups and pasta dishes.
Cheese Bread
Add:
2 tablespoons shredded cheddar
2 tablespoons mozzarella
1 tablespoon parmesan
The cheese contributes richness and additional moisture.
Pepper Bread
Add:
1/2 teaspoon cracked black pepper
1 tablespoon parmesan cheese
Produces a savory, aromatic bread.
Mediterranean Bread
Add:
Olives
Oregano
Feta cheese
Black pepper
This variation pairs beautifully with salads.
Chili Bread
Add:
Chili flakes
Black pepper
Garlic powder
Cheddar cheese
Creates a spicy version suitable for snacks.
Sweet Variations
Cinnamon Mug Bread
Add:
1 tablespoon sugar
1/2 teaspoon cinnamon
Pinch nutmeg
Produces a breakfast-style bread.
Honey Mug Bread
Add:
1 teaspoon honey
Extra teaspoon milk
Results in mild sweetness and increased moisture.
Raisin Bread
Add:
1 tablespoon raisins
1/2 teaspoon cinnamon
Creates a comforting breakfast bread.
Apple Spice Bread
Add:
Finely diced apple
Cinnamon
Nutmeg
Brown sugar
Produces a warm, autumn-inspired flavor profile.
Advanced Techniques
Double Mixing Method
Mix dry ingredients thoroughly first.
Then combine wet ingredients separately.
Finally combine both.
Advantages:
- Better consistency.
- More uniform texture.
- Improved rise.
Resting the Batter
Allow batter to rest for 2 minutes before microwaving.
Benefits:
- Better hydration.
- More even texture.
- Improved consistency.
Layered Flavor Method
Mix half the batter.
Add cheese or herbs.
Cover with remaining batter.
Produces distinct layers of flavor.
Common Problems and Solutions
Bread Is Tough
Causes:
Overmixing
Excess flour
Overcooking
Solutions:
Mix gently.
Measure accurately.
Reduce cooking time.
Bread Is Dense
Causes:
Expired baking powder
Insufficient leavening
Heavy batter
Solutions:
Use fresh baking powder.
Verify measurements.
Avoid excessive mixing.
Bread Is Dry
Causes:
Excess microwave time
Too little milk
Too little fat
Solutions:
Reduce cooking time.
Increase liquid slightly.
Add extra oil.
Bread Is Gummy
Causes:
Undercooking
Excess liquid
Insufficient flour
Solutions:
Cook longer.
Reduce liquid.
Increase flour slightly.
Bread Has No Flavor
Causes:
Insufficient salt
Lack of seasonings
Solutions:
Add herbs.
Use cheese.
Increase flavorings appropriately.
Nutritional Discussion
The nutritional content varies depending on ingredients.
A basic mug bread generally contains:
Calories: 220–280
Protein: 4–7 grams
Carbohydrates: 25–35 grams
Fat: 8–14 grams
Fiber: 1–3 grams
Adding whole grains, seeds, and vegetables increases nutritional value.
Serving Suggestions
Serve with:
Butter
Jam
Honey
Peanut butter
Cream cheese
Scrambled eggs
Fried eggs
Avocado
Hummus
Soup
Stew
Curry
Chicken salad
Tuna salad
Roasted vegetables
Cheese spreads
Nut butters
Fruit preserves
Chocolate spread
Yogurt
Fresh fruit
Pairing Ideas
Breakfast
Microwave mug bread with scrambled eggs and fresh fruit.
Lunch
Microwave mug bread served alongside vegetable soup.
Dinner
Microwave mug bread paired with stew or curry.
Snack
Microwave mug bread topped with cream cheese and herbs.
Dessert
Sweet cinnamon mug bread with honey.
Storage and Reheating
Although best consumed fresh, mug bread can be stored.
Room Temperature
Store in airtight container.
Consume within 24 hours.
Refrigeration
Store up to 3 days.
Reheat before serving.
Freezing
Wrap tightly.
Freeze up to 1 month.
Thaw before reheating.
Reheating Method
Microwave 10 to 15 seconds.
Avoid excessive reheating because dryness can occur.
Frequently Asked Questions
Can I Make Mug Bread Without Milk?
Yes.
Use water, plant milk, or diluted yogurt.
Can I Use Whole Wheat Flour?
Yes.
Expect denser texture and slightly nuttier flavor.
Can I Add Cheese?
Absolutely.
Cheese enhances flavor and richness.
Can I Use Self-Rising Flour?
Yes.
Reduce or eliminate added baking powder and salt.
Why Is My Bread Rubbery?
Overcooking is usually the primary cause.
Why Didn’t My Bread Rise?
The baking powder may be expired or improperly measured.
Can I Toast Mug Bread?
Yes.
Slice and toast lightly after cooling.
Can I Make Sandwiches With It?
Yes.
Allow it to cool completely before slicing.
Can I Add Seeds?
Yes.
Seeds provide texture and nutritional benefits.
Can Children Make This Recipe?
With adult supervision for microwave use, this recipe is generally simple enough for beginners.
Conclusion
Microwave mug bread is one of the fastest methods for creating fresh homemade bread from basic pantry ingredients. Despite its simplicity, the recipe offers tremendous flexibility. By adjusting flour types, seasonings, cheeses, herbs, sweeteners, fruits, vegetables, and seeds, you can create countless unique variations suited to nearly any meal or occasion. The convenience of mixing ingredients directly in a mug and cooking them within minutes makes this recipe especially valuable for busy schedules, small households, students, travelers, and anyone seeking a quick bread solution. With practice, experimentation, and attention to ingredient balance, microwave mug bread can become a dependable staple that delivers fresh, warm bread whenever you need it.