Introduction to Thermomix Biscuits
Thermomix biscuits are among the most rewarding homemade baked treats because they combine simplicity, comfort, creativity, and consistency. A Thermomix machine makes biscuit preparation faster and more reliable by automating many important baking processes such as mixing, creaming, kneading, grinding, whipping, and blending.
Biscuits made in a Thermomix can range from buttery tea biscuits and crisp cookies to soft vanilla biscuits, chocolate chip biscuits, sandwich biscuits, jam-filled biscuits, festive holiday biscuits, spiced biscuits, nut biscuits, iced biscuits, coconut biscuits, and countless custom creations.
This guide is intentionally extremely detailed and long. It explains every ingredient, every stage, every technique, every mistake to avoid, and every possible variation so that even a beginner can confidently produce bakery-style biscuits at home.
The recipe itself is easy, but understanding the small details can dramatically improve the final texture, flavor, aroma, shape, appearance, and shelf life of your biscuits.
What Makes Thermomix Biscuits Special
Traditional biscuit recipes require separate bowls, electric mixers, hand mixing, kneading surfaces, and extra cleanup. Thermomix simplifies nearly everything.
The machine helps with:
Precise mixing
Consistent dough texture
Fast ingredient incorporation
Even creaming of butter and sugar
Controlled kneading
Grinding nuts or sugar
Melting chocolate
Preparing fillings and icings
Reducing preparation time
The consistency of the Thermomix is one of its greatest advantages. Because the blade movement and speed are controlled, dough texture becomes easier to repeat successfully.
Understanding Biscuit Types
Before starting, it is useful to understand the main categories of biscuits.
1. Crisp Biscuits
These are dry, crunchy, and snappy. They usually contain:
More sugar
Longer baking time
Thinner dough
Examples:
Tea biscuits
Butter cookies
Shortbread-style biscuits
2. Soft Biscuits
These remain tender and slightly chewy.
They usually contain:
More moisture
Slightly less baking time
More butter or egg yolk
Examples:
Soft vanilla biscuits
Chewy chocolate chip cookies
3. Shortbread Biscuits
These are rich and buttery with a crumbly texture.
Characteristics:
High butter content
Minimal liquid
Fine texture
4. Decorative Biscuits
These are designed for icing and shaping.
Characteristics:
Firm dough
Smooth surface
Minimal spreading during baking
Complete Ingredient Breakdown
Unsalted Butter – 250 g
Butter is the heart of biscuit flavor.
Functions:
Provides richness
Creates tenderness
Improves mouthfeel
Adds aroma
Helps browning
Unsalted butter is preferred because:
You control the salt level
Flavor is cleaner
Texture is more predictable
Butter temperature matters greatly.
Correct butter texture:
Soft enough to press gently
Not oily
Not melted
If butter is too cold:
Creaming becomes difficult
If butter is melted:
Biscuits spread excessively
Caster Sugar – 180 g
Caster sugar dissolves more easily than regular granulated sugar.
Functions:
Sweetness
Texture
Browning
Spread control
Crispness
More sugar creates:
Crisper biscuits
More caramelization
Less sugar creates:
Softer texture
Less browning
Eggs – 2 Large
Eggs provide:
Structure
Moisture
Binding
Color
Protein
Egg yolks add richness while egg whites contribute structure.
Room-temperature eggs combine more smoothly.
Vanilla Extract – 2 teaspoons
Vanilla enhances the overall flavor.
Good vanilla creates:
Warm aroma
Balanced sweetness
Professional bakery flavor
Plain Flour – 500 g
Flour forms the biscuit structure.
Too much flour:
Dry biscuits
Dense texture
Too little flour:
Flat spreading biscuits
Cornflour – 40 g
Cornflour softens the texture.
Benefits:
Creates delicate crumb
Improves melt-in-mouth feeling
Reduces heaviness
Baking Powder – 1 teaspoon
Provides slight lift.
Too much:
Puffy biscuits
Too little:
Dense biscuits
Salt – 1 pinch
Salt balances sweetness and improves flavor depth.
Even sweet biscuits benefit from salt.
Optional Ingredients and Their Effects
Cocoa Powder
Creates chocolate flavor.
Use unsweetened cocoa.
Adding cocoa may require:
Slightly more moisture
Chocolate Chips
Provide bursts of melted chocolate.
Dark chocolate:
Richer flavor
Milk chocolate:
Sweeter taste
White chocolate:
Creamier sweetness
Coconut
Adds texture and tropical flavor.
Cinnamon
Creates warmth and spice.
Excellent for:
Winter biscuits
Tea biscuits
Lemon Zest
Adds freshness and brightness.
Orange Zest
Creates aromatic citrus notes.
Nuts
Almonds
Pistachios
Walnuts
Hazelnuts
These add:
Crunch
Richness
Flavor complexity
Full Equipment Guide
Thermomix Machine
Main preparation tool.
Functions used:
Mixing
Kneading
Chopping
Melting
Baking Trays
Heavy trays bake more evenly.
Thin trays may burn biscuit bottoms.
Baking Paper
Prevents sticking.
Improves even baking.
Cooling Rack
Allows airflow around biscuits.
Prevents soggy bottoms.
Rolling Pin
Used for flattening dough evenly.
Biscuit Cutters
Different shapes create visual variety.
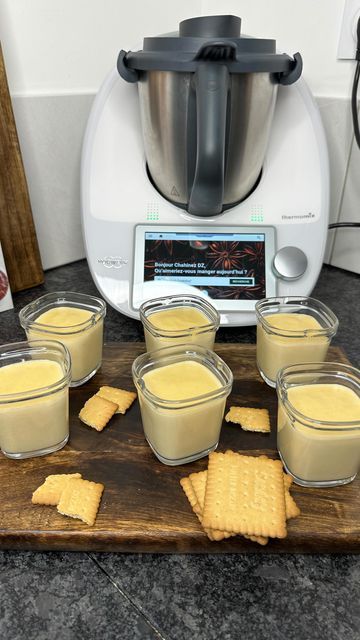
Full Preparation Process
Stage 1: Organizing the Workspace
Professional bakers organize ingredients before starting.
This is called:
“Mise en place”
Benefits:
Reduces mistakes
Improves workflow
Prevents forgotten ingredients
Prepare:
Measured ingredients
Lined trays
Preheated oven
Clean surfaces
Stage 2: Preparing the Butter
Butter consistency is one of the most important baking factors.
Perfect butter texture:
Cool but soft
Test:
Press finger lightly into butter.
If finger leaves gentle indentation:
Ready
If butter collapses:
Too warm
If butter resists:
Too cold
Stage 3: Creaming Butter and Sugar
Place butter and sugar into Thermomix bowl.
Mix:
40 seconds
Speed 4
Scrape bowl.
Mix:
Another 30 seconds
Speed 4
This stage incorporates air.
Air pockets help:
Lighter texture
Better rise
Improved structure
Correct creamed mixture:
Paler color
Fluffy appearance
Smooth texture
Stage 4: Adding Eggs
Add eggs one at a time if desired.
Mix:
20 seconds
Speed 4
Scrape bowl.
Mix again briefly.
Do not overmix.
Overmixing eggs may:
Develop gluten later
Create tough biscuits
Stage 5: Flavoring
Add:
Vanilla
Zest
Coffee
Spices
Flavor should be evenly distributed.
Stage 6: Adding Dry Ingredients
Add:
Flour
Cornflour
Baking powder
Salt
Mix:
20 seconds
Speed 5
Then:
Dough Mode
40 seconds
Stop once dough combines.
Avoid excessive kneading.
Why?
Too much mixing develops gluten.
Gluten development causes:
Hard biscuits
Chewy texture
Reduced tenderness
Stage 7: Dough Evaluation
Correct dough should be:
Soft
Smooth
Non-sticky
Easy to handle
If too sticky:
Chill longer
If too dry:
Add tiny amount milk
Stage 8: Chilling the Dough
Wrap dough tightly.
Refrigerate:
30–60 minutes
Benefits:
Butter firms
Flavor improves
Rolling becomes easier
Spreading reduces
Professional bakers often chill overnight for enhanced flavor.
Stage 9: Rolling Dough
Lightly flour surface.
Roll evenly.
Thickness determines texture.
Thin dough:
Crunchier biscuits
Thick dough:
Softer biscuits
Ideal standard:
5–6 mm
Stage 10: Cutting Shapes
Press cutters firmly.
Avoid twisting cutters because twisting seals edges and prevents even rise.
Re-roll scraps gently.
Too much rerolling may toughen dough.
Stage 11: Decorating Before Baking
Possible toppings:
Sugar
Sprinkles
Nuts
Jam
Chocolate pieces
For shiny tops:
Brush with milk or egg wash.
Stage 12: Baking
Temperature:
170°C fan
180°C conventional
Time:
12–15 minutes
Watch carefully.
Perfect biscuits:
Light golden edges
Set centers
Even color
Understanding Oven Behavior
Every oven behaves differently.
Some run:
Hotter
Cooler
Unevenly
Use oven thermometer if possible.
Signs of Underbaking
Pale bottoms
Raw centers
Very soft structure
Signs of Overbaking
Dark edges
Dry texture
Burnt aroma
Cooling Science
Biscuits continue cooking slightly after removal.
Cooling allows:
Structure stabilization
Moisture redistribution
Texture development
Never stack hot biscuits.
Steam causes sogginess.
Decorating After Baking
Simple Icing
Ingredients:
Icing sugar
Milk
Vanilla
Mix until smooth.
Royal Icing
Used for detailed decorations.
Ingredients:
Egg white powder or egg whites
Icing sugar
Lemon juice
Chocolate Coating
Melt chocolate in Thermomix.
Dip biscuits halfway.
Allow to set.
Jam Filling
Spread jam between two biscuits.
Dust top with icing sugar.
Advanced Biscuit Variations
Chocolate Thermomix Biscuits
Replace:
40 g flour
With:
40 g cocoa powder
Add:
Chocolate chips
Result:
Rich chocolate biscuits
Coconut Biscuits
Add:
70 g desiccated coconut
Result:
Chewy coconut flavor
Lemon Biscuits
Add:
2 tablespoons lemon zest
Optional lemon glaze.
Coffee Biscuits
Add:
1 tablespoon instant coffee
Excellent with dark chocolate.
Almond Biscuits
Add:
Almond extract
Ground almonds
Cinnamon Biscuits
Add:
2 teaspoons cinnamon
Perfect with tea.
Pistachio Rose Biscuits
Add:
Rosewater
Chopped pistachios
Elegant flavor profile.
Sandwich Biscuits
Bake thinner biscuits.
Pair with:
Jam
Chocolate ganache
Buttercream
Caramel
Filled Thumbprint Biscuits
Press thumb indentation before baking.
Fill with:
Jam
Chocolate
Caramel
Holiday Thermomix Biscuits
Eid Biscuits
Add:
Cardamom
Pistachio
Rosewater
Decorate elegantly.
Christmas Biscuits
Add:
Ginger
Nutmeg
Cinnamon
Use festive cutters.
Valentine Biscuits
Heart shapes
Pink icing
Strawberry filling
Birthday Biscuits
Bright icing
Sprinkles
Colorful decorations
Professional Texture Control
How to Create Ultra-Crisp Biscuits
Use:
More sugar
Thin rolling
Longer baking
Cool fully before storage.
How to Create Melt-in-Mouth Biscuits
Use:
More cornflour
Gentle mixing
Short baking
How to Create Soft Chewy Biscuits
Use:
Brown sugar
Slight underbaking
Storage Science
Biscuits absorb moisture from air.
Store in:
Airtight containers
Separate soft and crisp biscuits.
Otherwise:
Textures change
Freezing Instructions
Freezing Dough
Wrap tightly.
Freeze up to:
3 months
Freezing Baked Biscuits
Cool fully first.
Store in freezer-safe container.
Troubleshooting Complete Guide
Problem: Dough Too Sticky
Causes:
Warm butter
Hot weather
Too little flour
Solutions:
Refrigerate longer
Add tiny flour amount
Problem: Dry Dough
Causes:
Too much flour
Overmixing
Solutions:
Add milk carefully
Problem: Biscuits Spread Excessively
Causes:
Warm dough
Too much butter
Solutions:
Chill trays before baking
Problem: Uneven Browning
Causes:
Uneven oven heat
Solutions:
Rotate trays halfway
Problem: Hard Biscuits
Causes:
Overbaking
Too much gluten
Solutions:
Mix less
Bake shorter
Baking Science Explained
Why Butter Matters
Butter melts during baking.
This creates:
Spread
Flavor
Tenderness
Why Sugar Matters
Sugar melts and caramelizes.
Creates:
Color
Crispness
Flavor
Why Flour Matters
Flour proteins form gluten.
Too much gluten:
Tough texture
Controlled gluten:
Balanced structure
Why Chilling Matters
Cold dough spreads slower.
Result:
Better shapes
Improved texture
Large Batch Thermomix Biscuit Production
For parties or events:
Double recipe carefully.
Avoid overfilling Thermomix bowl.
Work in batches if necessary.
Serving Suggestions
Serve biscuits with:
Tea
Coffee
Milk
Hot chocolate
Can also accompany:
Ice cream
Custard
Fruit platters
Gift Packaging Ideas
Glass jars
Metal tins
Ribbon boxes
Transparent bags
Homemade biscuits make excellent gifts.
Homemade Biscuit Business Tips
If selling biscuits:
Maintain consistent size
Use digital scales
Package professionally
Label ingredients clearly
Popular flavors:
Chocolate chip
Vanilla butter
Coconut
Pistachio
Lemon
Full Example Baking Timeline
10:00 AM
Prepare ingredients
10:10 AM
Cream butter and sugar
10:15 AM
Add eggs and dry ingredients
10:20 AM
Finish dough
10:25 AM
Chill dough
11:00 AM
Roll and cut biscuits
11:15 AM
Bake first tray
11:30 AM
Cool and decorate
Approximate Nutritional Information Per Biscuit
Calories: 120–160
Fat: 6–8 g
Carbohydrates: 14–18 g
Protein: 2 g
Sugar: 6–9 g
Values depend on size and additions.