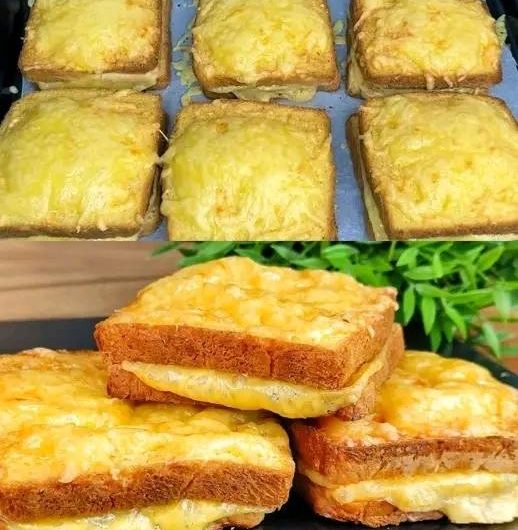
AIR FRYER 3-INGREDIENT CHEESE TOAST
Why This Recipe Is Amazing
This recipe is:
- Only 3 ingredients
- Ready in under 10 minutes
- Crispy on the outside, gooey on the inside
- Perfect for breakfast, snack, late-night cravings, or lazy meals
- Requires no stove, no oven, no butter, no oil
The air fryer does all the work
INGREDIENTS (ONLY THREE!)
Bread – 2 slices
You can use any bread, but each gives a different result:
- White bread → Soft inside, classic comfort-food taste
- Whole wheat bread → Slightly nutty, healthier feel
- Sourdough → Extra crispy with a chewy center
- Multigrain → Crunchy texture with more flavor
- Sandwich bread → Best for melty cheese coverage
Thickness matters:
- Thin bread = crispier toast
- Thick bread = softer inside
Cheese – ½ to ¾ cup (shredded or sliced)
Cheese is the STAR
Best cheeses:
- Mozzarella → Super stretchy and mild
- Cheddar → Sharp, bold flavor
- Processed cheese slices → Ultra creamy melt
- Colby Jack → Smooth and rich
- Monterey Jack → Mild and buttery
Tip:
- Shredded cheese melts more evenly
- Sliced cheese melts smoother but slower
You can mix cheeses too—but that would technically make it advanced level
Salt – a tiny pinch (optional but recommended)
Salt enhances cheese flavor.
- Just one small pinch
- Skip if your cheese is already salty
EQUIPMENT NEEDED
- Air Fryer
- Tongs or spatula
- Plate
That’s it!
STEP-BY-STEP INSTRUCTIONS (EXTREMELY DETAILED)
STEP 1: Preheat the Air Fryer (Optional but Best)
- Set air fryer to 180°C / 350°F
- Preheat for 2–3 minutes
Why preheat?
- Ensures even melting
- Prevents soggy bread
- Helps cheese melt before bread dries out
STEP 2: Prepare the Bread
- Place bread slices on a clean plate
- Make sure the bread is dry
- Moist bread = soggy toast
Do NOT butter the bread
Do NOT oil the basket
The cheese provides enough fat.
STEP 3: Add Cheese
- Sprinkle cheese evenly over each slice
- Cover the bread edge-to-edge
- Don’t overload (too much cheese = messy melt)
Ideal thickness:
- Enough to cover bread
- About ¼ inch thick layer
STEP 4: Add Salt (Optional)
- Sprinkle just a pinch
- Spread evenly
Cheese flavor becomes brighter with salt!
STEP 5: Place Toast in Air Fryer
- Carefully place slices into air fryer basket
- Leave space between slices
- Make sure cheese faces up
Never stack slices!
STEP 6: Air Fry
- Temperature: 180°C / 350°F
- Time: 4–6 minutes
⏱️ Check at:
- 3 minutes → Cheese just starting to melt
- 4 minutes → Perfect melt
- 5–6 minutes → Golden, bubbly cheese
Watch closely:
- Cheese melts fast
- Bread can burn if ignored
STEP 7: Final Crisp (Optional)
For extra crispy cheese:
- Increase temp to 200°C / 390°F
- Air fry 30–60 seconds
This creates:
- Light browning
- Crispy cheese edges
STEP 8: Remove and Rest
- Use tongs
- Transfer to plate
- Let rest 30 seconds
Why?
- Cheese sets slightly
- Prevents mouth burns
TEXTURE & TASTE BREAKDOWN
- Bottom: Golden & crisp
- Middle: Soft bread
- Top: Melty, stretchy cheese
- Edges: Light crunch
🔄 COMMON MISTAKES (AVOID THESE!)
Too much cheese → Overflow mess
High heat too early → Burnt bread No checking → Overcooked toast
Stacking → Uneven cooking
OPTIONAL UPGRADES (Still Simple!)
(Not part of the 3 ingredients, but fun!)
- Black pepper
- Chili flakes
- Garlic powder
- Oregano
- Italian seasoning
Sprinkle after cooking for best aroma.
SERVING IDEAS
- With ketchup
- With tomato soup
- With tea or coffee
- As open-face sandwich
- Cut into triangles for kids
STORAGE (If You Must)
Best eaten fresh, but:
- Can refrigerate for 1 day
- Reheat in air fryer 2 minutes at 160°C