Section 1: Ingredients in Depth
1. Heavy Cream (Core Ingredient)
Quantity: 1 cup (cold)
Heavy cream is the foundation of this dessert. It provides:
- Structure (when whipped)
- Smooth texture
- Rich flavor
Important details:
- It must be cold (straight from the fridge)
- Fat content should be high (around 30% or more)
- Low-fat cream will not whip properly
Signs of good cream:
- Thick but pourable
- No sour smell
- Uniform texture (not watery)
2. Condensed Milk
Quantity: 3 tablespoons
Purpose:
- Sweetness
- Creaminess
- Slight caramel-like flavor
Adjustments:
- Use less if you prefer mild sweetness
- Use more if you want a richer dessert
3. Vanilla Essence
Quantity: 1/2 teaspoon
Role:
- Enhances overall flavor
- Adds a subtle bakery-style aroma
You can skip it, but the dessert will taste less refined.
4. Powdered Sugar (Optional)
Quantity: 2 tablespoons
Used only if:
- You want extra sweetness
- Your condensed milk is not enough
Tip:
Always use powdered sugar, not granulated, to avoid graininess.
5. Biscuits (Texture Element)
Quantity: 6–8 biscuits
Purpose:
- Adds structure
- Absorbs moisture
- Creates a cake-like feel after chilling
Types you can use:
- Digestive biscuits
- Tea biscuits
- Marie biscuits
Crushing method:
- Rough crush is better than fine powder
6. Add-ins (Flavor + Texture)
You can mix and match:
Chocolate:
- Chocolate chips
- Chopped chocolate
Fruits:
- Banana (soft and sweet)
- Apple (slightly crunchy)
- Mango (juicy and flavorful)
Nuts:
- Almonds (mild crunch)
- Cashews (creamy crunch)
- Pistachios (flavorful and colorful)
7. Optional Flavor Boosters
These are not required but elevate the dessert:
Cocoa powder:
- Makes it chocolate-flavored
Instant coffee:
- Adds a slight bitterness that balances sweetness
Jam or syrup:
- Adds fruity sweetness and color
8. Toppings
Used for final presentation and extra flavor:
- Chocolate syrup
- Caramel sauce
- Whipped cream
- Crushed biscuits
- Nuts
Section 2: Equipment Explained
Mixing Bowl
- Preferably metal or glass
- Chilling improves whipping
Whisk or Beater
- Hand whisk: requires effort but works
- Electric beater: faster and more consistent
Serving Glasses
- Transparent glasses show layers beautifully
- Bowls work if presentation is not important
Section 3: Preparation Steps (Ultra Detailed)
Step 1: Temperature Control
This step is often ignored but is critical.
Actions:
- Place bowl and whisk in freezer for 5–10 minutes
- Keep cream refrigerated until the last moment
Why it matters:
- Cold temperature helps air stay trapped in cream
- Results in faster whipping and thicker texture
Step 2: Whipping the Cream
- Pour cream into chilled bowl
- Start whisking immediately
Stages of whipping:
Stage 1: Liquid
- Cream is thin and runny
Stage 2: Slightly thick
- Small bubbles appear
Stage 3: Soft peaks (target stage)
- When you lift whisk, peaks slightly bend
Do not go to:
- Stiff peaks (too thick)
- Butter stage (over-whipped)
Step 3: Adding Sweeteners and Flavor
Add:
- Condensed milk
- Vanilla essence
- Powdered sugar (if needed)
Mix gently but thoroughly.
Important:
- Do not over-mix after adding ingredients
- Maintain airy texture
Step 4: Flavor Customization
You can divide cream into portions and create multiple flavors:
Chocolate:
- Mix cocoa powder and chocolate chips
Coffee:
- Dissolve coffee in a small amount of water, then mix
Fruit:
- Add chopped fruits carefully (avoid too much juice)
Step 5: Biscuit Preparation
Crushing technique:
- Use hands or rolling pin
- Keep uneven texture
Why uneven pieces are better:
- Creates contrast
- Prevents soggy texture
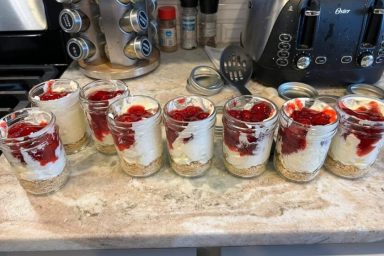
Step 6: Layering Process
Layering is essential for taste balance.
Basic structure:
- Biscuit layer
- Cream layer
- Add-ins
- Repeat
Detailed layering example:
First layer:
- 2 tablespoons biscuits (base support)
Second layer:
- Thick cream layer (main body)
Third layer:
- Fruits/chocolate/nuts (flavor burst)
Repeat layers depending on glass size.
Final layer:
- Always cream for a smooth finish
Step 7: Decoration
This step improves both taste and appearance.
Options:
- Drizzle chocolate syrup in zigzag pattern
- Sprinkle nuts for crunch
- Add whipped cream swirl
- Light dusting of cocoa powder
Step 8: Serving Options
Immediate serving:
- Light, airy, and creamy
Chilled serving (recommended):
- Refrigerate 15–30 minutes
- Biscuits soften
- Texture becomes cake-like
Section 4: Texture Science
This dessert works because of contrast:
Cream:
- Soft and airy
Biscuits:
- Slightly firm or soft (depending on time)
Add-ins:
- Provide variation (crunch, chew, juiciness)
Balance is key:
Too much cream = overly soft
Too many biscuits = dry
Section 5: Advanced Variations
1. Layered Chocolate Delight
- Add chocolate in every layer
- Use chocolate syrup between layers
2. Tropical Version
- Mango + banana + cream
3. Coffee Dessert
- Coffee cream + biscuit layers
4. Nut Crunch Version
- Heavy use of nuts for texture
5. Light Version
- Replace cream with thick yogurt
- Use honey instead of sugar
Section 6: Common Mistakes (Detailed)
- Warm cream
- Will not whip properly
- Over-whipping
- Turns grainy or buttery
- Too much liquid from fruits
- Makes dessert watery
- Fine biscuit powder
- Removes texture contrast
- Skipping layering
- Reduces overall experience
Section 7: Professional Tips
- Add a tiny pinch of salt to enhance sweetness
- Use a piping bag for neat cream layers
- Chill glasses before serving
- Use different layers for visual contrast
- Add crunchy toppings just before serving
Section 8: Time Breakdown
Preparation: 3 minutes
Whipping: 2 minutes
Layering: 1–2 minutes
Optional chilling: 15–30 minutes